Saturn Occultation – 21st August 2024

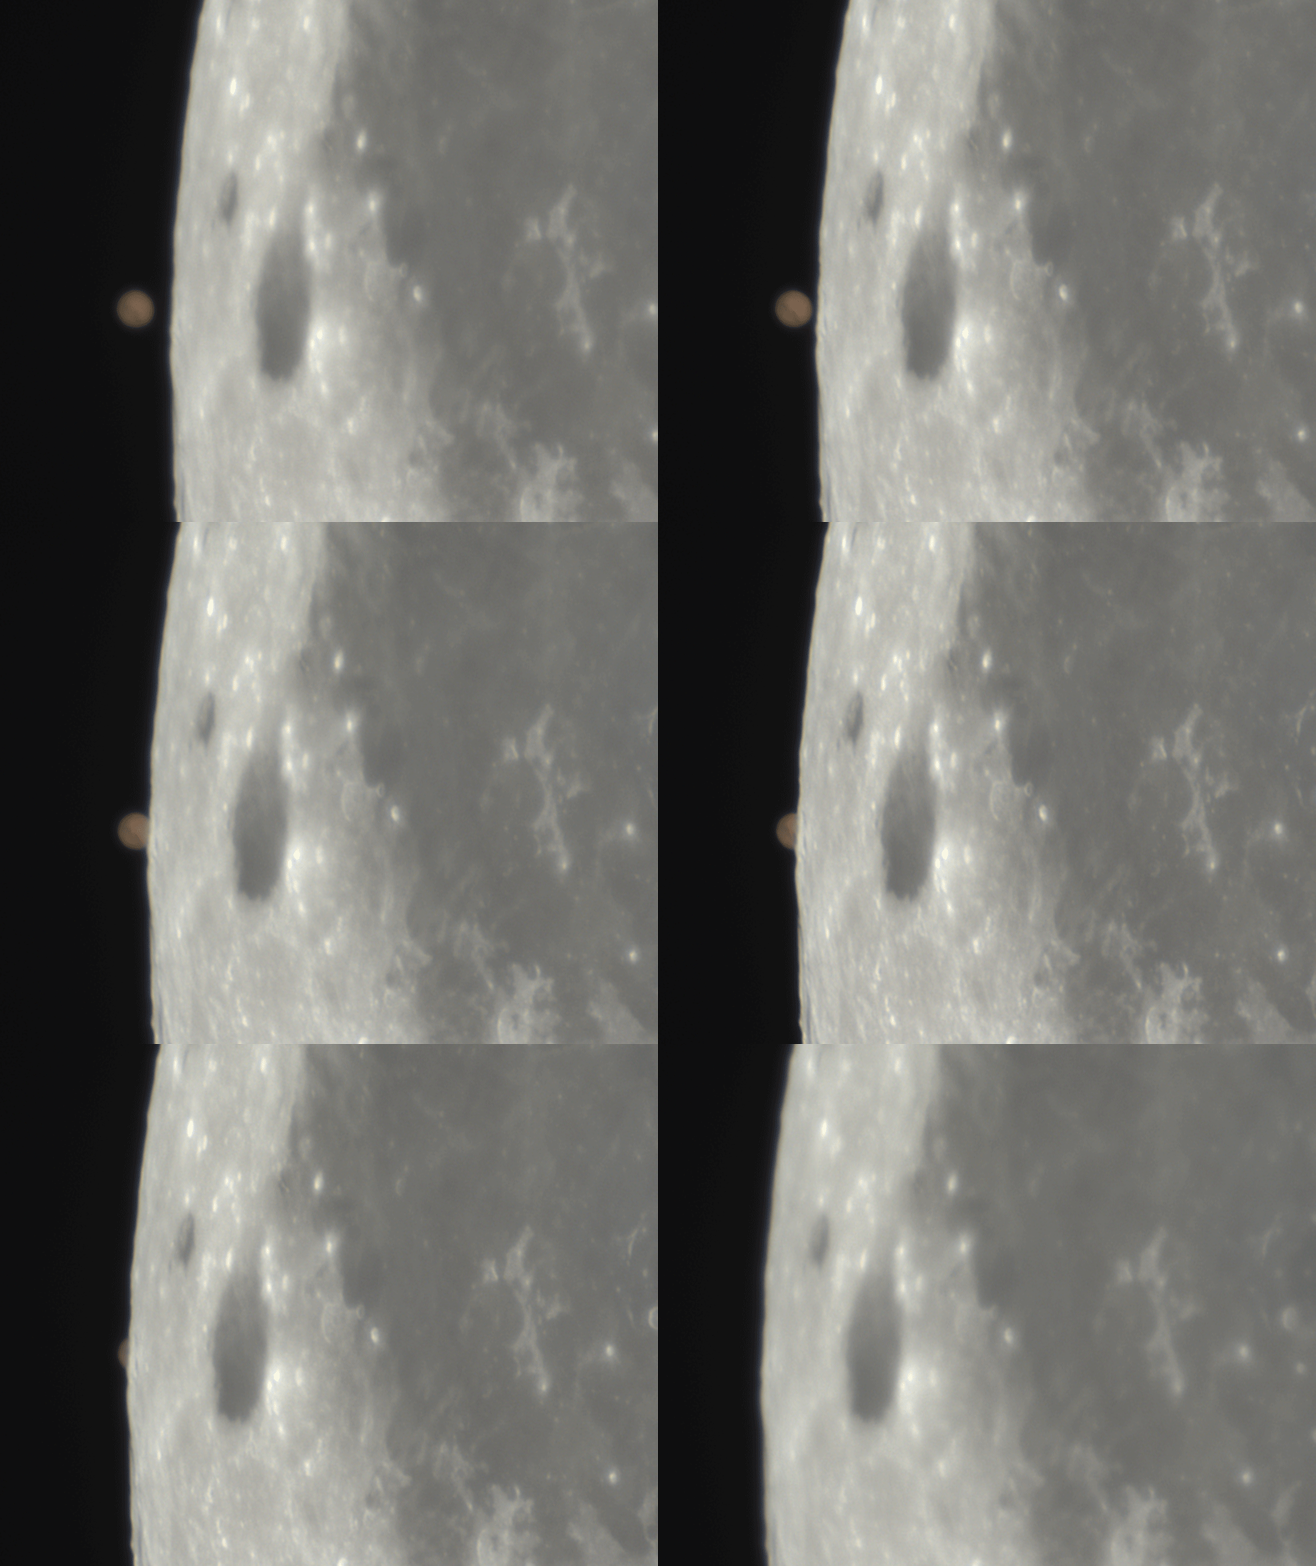
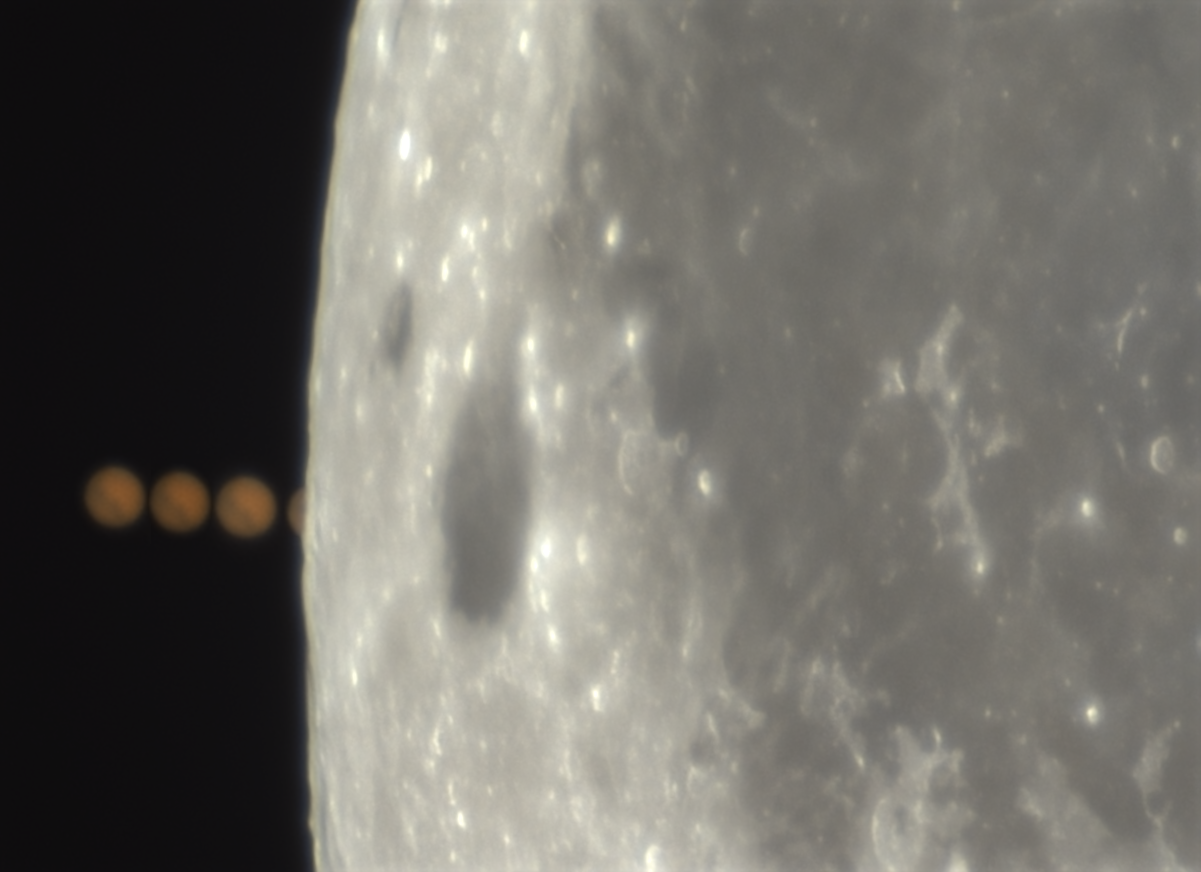
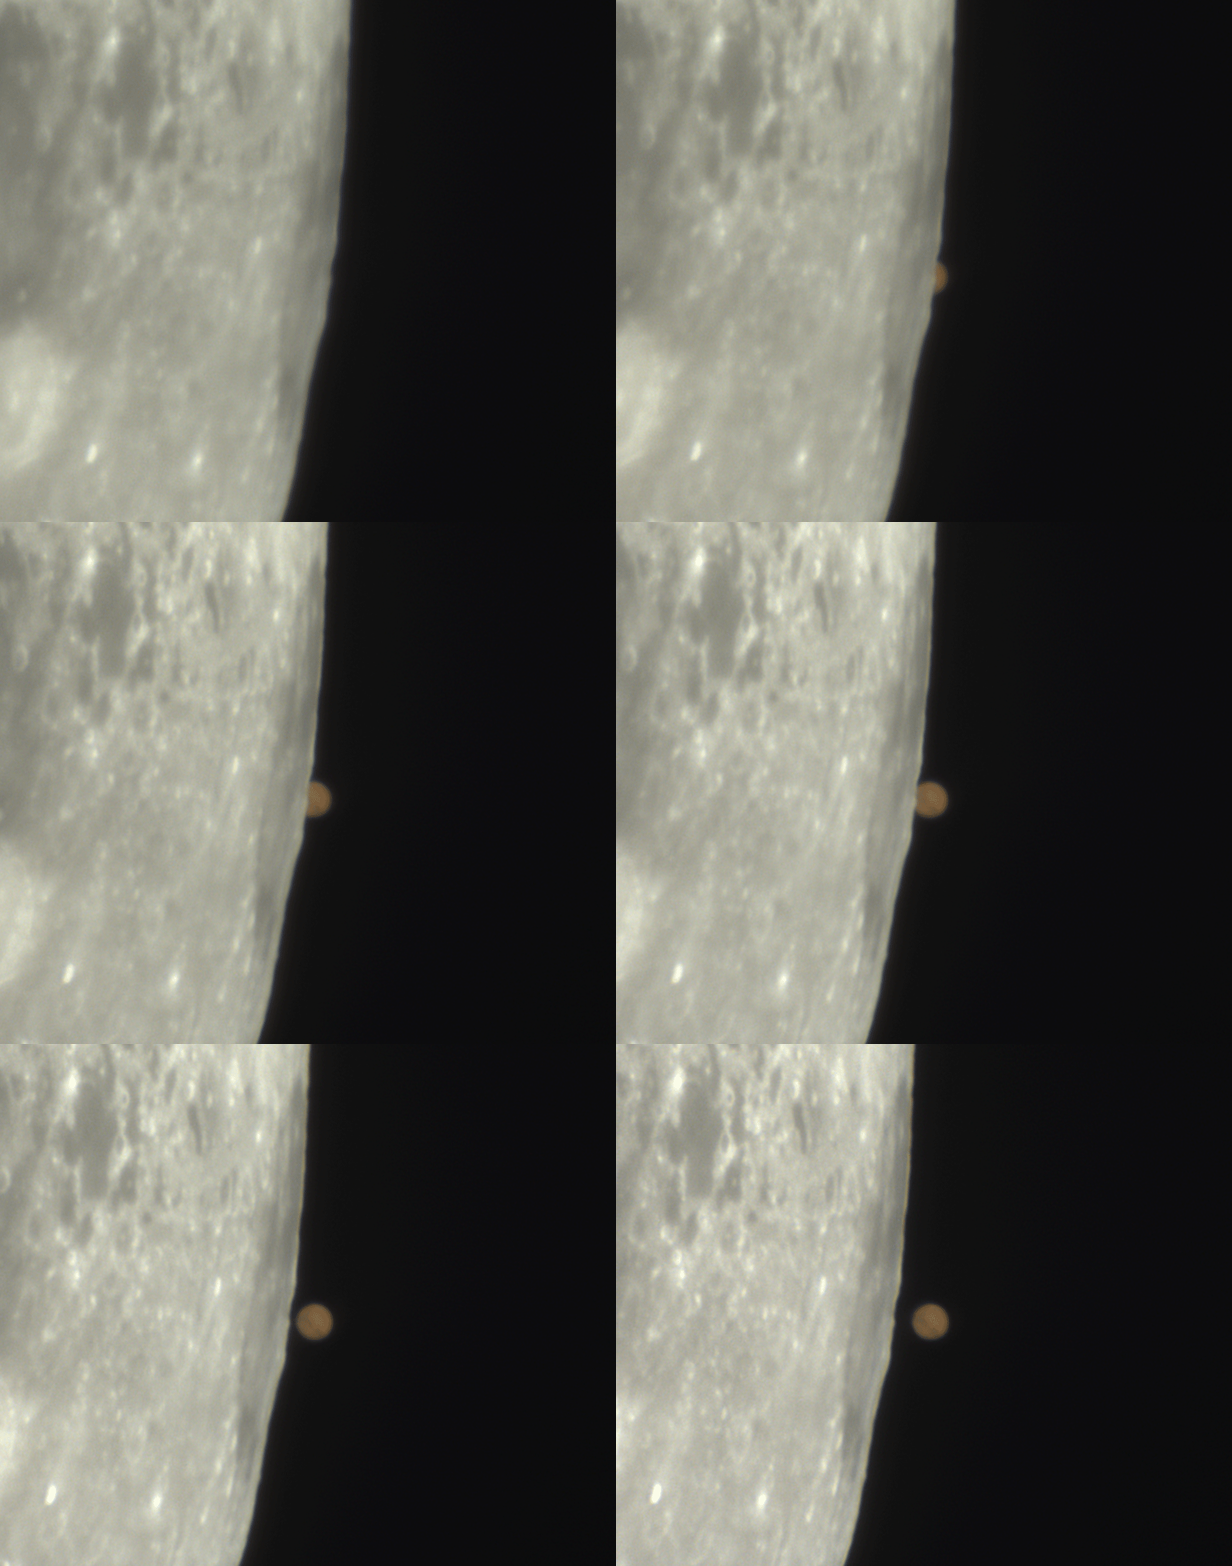
On the 21st of August I was really looking forward to the Moon occulting Saturn in the early hours of the morning, reappearing as the sky was getting very bright.

I was really hoping to improve on the images I had managed on similar events in the past.

Here’s some of my previous attempts, where I always managed to get The Moon’s limb over-exposed.
But there’s a good reason for that.

24th July 2007.
Satocc2

18th April 2022.
Satocc 20220418

Of course, the image I had in mind of producing of the event now that I had much so much more experience in taking this type of image.
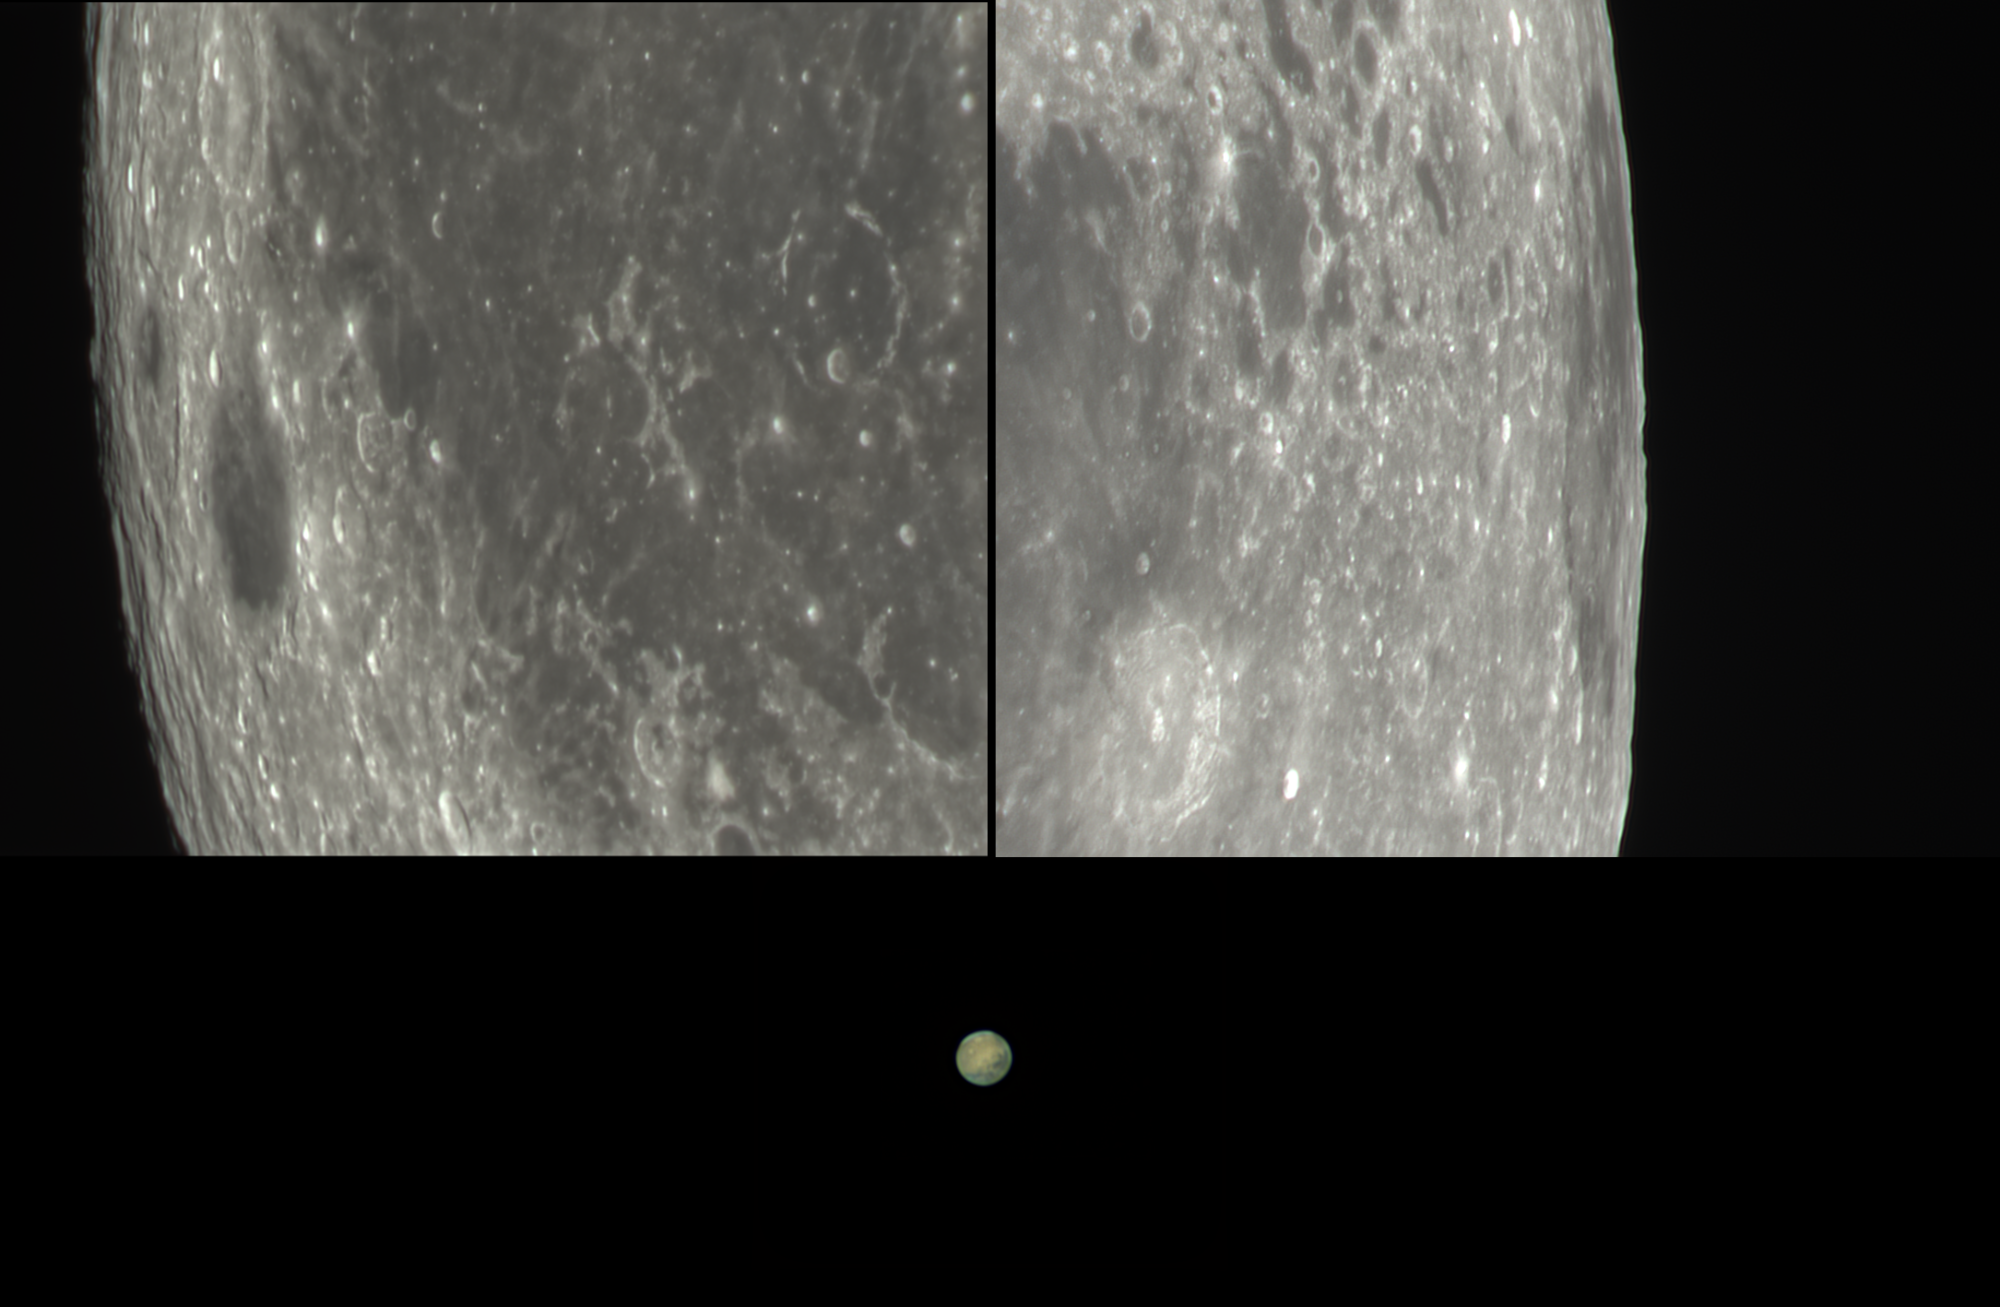
Saturn Occultation Mock Up Mosaic 2024 08 21 0422 1 Saturn Occul

We could say that this image was taken that morning, BUT the Saturn image was captured a couple of hours before the event started.
The Moon image was taken during the egress phase and I erased the not so good image of Saturn out of it, blending in the previous and better Saturn image to the same size and position as I saw and captured.
I know what you are going to say at this point, I’ve gone way too far in producing this.
Perhaps I shouldn’t have put the artificial dark Moon limb on top of Saturn, or even added Titan in its correct position top right?
Or maybe I should never have produced this at all? 😉

But just look around the Internet and on social media where people have posted plenty of these composite or montaged images.
Sadly, these images always get multitudes of likes and re-posted much more often compared to most other folks images that are “The Real Deal”.
Is it wrong or right to do this? As long as it is stated it’s a montage, I guess not, but many don’t.

An image like this from a single image capture is really not possible.
Saturn is a long way from Earth, so although looking reasonably bright in the night sky and through a telescope the amount of light that reaches us is much less than that of The Moon.
To capture Saturn, needs a reasonably long exposure or high gain setting just to make it visible.
This will over-expose The Moon, making it far too bright and washing out lunar surface details.

To capture my videos which will be used to create the final images, I adjusted both exposure and gain settings to just start to over expose The Moons bright limb.
The ingress was trickier as that side of The Moon’s limb was a lot brighter.
This overwhelms and washes out Saturn even more as it got closer to the limb.
The thin interfering cloud also made Saturn dim occasionally as it cut light off from reaching the camera.

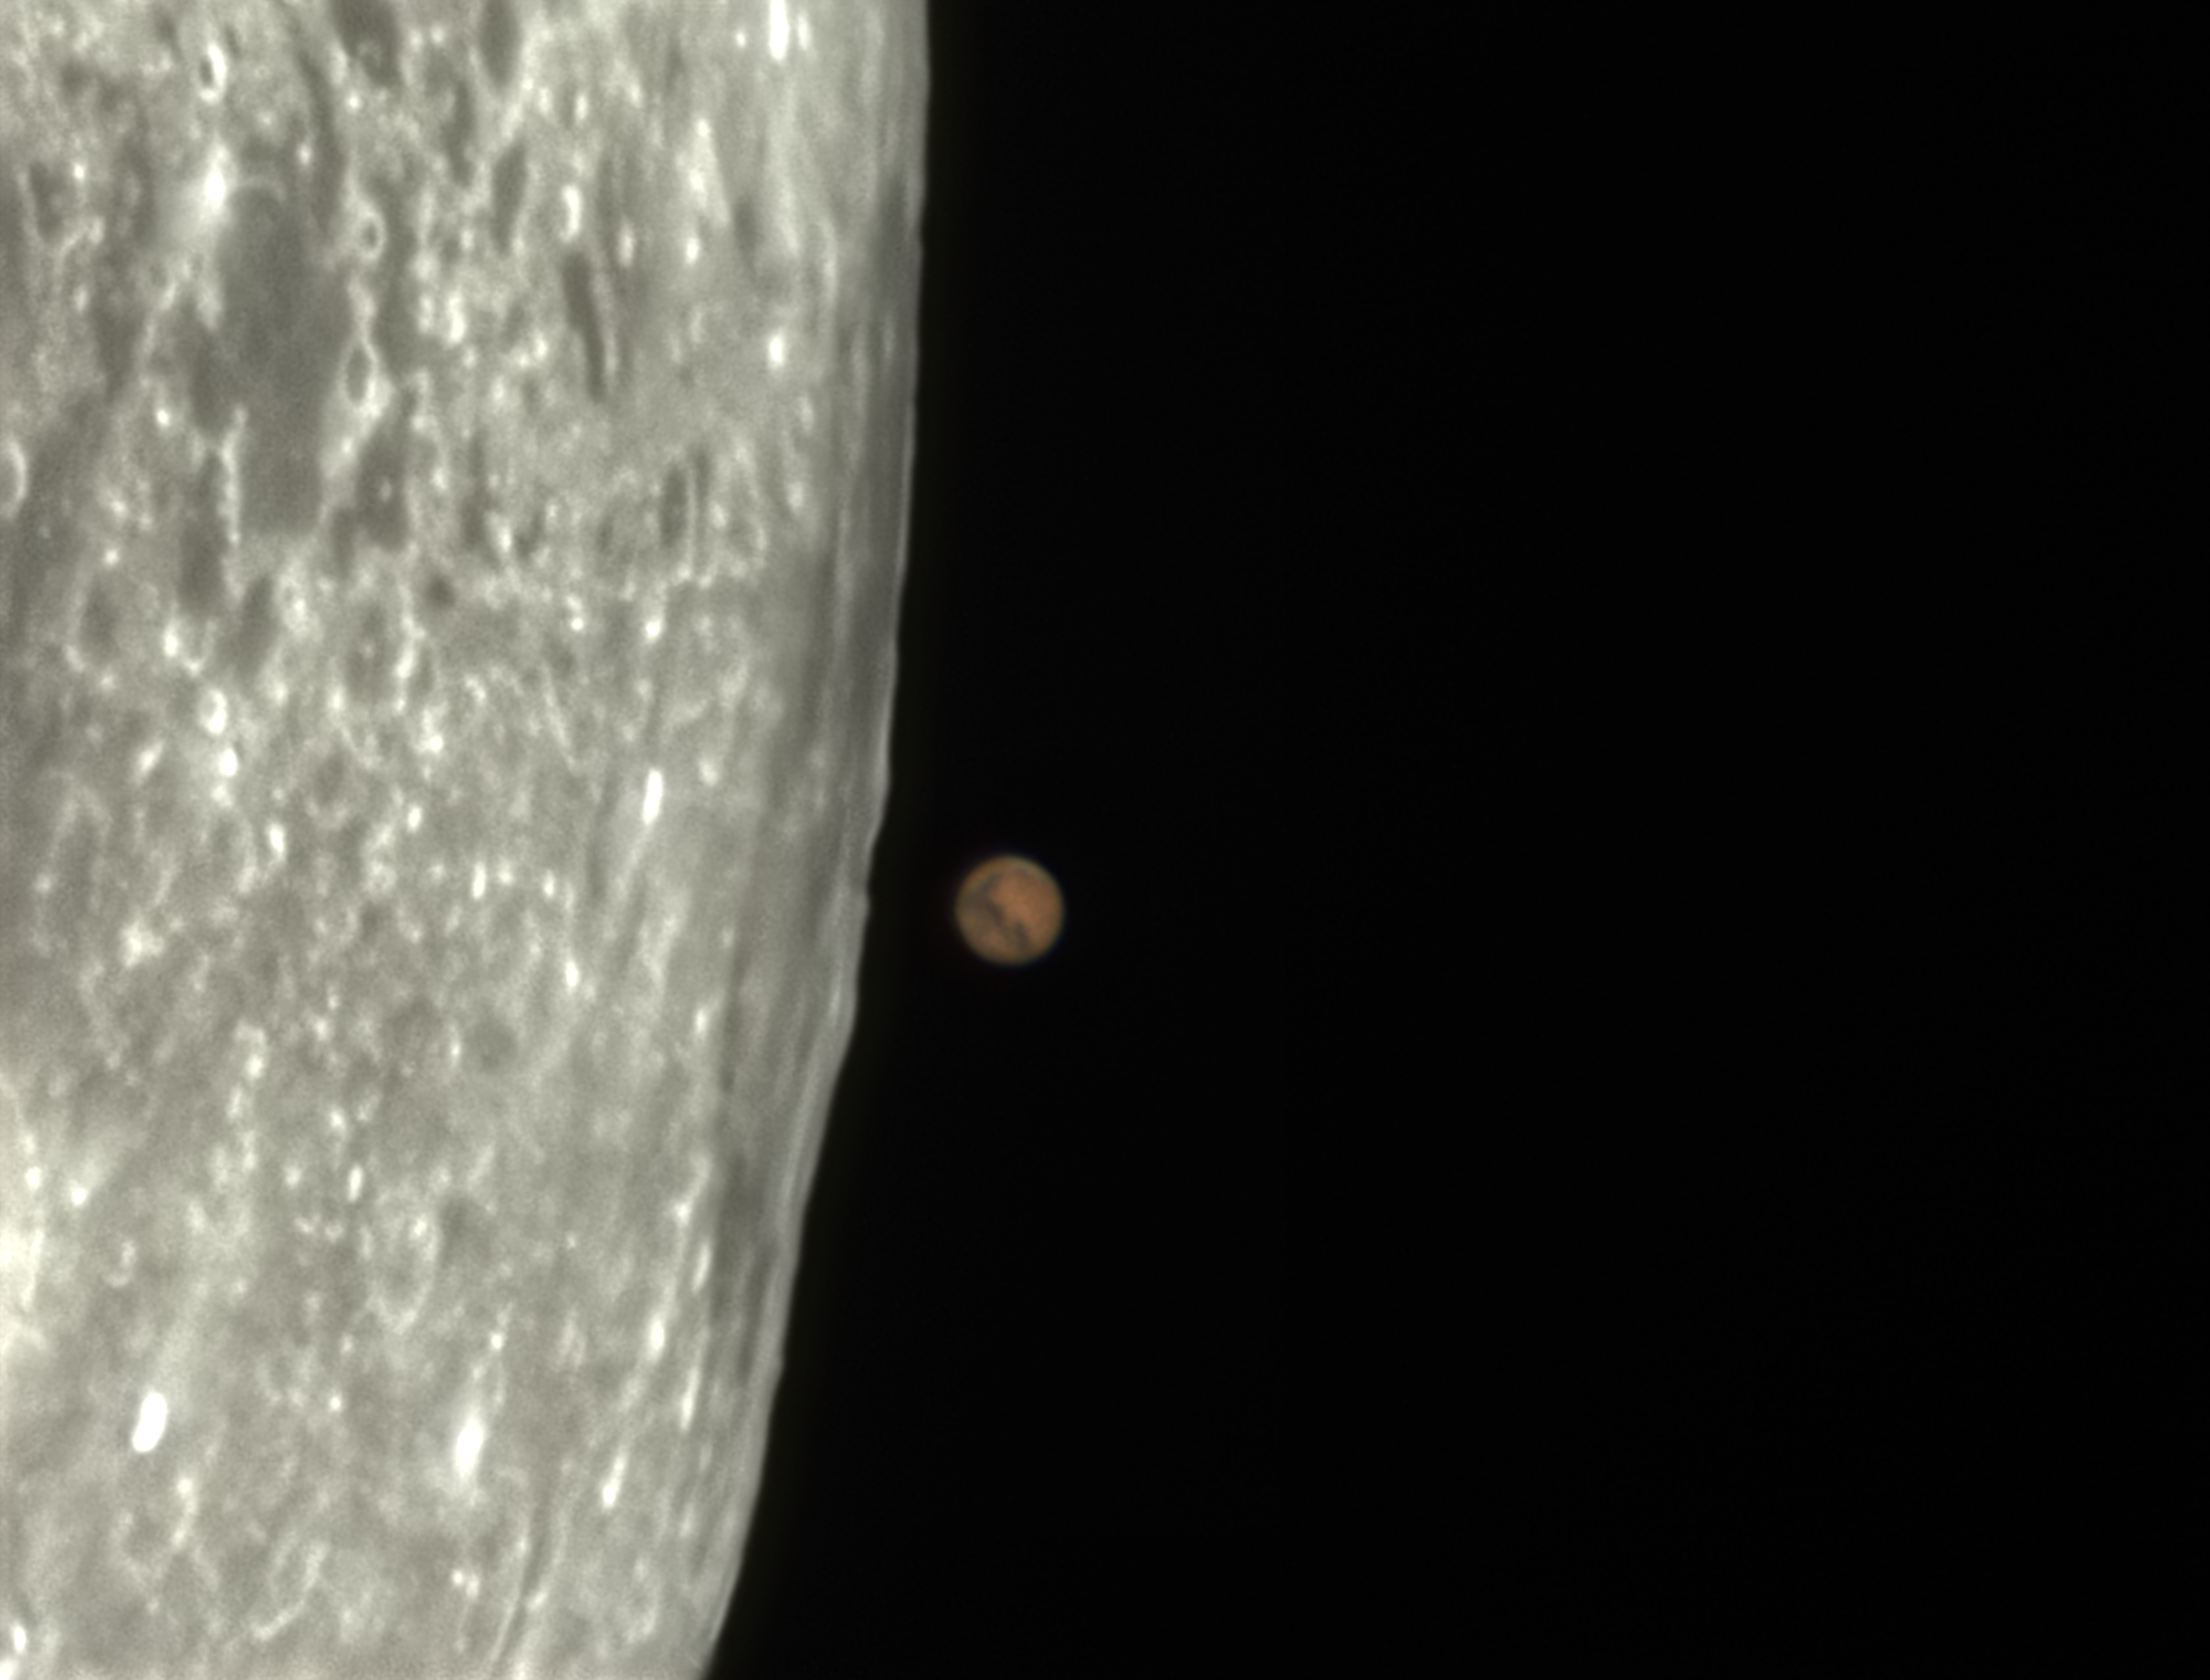
On the opposite side, where Saturn will reappear, The Sun was setting over The Moon, creating long shadows on the surface to make that limb a bit darker.
As The Moon was just past full, Saturn also appeared from behind the dark limb.
This made it a lot easier to capture the egress as I could make Saturn a bit brighter during the capture, without overexposing The Moon.
BUT, this was also as dawn was breaking, so the sky was getting reasonably bright by the time Saturn reappeared.

So, how did I do?

Up all night, I made some mistakes and thin cloud did interfere, making getting the the exposures right a bit more of a challenge.
I captured a long video at ingress and egress, observing the event through my 10″ Dobsonian.
The view, especially of egress was exquisite. 🤩

The images were chopped and stacked into sections using AutoStakkert!
The colour was corrected using Registax RGB alignment Tool.
The  images were then sharpened using Astro Surface.
Final polish was using Affinity Photo.

Saturn was brightened in the final images by using the tone mapping tool in Affinity Photo, not a composite.

I’m really pleased with what I got in the end and I will probably try not to magnify the image quite so much next time.

I also managed to capture data to give me a “decent” composite image, which is almost as good as the best of them out there. 😉

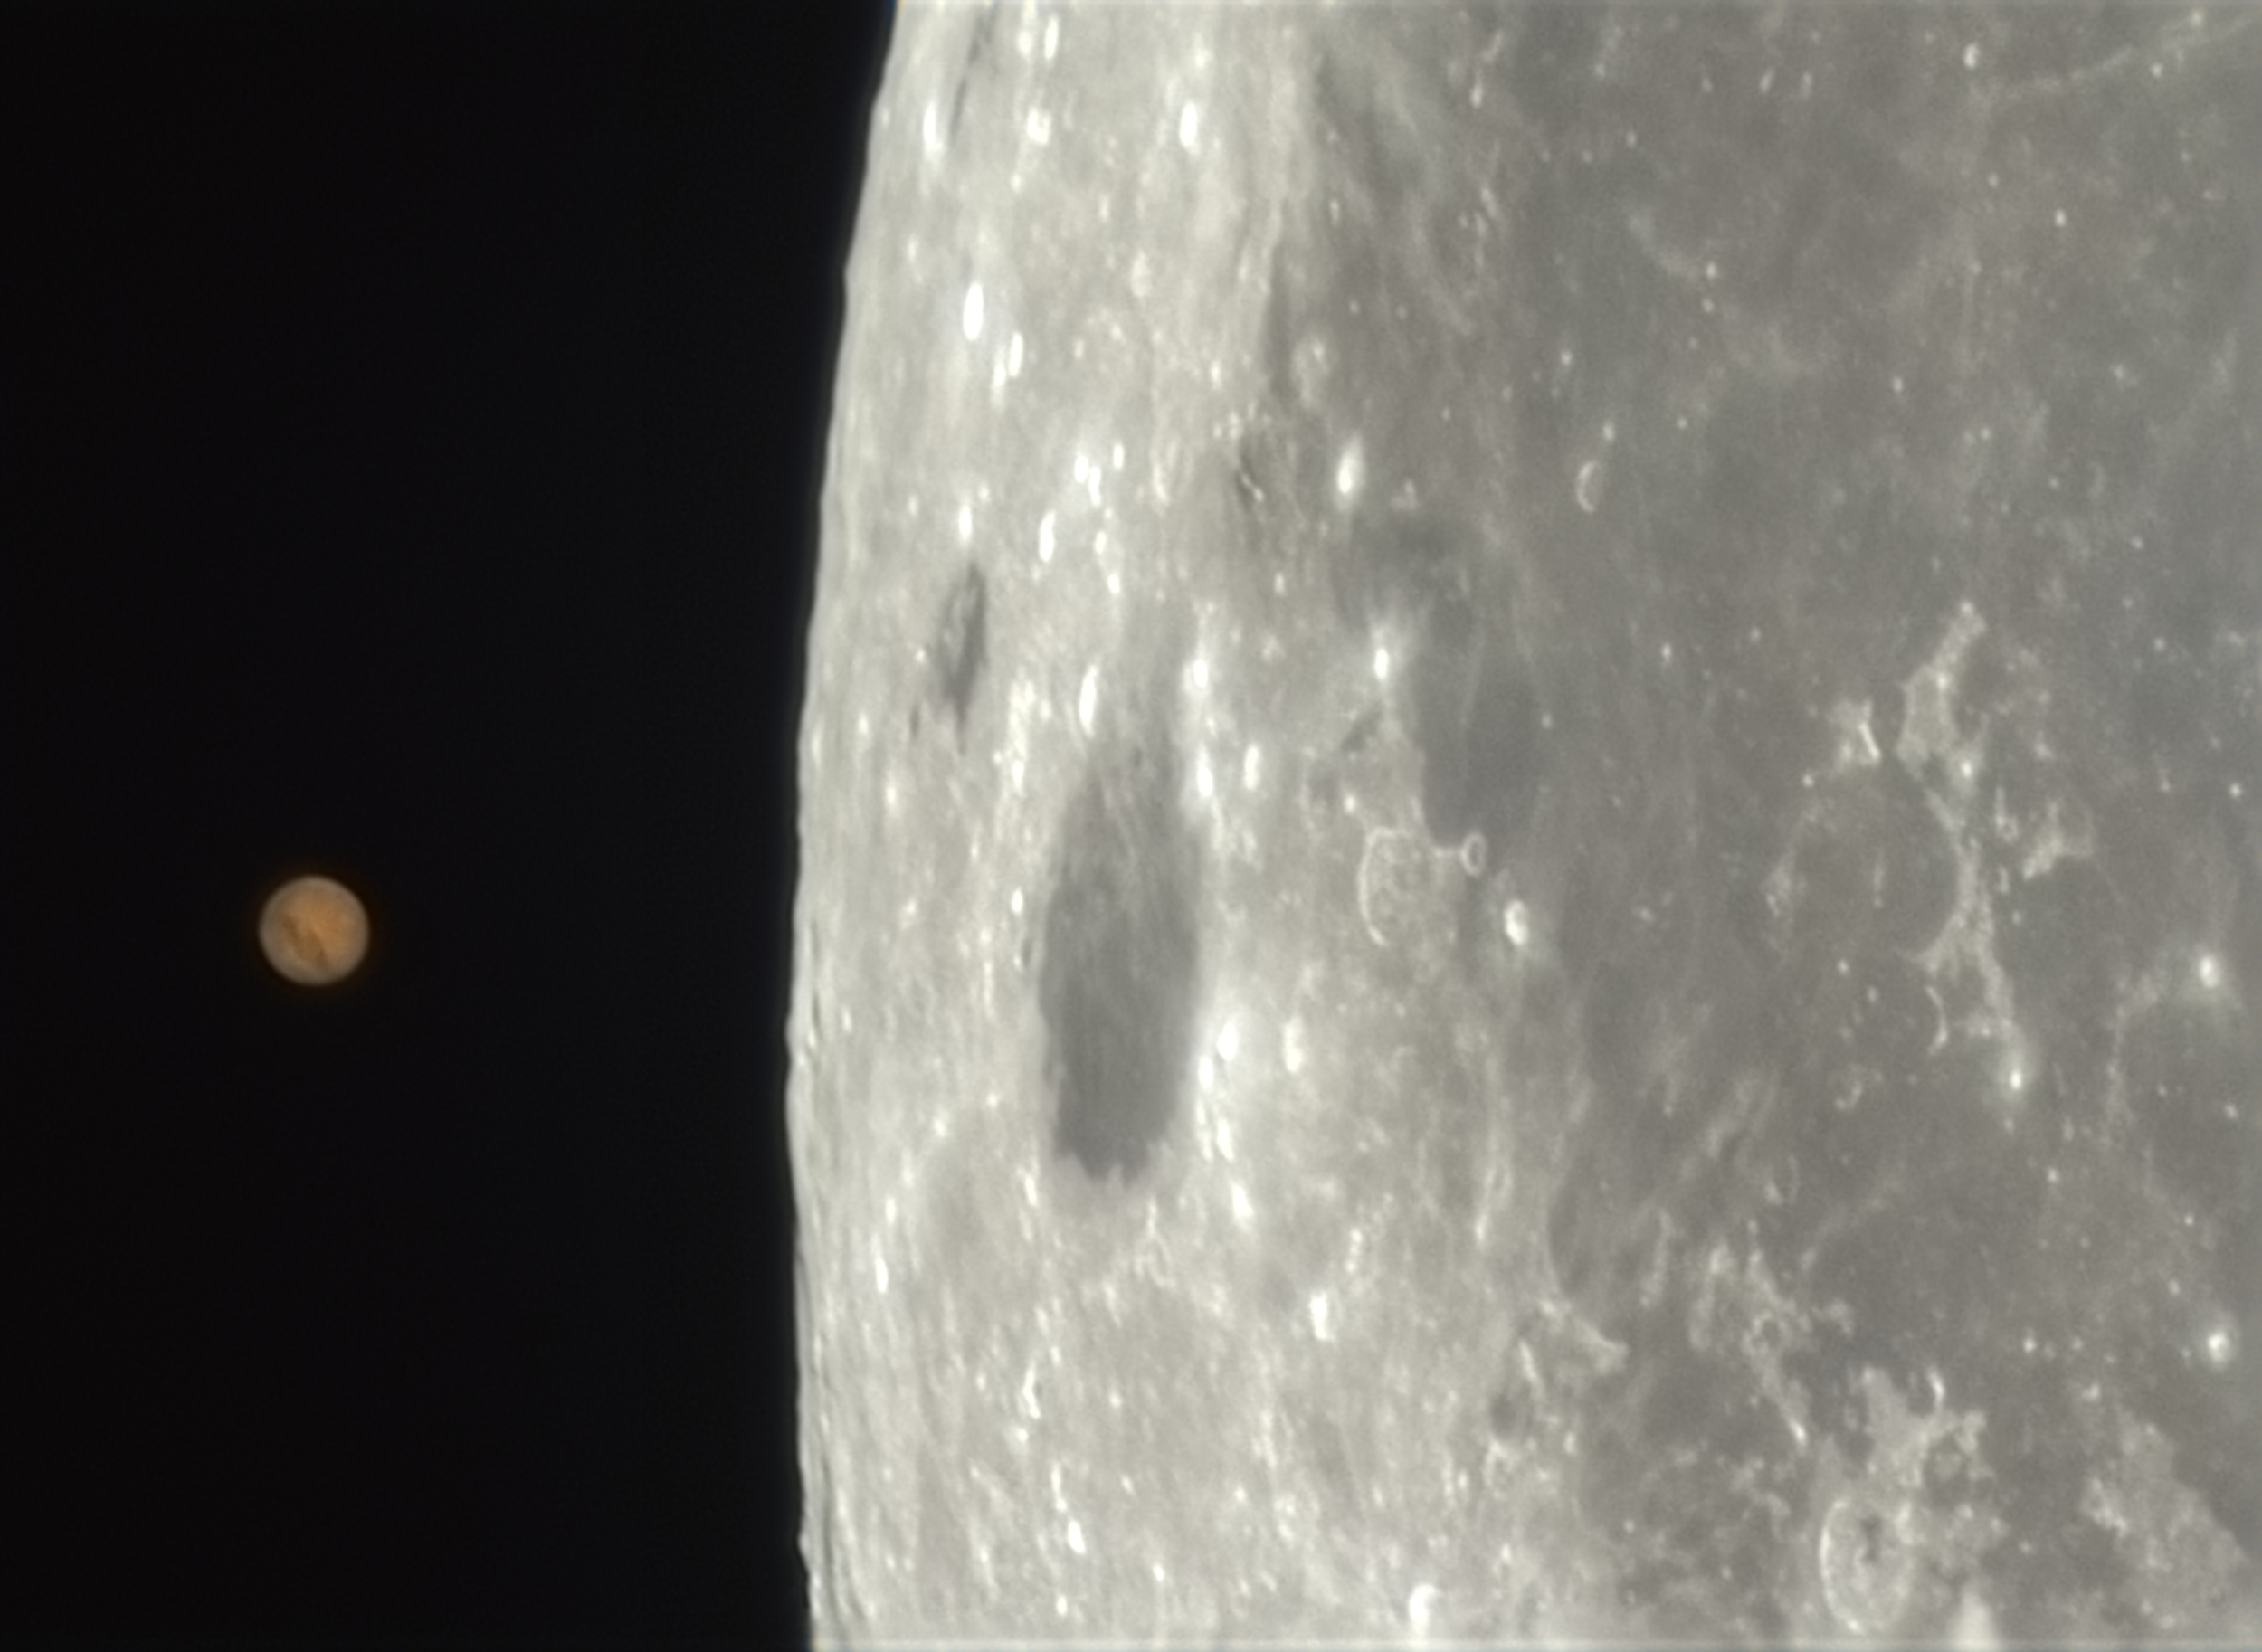
Just before Ingress.

2024 08 21 0328 4 Saturn Occultation Expand000016 Lapl5 Ap639 S Rgb 2

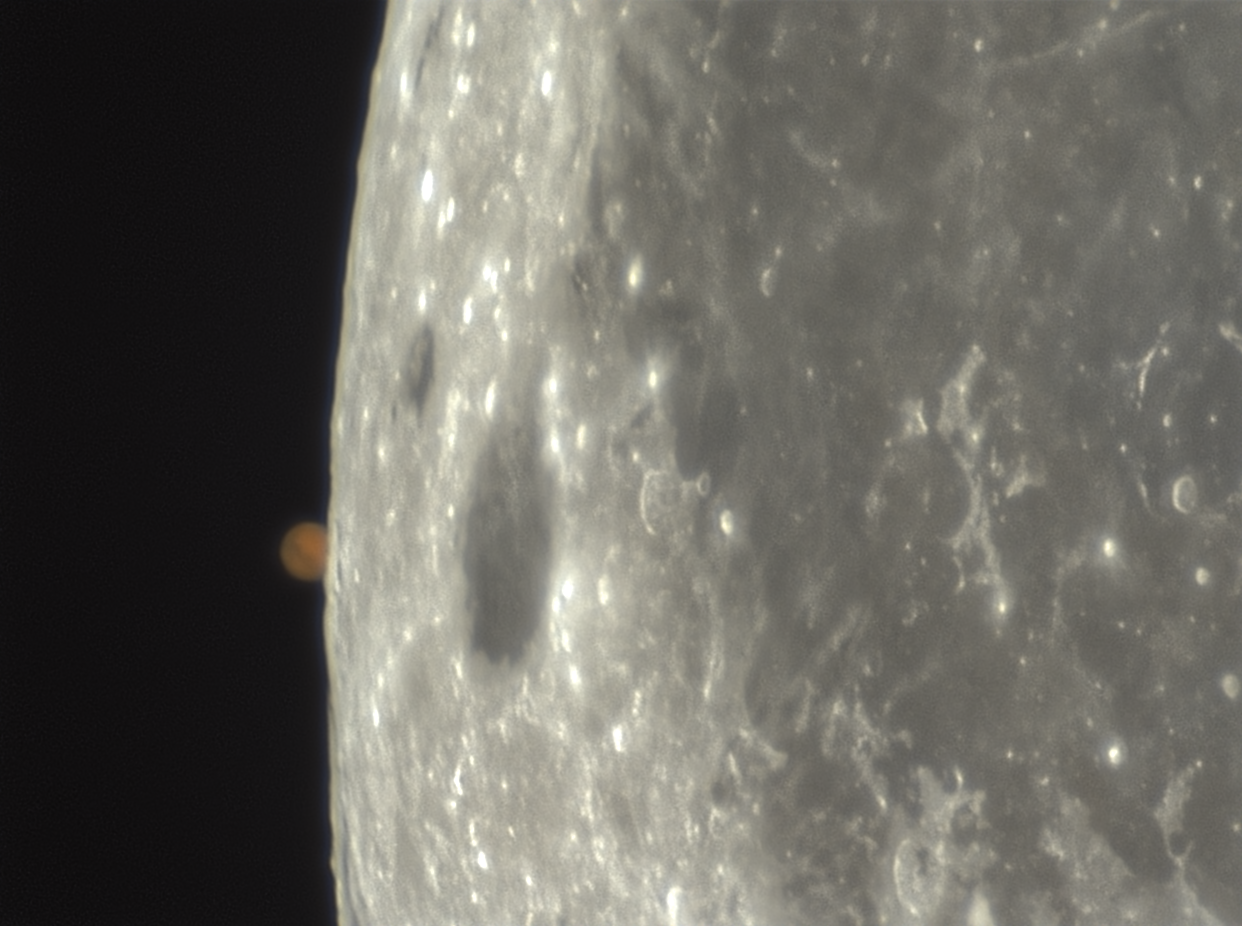
During Egress:

2024 08 21 0418 5 Saturn Occultation Egress Expand000083 Lapl5 Ap690 Tm Rgb S Final


T Coronae Borealis – Possible outburst this year?

T Coronae Borealis (T CrB) is a red giant star lying 3,000 light years away.
This extremely interesting star is usually about magnitude +10, which is well below naked eye visibility, but it is reaching the end of its life. As a result, the star has regular outbursts about every 80 years, and when in outburst can reach magnitude +2, giving it the nickname of The Blaze Star.
At maximum magnitude it will be easily seen with the naked eye being about the same brightness as The Pole Star, Polaris. It will stay this bright for a month or two, before fading back to magnitude +10.

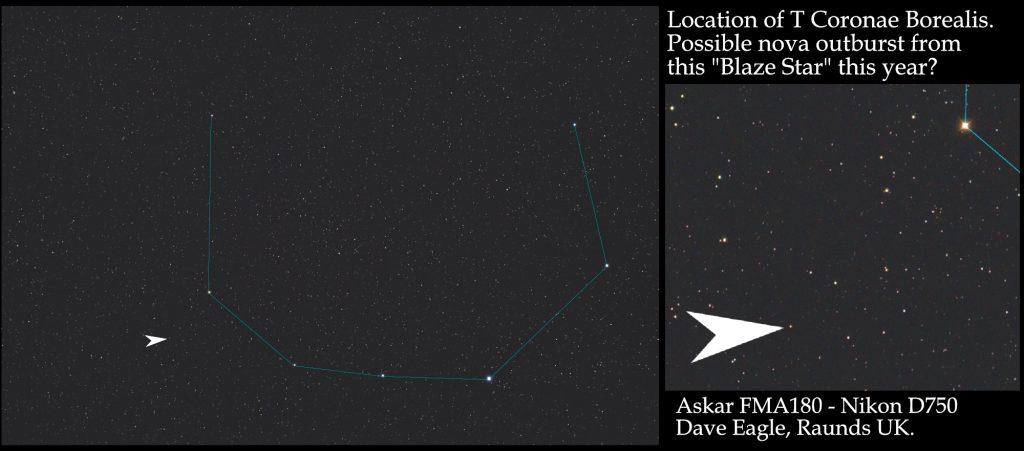
I took this wide angle image of Corona Borealis on the 2nd of June 2024, which indicates the position of T CrB, not far from Epsilon CrB. It was still a faint magnitude +10 at this time, so has not erupted yet.

Keep looking up folks, because you just never know when T CrB it might start coughing.
Good luck.

Corona Borealis 20240602 Annotated


Comet 12P / Pons-Brooks – It’s getting brighter.

After a few recent outbursts, Comet 12P / Pons-Brooks is now starting to brighten and show lots of activity as it approaches perihelion in April.

See my Sky Diary for more details about the comet and many other events:
www.star-gazing.co.uk/Diary

The comet was discovered in 1812 by Jen-Louis Pons and independently rediscovered by William Robert Brooks in 1883, and has an orbital period of 71.3 years, so is known as a Halley-type comet.

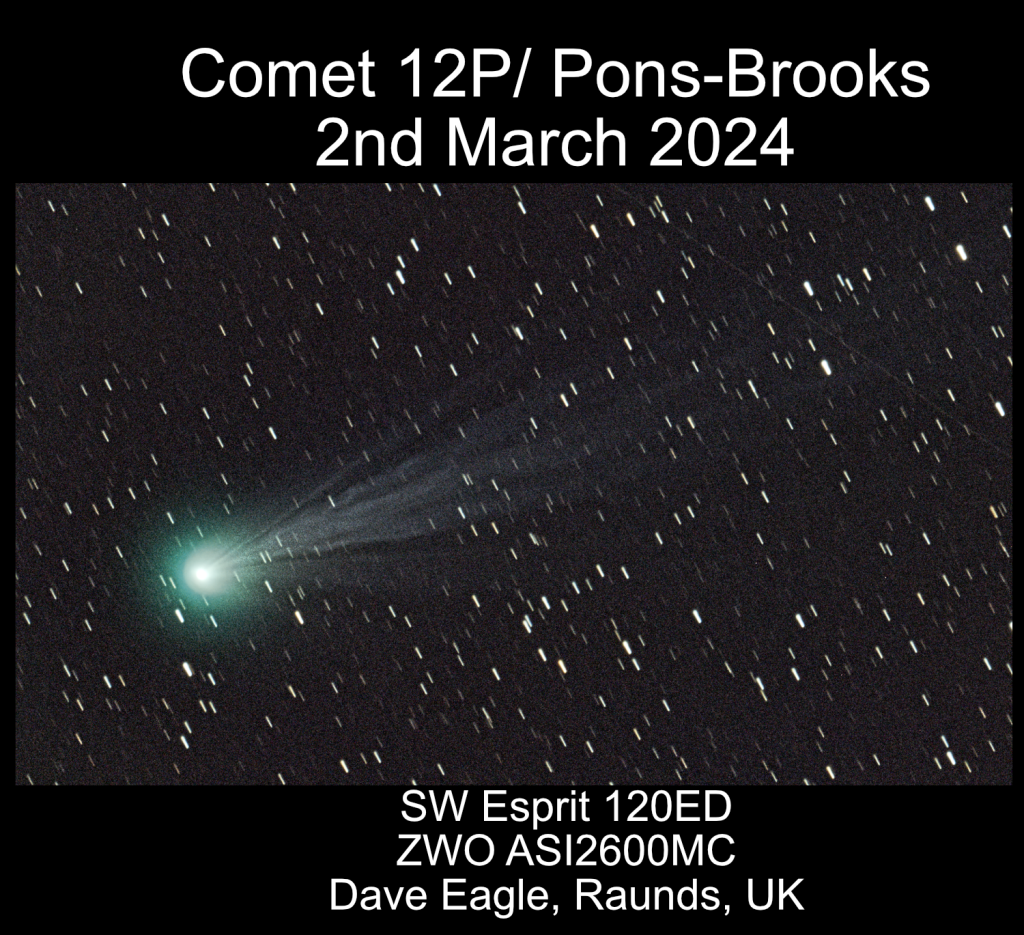
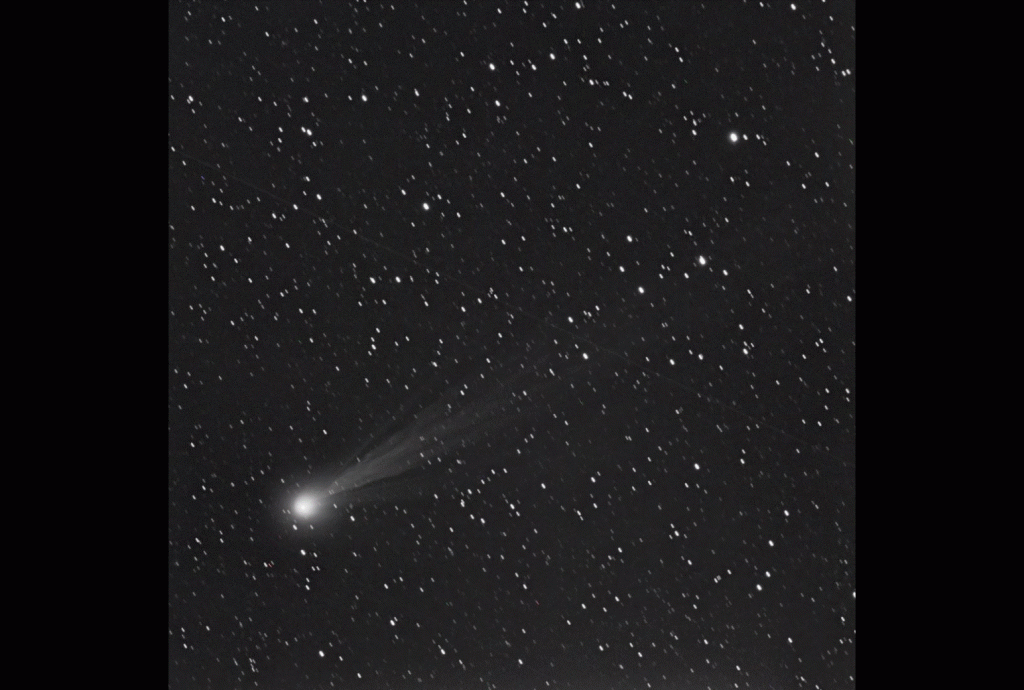
It is brightening rapidly and has developed a nice tail, with lots of activity around the coma, as shown in the image and animation below I took on the 2nd of March 2024.

Comet 12p 20230302 Flats+lights Stack Autosave007 Web Smaller

https://www.star-gazing.co.uk/Images/2024/Comet-12P-Animation-20240203.gif

Comet 12p Animation 20240203


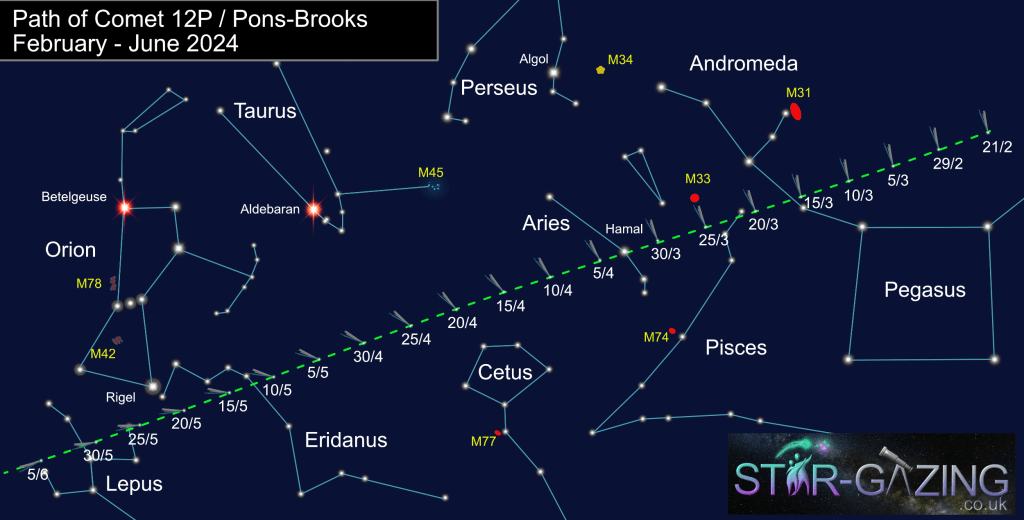
The comet could get bright enough to become visible with the naked eye during March as it passes through Andromeda and into Pisces and Aries.

12P passes south of Messier 33 in Triangulum around the 27th of March, and very close to the bright star Hamal in Aries on the 31st of March and the 1st of May.

Unfortunately, as it gets brighter, it will start getting lower in the south eastern sky each evening, so make the most of any opportunity to view or image it while you can.

If you are lucky enough to be travelling to North America to see the total solar eclipse on the 8th of April, it may even be visible to the naked eye during the eclipse. 🤞

The thin crescent Moon will be close to the comet and Jupiter in the western sky on the evening of the 10th of April, but from the UK the comet is low down after dark and mow starting to get lost in the evening twilight.

Perihelion occurs on the 21st of April, when the comet will be just northeast of the tail of Cetus, when it will be 72.6 million miles from The Sun.

The comet’s magnitude at this time is predicted to be about +4, but it will be very low down in the western sky to the south east of Jupiter, but virtually lost in the twilight and will soon be gone.

This will make it extremely difficult to see, unless it gets extremely bright and produces a long, bright tail.

By the second week of May the comet has moved south into Eridanus but we will not be able to view this.

Comet 12p February June Web


Comet 144P (Kushida)

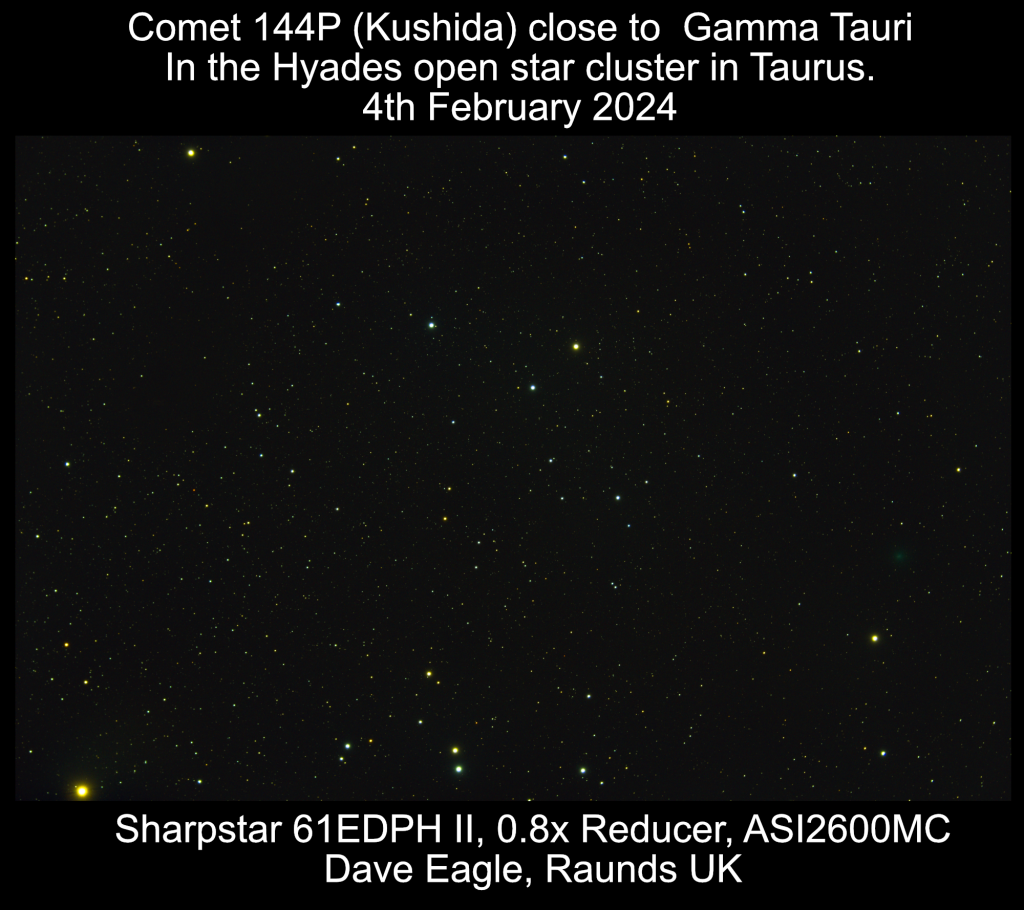
Comet 144P (Kushida) is currently visible in Taurus, just west of The Hyades Star Cluster.

I managed to capture it on the evening of the 4th of February as it approached the Hyades Star Cluster.

Hyades Comet 144p Full Stack 20230204 Web

The comet reached its maximum magnitude at the end of January, so is now starting to fade.

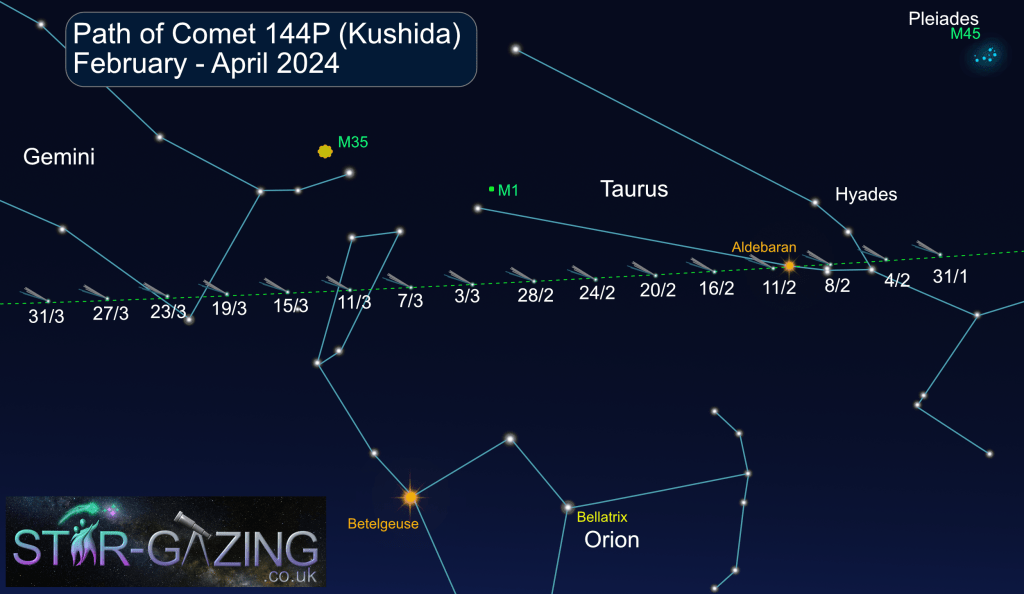
The comet moves into Taurus over the next couple of weeks, moving through the Hyades Star Cluster between the 5th and 11th of February.

It passes very close to the bright first magnitude star Aldebaran on the 10th and 11th of February.

It moves into the northern part of Orion in march, passing into Gemini by the middle of March.

The map below shows the movement of the comet during February and March.

Comet 144p Kushina February March


Comet C/2023 A3 (Tsuchinsan-ATLAS)

To keep up to date with events, download and install the TeamUp Sky Diary and carry it about on your phone:
https://www.star-gazing.co.uk/WebPage/sky-diary


We could be in for a real treat next year.
This is Comet C/2023 A3 (Tsuchinsan-ATLAS).

It will not be visible until the autumn, but if predictions are correct (Yeah Right!!!) the position of the comet relative to The Sun after perihelion has the potential to make it a nice bright comet.
As the comet is between The Earth and The Sun when at its best in October, this could make it extremely bright.

I added the ephemerides into Stellarium to produce some of the following diagrams.
My guide on how to do this is here: https://youtu.be/6-7HgYFl0tY

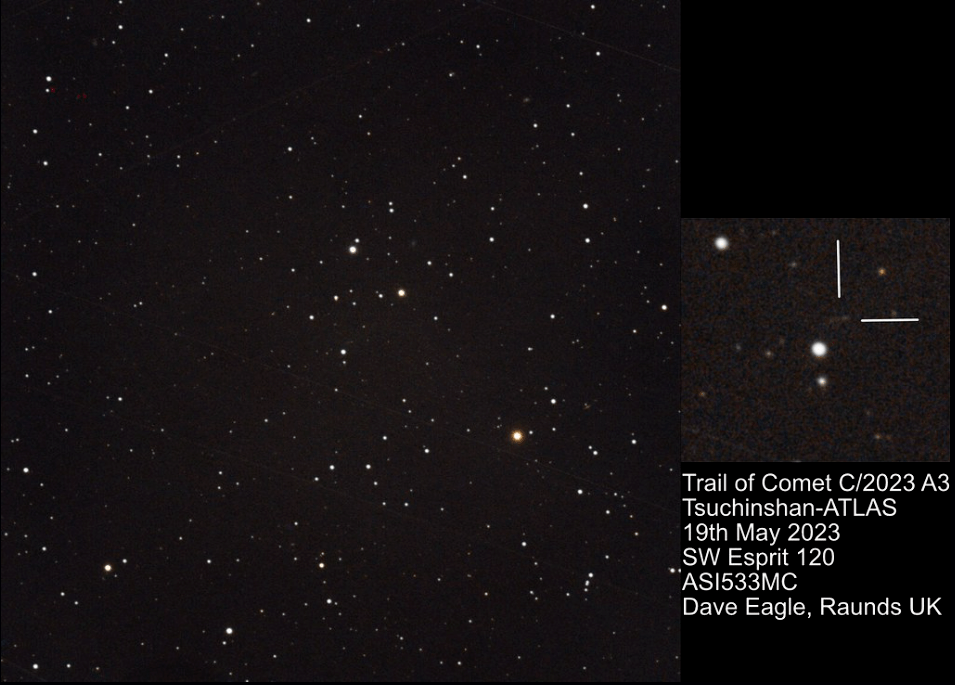
I managed to image it as small, faint trail on the 19th May 2023.

2023 A3 20230519

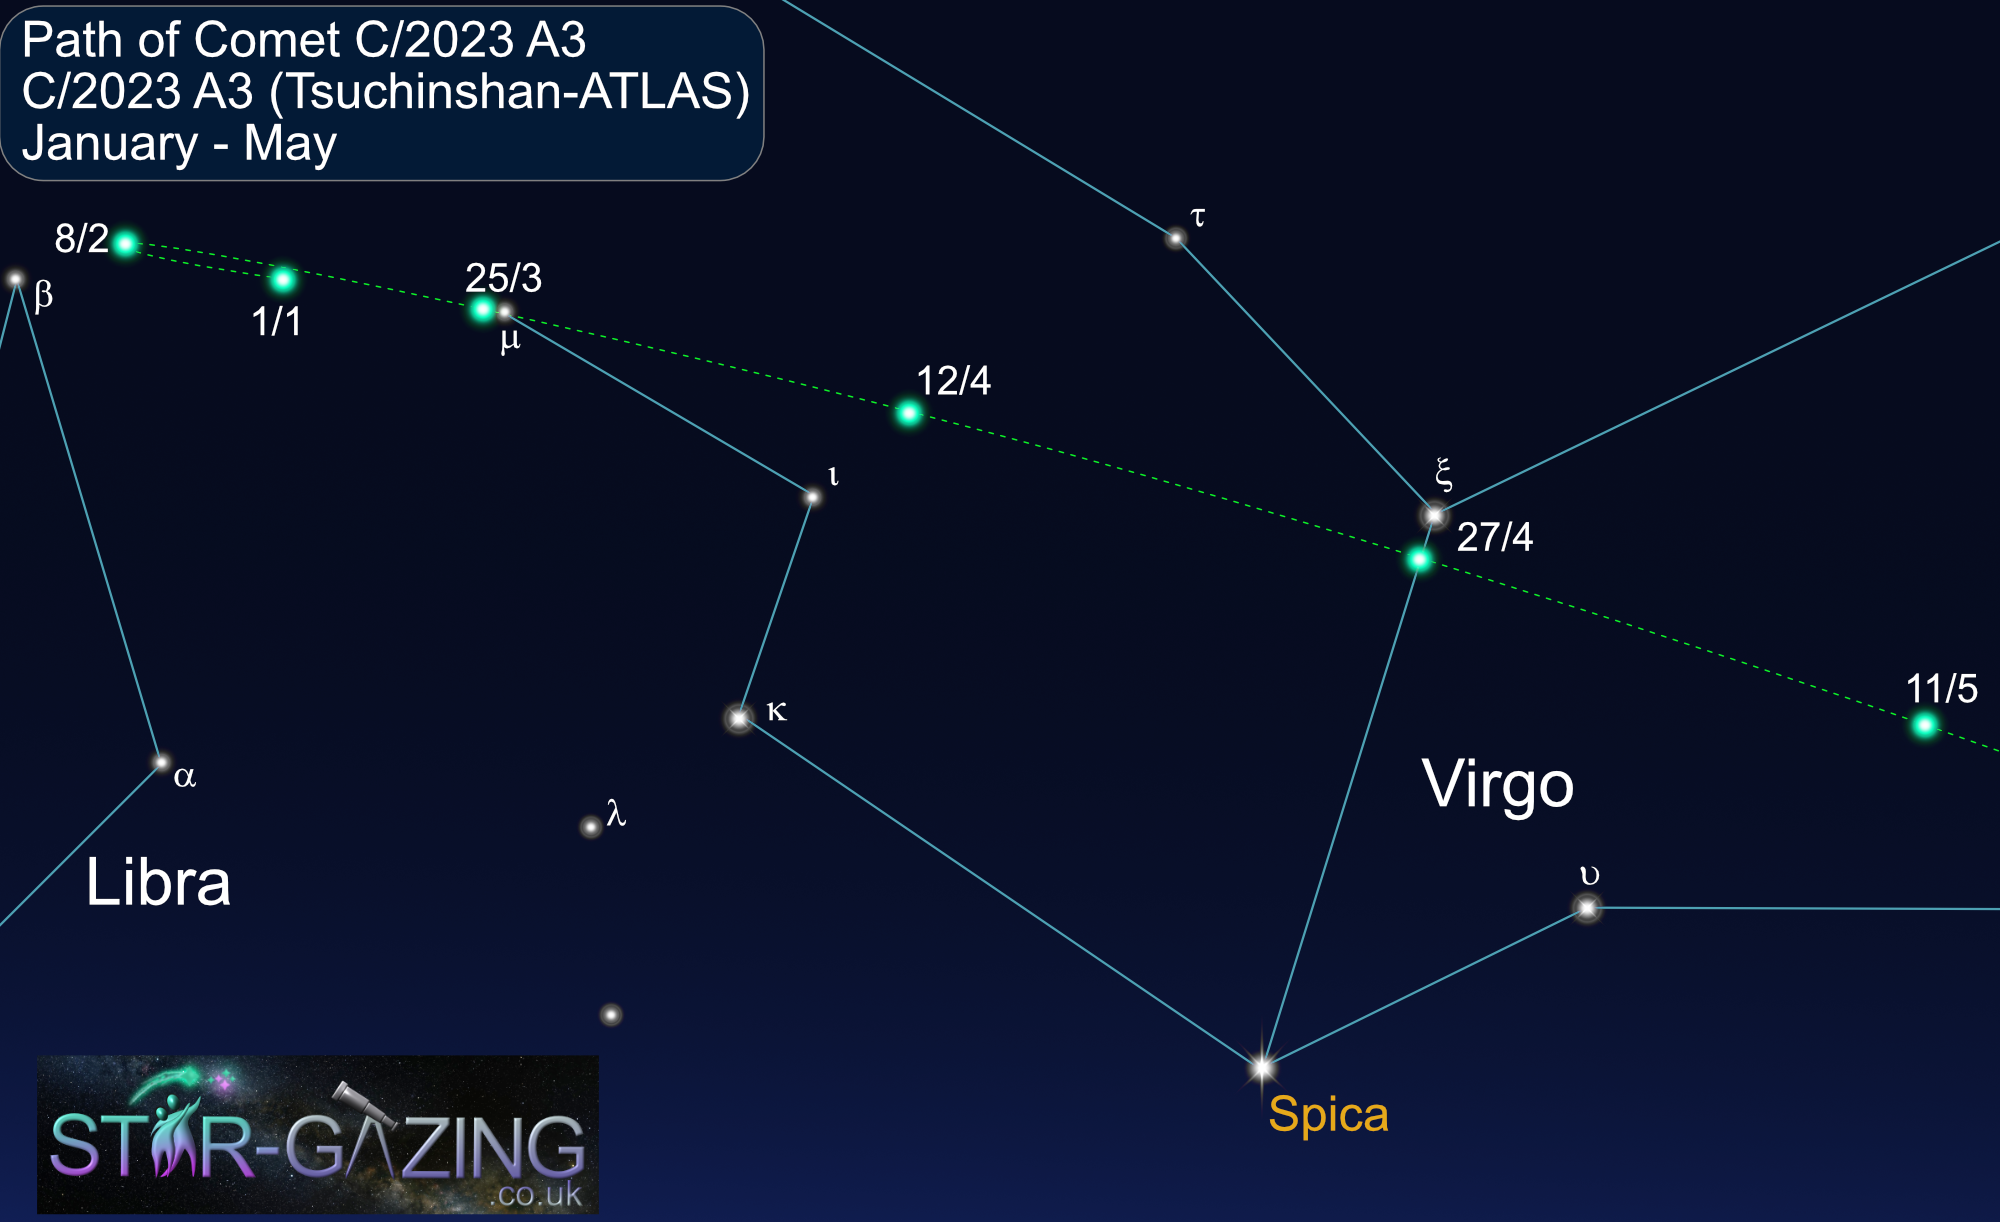
At the start of January, the comet is moving eastwards in Libra and should be about 14th magnitude.

It loops around and starts moving westwards by the 8th of February.

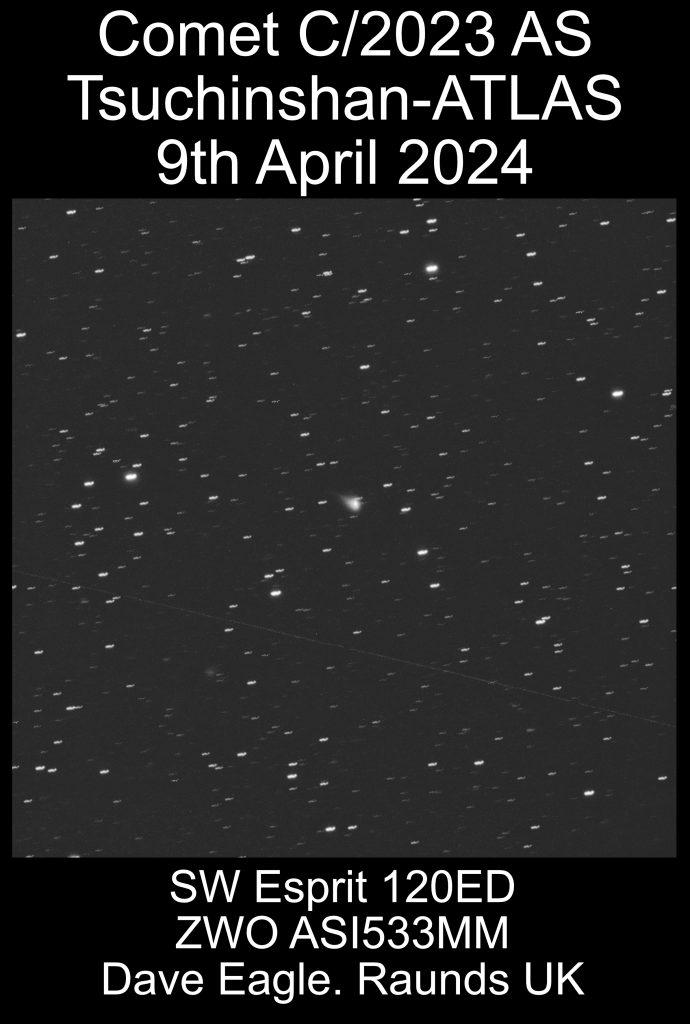
Update 10th April 2024.
It is now around 12th magnitude, so brightening well, and is definitely looks like a comet now.

Comet C2023a3 Tsu Atlas 20240409
On the 23rd of March the comet enters Virgo, where it spend the rest of the summer, moving slowly through the constellation, gradually brightening as it approaches the inner solar system.

It passes close to the +3.88 magnitude Mu Virginis on the 24th of March and close to the 3rd magnitude star Virginis on the 27th of April. The magnitude of the comet could now have brightened to about tenth magnitude.

The map below shows the path of the comet in Libra an Virgo from January to May.

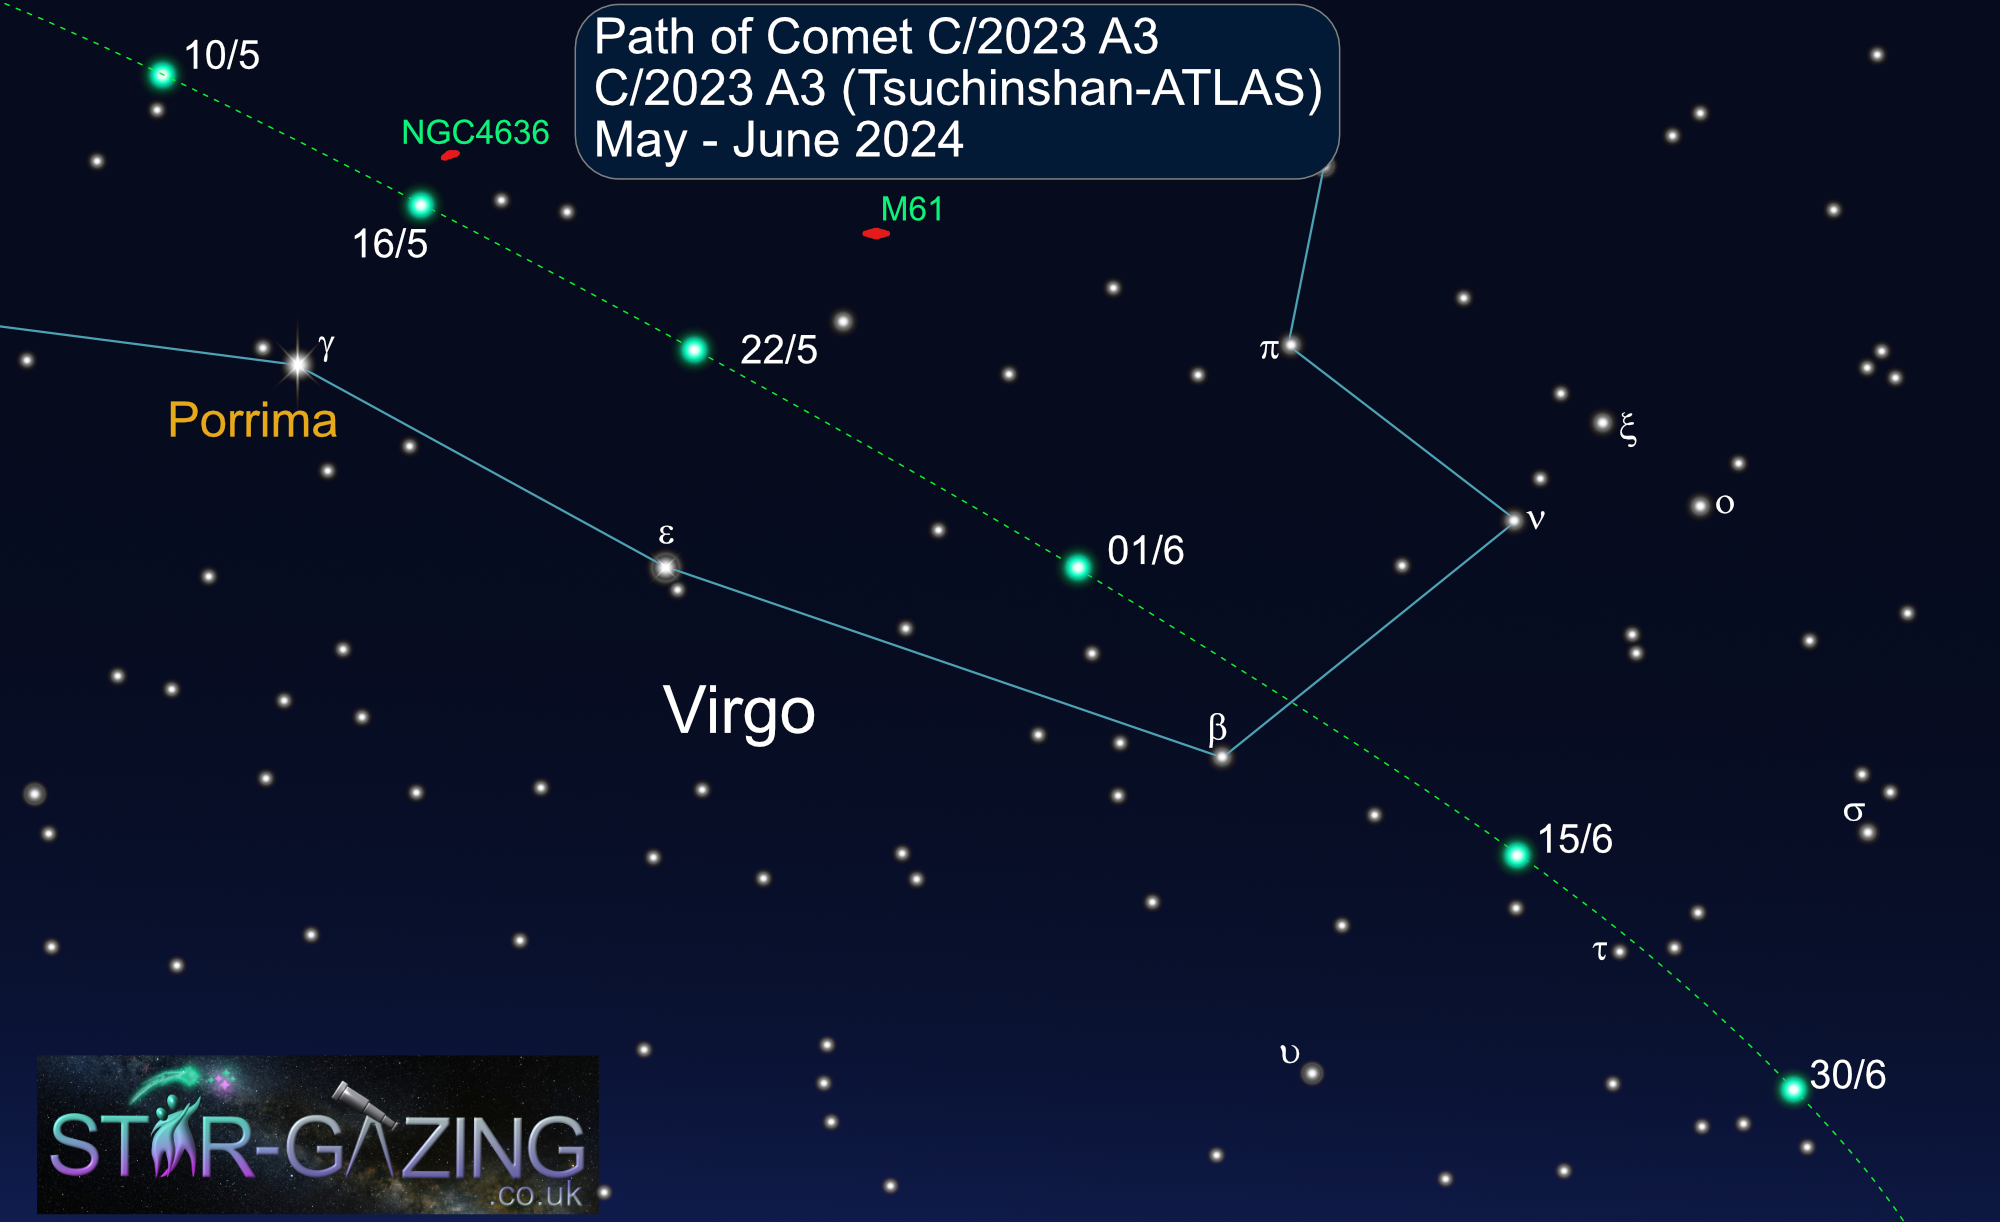
On the 15th of May the comet passes close to the galaxy NGC4636.

By the end of May, the comet is now starting to approach The Sun.
The 1st Quarter Moon passes close to the comet on the 13th of June.
As we get into June and it is really starting to brighten, the comet will now be low in the south western twilight after sunset.


The comet now becomes more difficult to spot as it slides into the Sun’s glare and is soon lost in the bright evening twilight in the south western sky. We are now unlikely to see it (briefly) until around the 28th of September.

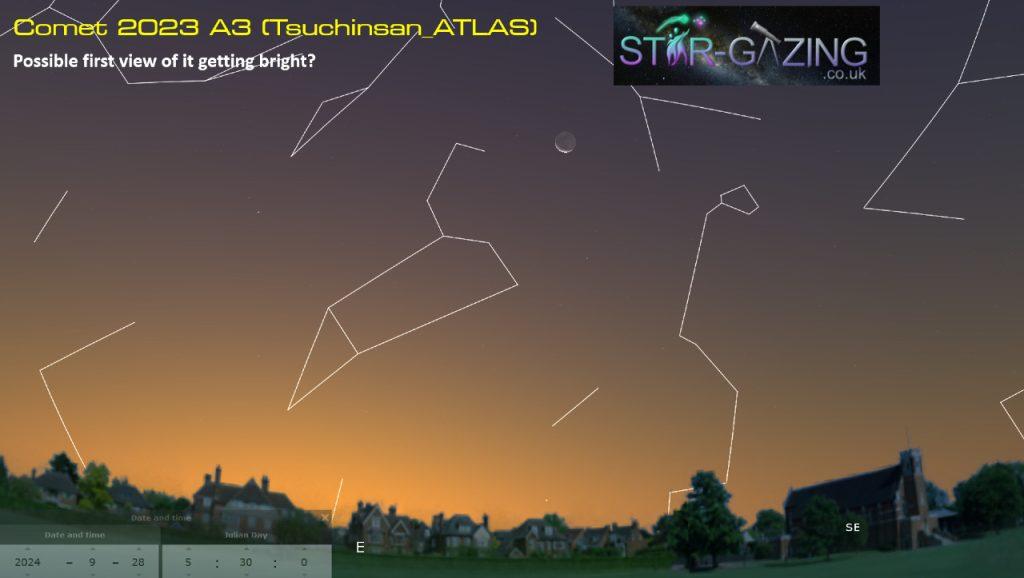
The image below shows it as a small bright spot, only a few degrees above the western horizon just before dawn on the 28th of September, when the comet is just past perihelion (Closest to The Sun).
As the comet is on the other side of The Sun, if it has developed a tail at this time it will probably be pointed away from us so we are unlikely to see much of it.

1.2023 A3 20240928

We’ll need to wait a couple of weeks for the comet to move away from The Sun, when it reappears in the evening western twilight.
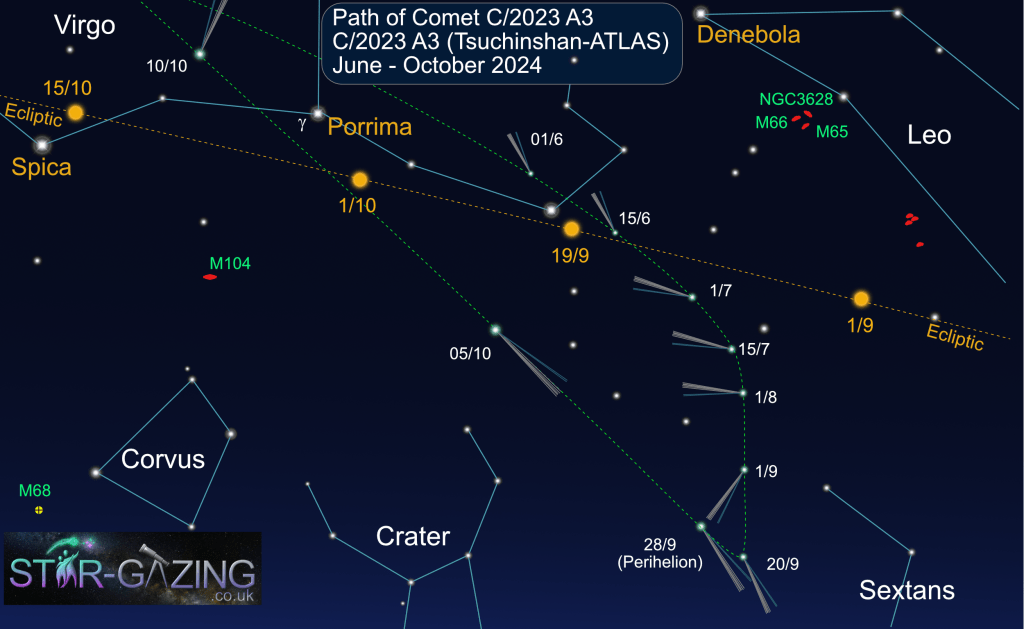
The map below shows how the comet rounds The Sun, but this will not be visible from Earth as the comet will be too close to The Sun.

Notice how the direction of the tail changes as it rounds The Sun. The Position of The Sun along the ecliptic at this time is also plotted.
Around the time of perihelion, the comet could reach a magnitude of -3 or -4. Opinions do vary. Well, it is a comet after all.
The only way to see how bright it is is to get out and see it when we can.

It will still be fairly  close to The Sun at this time and unlikely to be seen.
But if it does reach that magnitude, it may just be visible in a daytime sky if tracked down with extreme care.

Comet 2023a3 At Perihelion 2

Once the comet passes perihelion we’ll get our best chance to view it from the 11th or 12th of October, when it moves into the western evening sky.

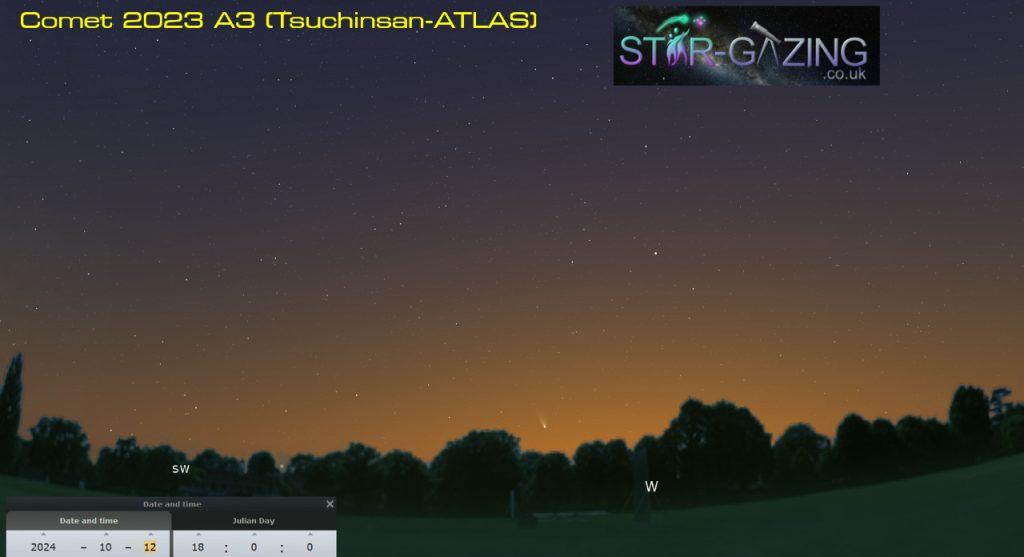
On the 12th, at about 18:00 UT, the comet is low in the twilight after sunset and sets very quickly after The Sun, but could now have developed a reasonable tail. Depending on how bright and long that tail is, we may still be able to see it once the comet itself has set (Fingers crossed).

1.2023 A3 20241012

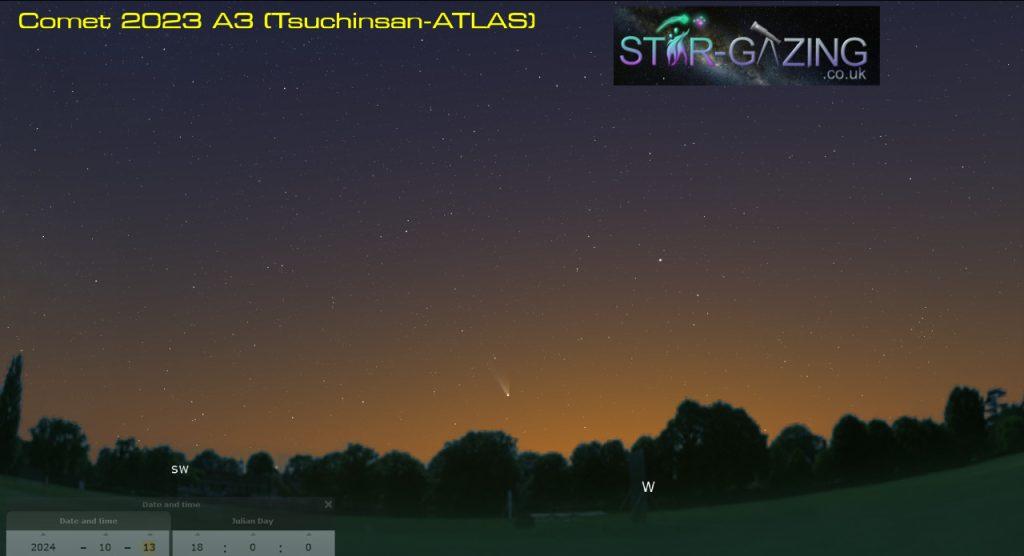
The next evening 13th of October, the comet is a little bit higher in the sky and sets slightly later.
How bright will the comet be at this time? It will have faded, but could still be about 1st magnitude object.
The comet is now at its closest to The Earth passing us at a distance of 44,618,787 miles.

1.2023 A3 20241013

On the 14th of October the comet is quite a bit higher in the sky, so we can observe it a later time when the sky will be a bit darker, so you should be able to see more faint features in the comet and any tail.
The comet is passing almost between us and The Sun, so sunlight will be illuminating the dust and gas around the comet potentially making it extremely bright.
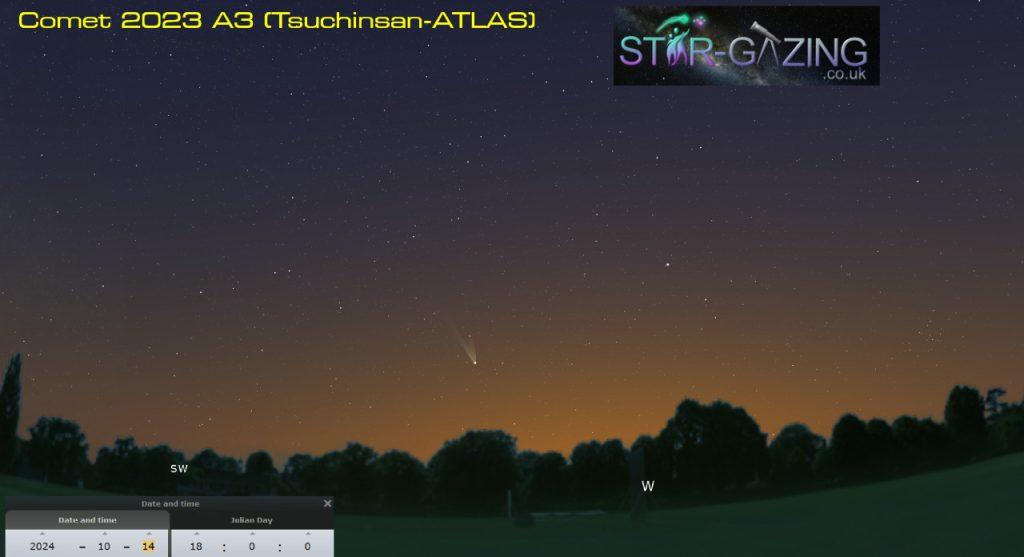
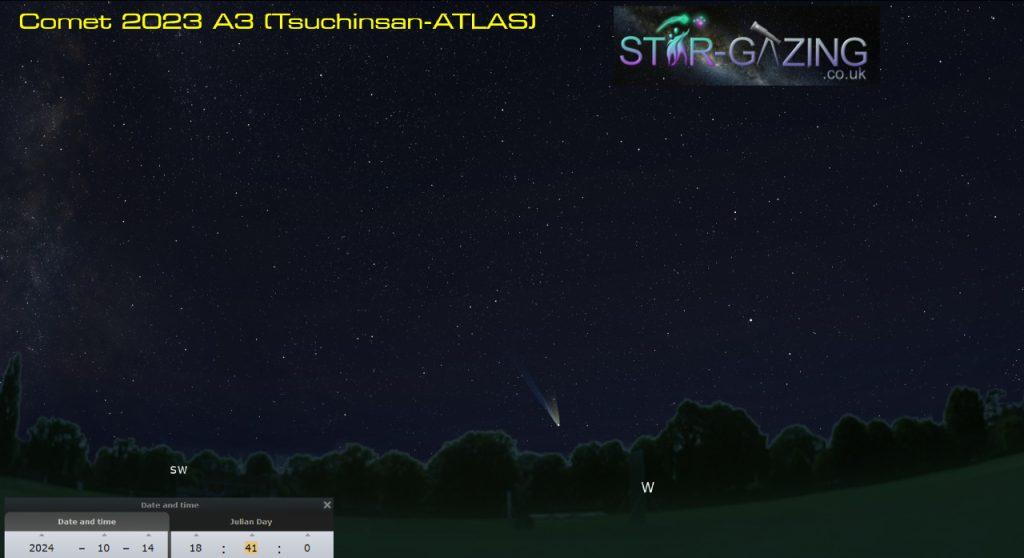
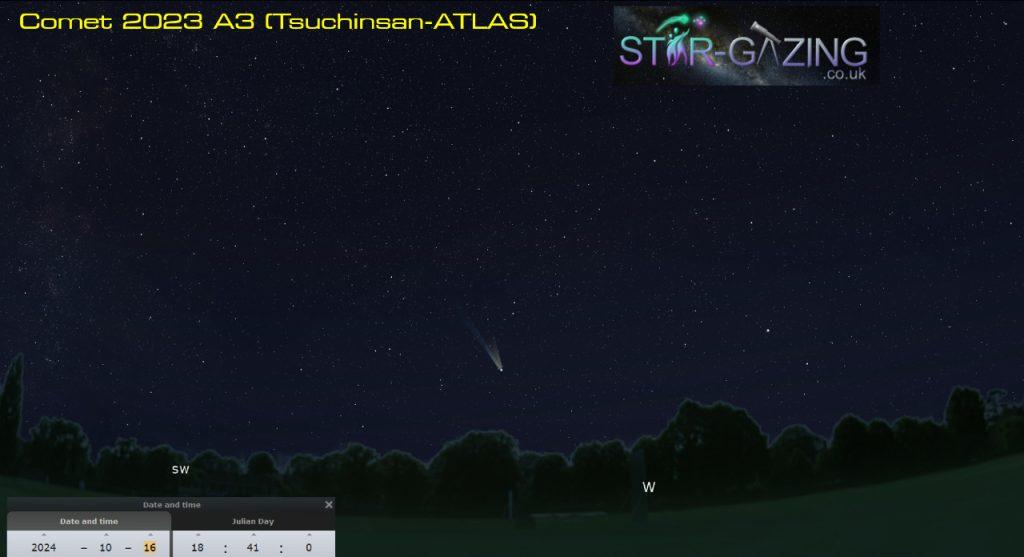
The images below show the comet at 18:00 UT, and 18:41 (when the sky will be darker) on the 14th of October.

1.2023 A3 20241014 1

1.2023 A3 20241014 2

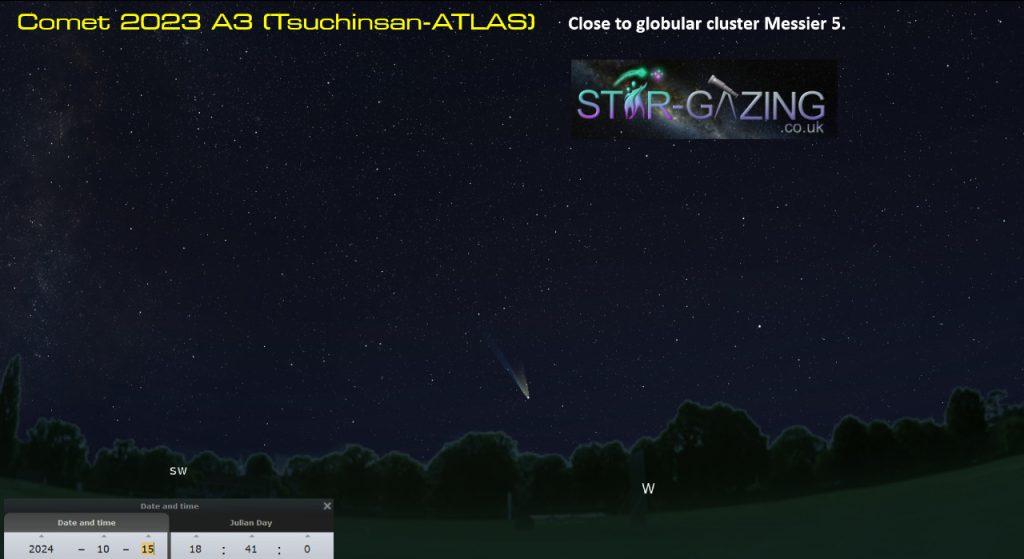
On the evening of the 15th, the comet should now be starting to fade, but is even higher in the sky.

1.2023 A3 20241015 1

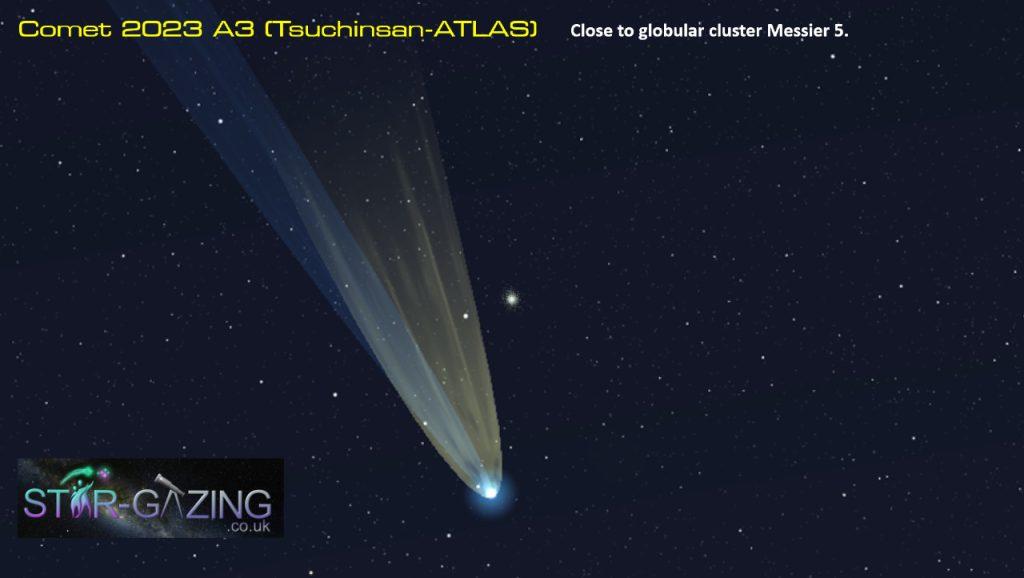
This evening it is passing close to the globular cluster Messier 5, which should give us a great photographic opportunity. 🤞

1.2023 A3 20241015 2

By the 15th of October, the comet has moved well up in the western evening sky and is now moving through Serpens Caput and should have noticeably faded.

1. 2023 A3 20241016

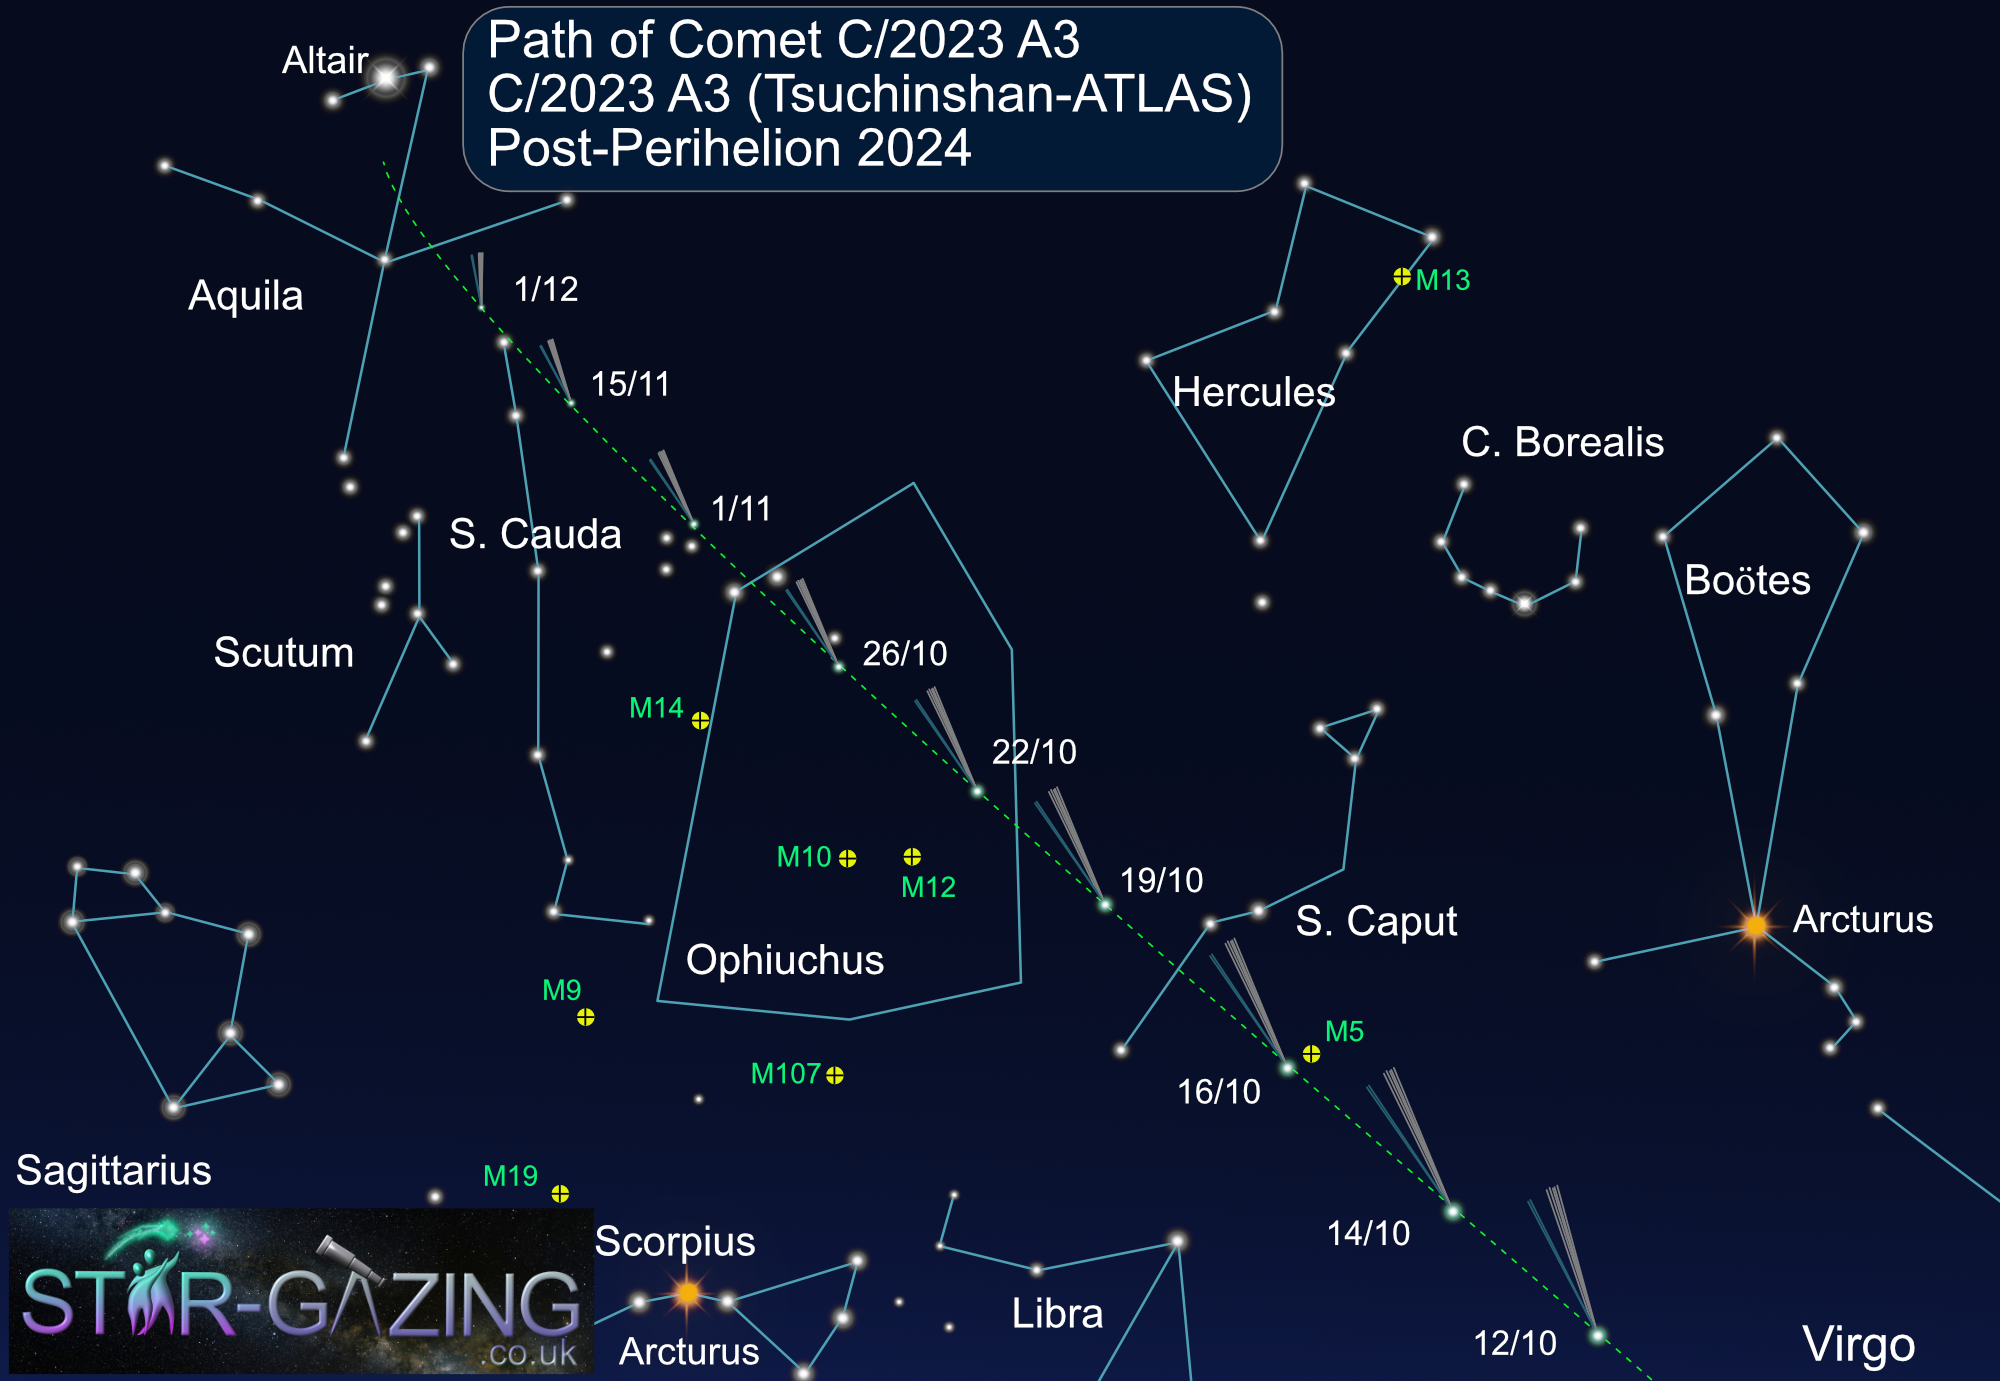
This final image shows the path and position of the comet between the 14th and 27th of October from Virgo to Ophiuchus, and on into Aquila in late December, where we should be able to follow it as it moves out from the inner solar system and fades away.

I for one, will be very interested in following this comet over the coming months to see it starting to brighten and keeping the faith that it does give us a great display mid October.

The only way to know for sure, is to KEEP LOOKING UP!

Dave


Smart Telescopes. Fad, or astrophotography future?

Smart telescopes have been around for quite a while now.
Talking to Vespera and Uninstellar owners over the past year or more, they all said they enjoy the experience and are getting very good results.
But the cost of these can be somewhat prohibitive.

The Dwarf telescope came out some time ago, which was much more affordable, but reviews on these were quite mixed.

ZWO announced they were going to release their smart telescope, the SeeStar S50, and that would also be pitched at an affordable price.

Knowing just how fantastic their ASIAIR works, I was intrigued and looking forward to seeing how folks got on with it.

After quite a few frustrating delays, it was finally unleashed upon the world.
I managed to get one of the demo models from First Light Optics to try it out.

What is a Smart Telescope?
Using an app on a smartphone or tablet, you connect to the scope and send it to the object you want to image.
It then takes an image for however long you want… (But see below).
At the end of the exposure, the software processes the subs taken and the processed image is uploaded straight onto the smartphone or tablet being used.

All good stuff!
But be aware that there are a number of limitations, which I’ll discuss later.

Specifications of the SeeStar S50.
50mm aperture, triplet apochromatic optics should give relatively low chromatic aberration.
250mm focal length. Gives a field of view just over 1/2 a degree left to right. Enough to fit The Moon or Sun in.
Imaging chip IMX462.
Resolution 1920×1080.
Dew Heater built in.
Dual Band Nebula Filter.
Solar white light filter supplied.
Alt-Azimuth mount, with built in WiFi and Bluetooth.
Battery life, up to 6hs. Less with the dew heater on.
Weight 3kg.

What’s it like?
The SeeStar S50 is supplied in a very nice lightweight expanded polystyrene case, which ideal for travelling.

The case has a better feel than I expected, but not of the same quality as the Vespera’s and Unistellar’s, but hey, it is a lot cheaper.

It is very compact and the tripod screws onto the 3/8″ thread on the bottom.
This common thread will allow you to attach the SeeStar S50 onto many other, bigger and more stable tripods, if needed.

The App.
I downloaded the SeeStar App from the Andriod Play Store. It is also available for iPhones and iPads as well.
Watch out for the minimum specifications of phone and tablet that can be used with it.

All installed OK and I switched the SeeStar on and was ready to play.
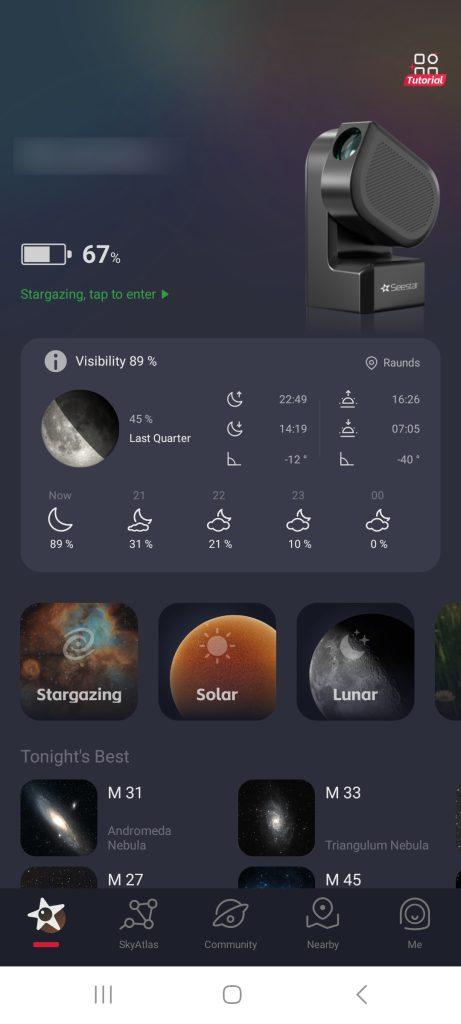
I connected my phone to the WiFi on the SeeStar and opened the app.
After a setup routine, by pressing a button on the SeeStar and rotating it a few times, I was connected and ready.
Screenshot 20231105 215045 Seestar

As an aside, I was also able to turn on Station mode and connect it to my home WiFi.
This allowed me to connect to the SeeStar from anywhere inside the house.
No more standing out in the cold for me operating a telescope.
After all, I am getting to that age where I need to keep myself warm!

Clicking on the top part of this screen brings you into the SeeStar Settings.Screenshot 20231110 120948 Seestar

To turn off the SeeStar, you need to scroll down the bottom of this menu, as it is below the intial screen

Once all connected, I clicked on the StarGazing button.

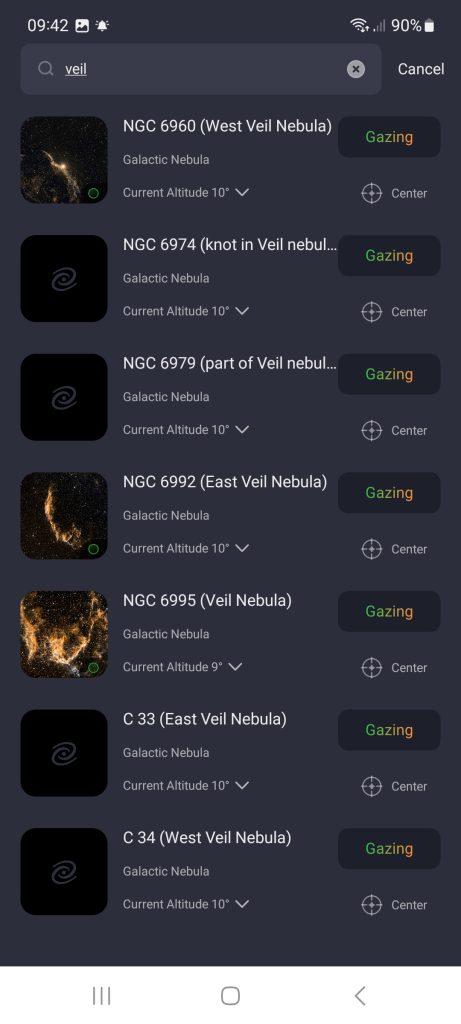
By clicking on the image of The Plough, I went into the map and searched for the Veil Nebula.
It found a number of entries for this, so clicked the Gazing button next to The Witches Broom and the SeeStar obediently went to it.

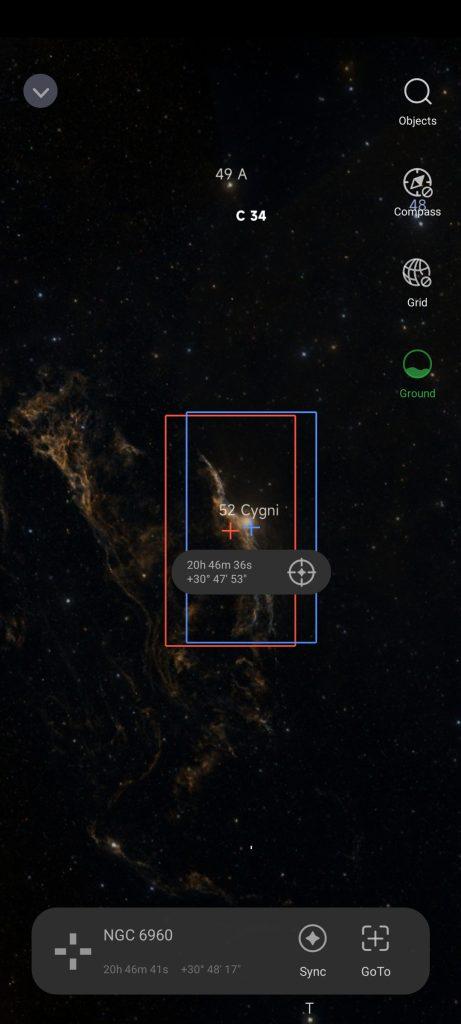
The SeeStar takes an image, looks at the position of the stars in the image and works out where it is pointing by plate solving, then corrects its position if required. No user intervention is required.

If the framing isn’t quite to your liking, you can move the background sky underneath the rectangle to reposition the camera.

Comet 2023 H2 (Lemmon) was in the database, and it went to it, and managed to image the comet, but I could not get a very good image, as the comet was moving too fast.
Screenshot 20231112 094241 Seestar

Screenshot 20231112 094621 SeestarThe SeeStar has been set so that the camera chip is set to give a portrait image, rather than landscape. This cannot be changed. I guess ZWO did this so that the image format fits popular sharing apps, such as Instagram, so images can be shared easily.

Clicking the button top left, brings us out of the map back into the Stargazing window.

Once it has settled on the chosen object, it will be continually previewing.
Some stars or bright objects should be visible on the screen.

Depending on which object you have selected, you may want to use the dual band filter to get better contrast of the nebula.
Click on the Filter button and the filter moves across the camera and will be highlighted in green.

The image can be brightened or dimmed down by using the Adjust button, which changes the gain of the camera.

You are not able to adjust the exposure, I’ll mention more about that in a bit.

The AF button is the autofocus, which can be used if the autofocus hasn’t already worked.

The circle in the middle can be used to move the Seestar in any direction manually.
This control does take a bit of getting used to. I’d prefer up, down, left, right buttons and a speed control myself.

Taking an image.
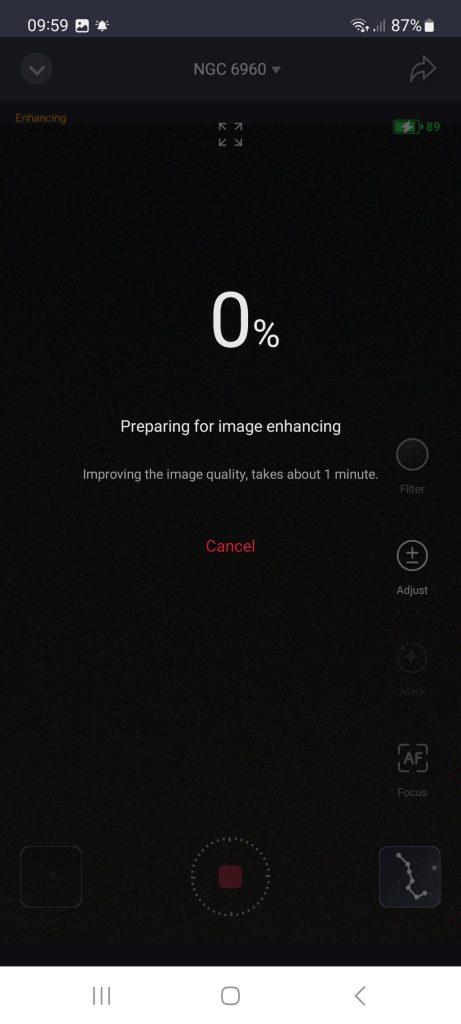
To start the exposure, or as the SeeStar calls it, “Enhancing the image”, click the red button at the bottom of the screen
This takes a minute to start.
Screenshot 20231112 095956 Seestar

The SeeStar now takes a series of exposures, which it will add together at the end of the “exposure”. Here’s where some of those limitations I mentioned start to kick in.

The SeeStar is on an Alt-azimuth mount. As a result, as the sky rotates above (Oh, OK, as Earth rotates under the sky), the image will rotate in the field of view. This can be easily noticed in how the orientation of Orion rises and sets leaning in different directions.

As the imaging chip is set and cannot rotate to match this rotation, as the SeeStar tracks the sky, the image falling on the chip is rotating. This will produce trailing.

The rotation of the images does produce some artefacts around the edges of the images, which gets worse the longer the exposure. I went up to 15 minutes for some exposures with one object, which went really well.M32 5x10s Image Rotation
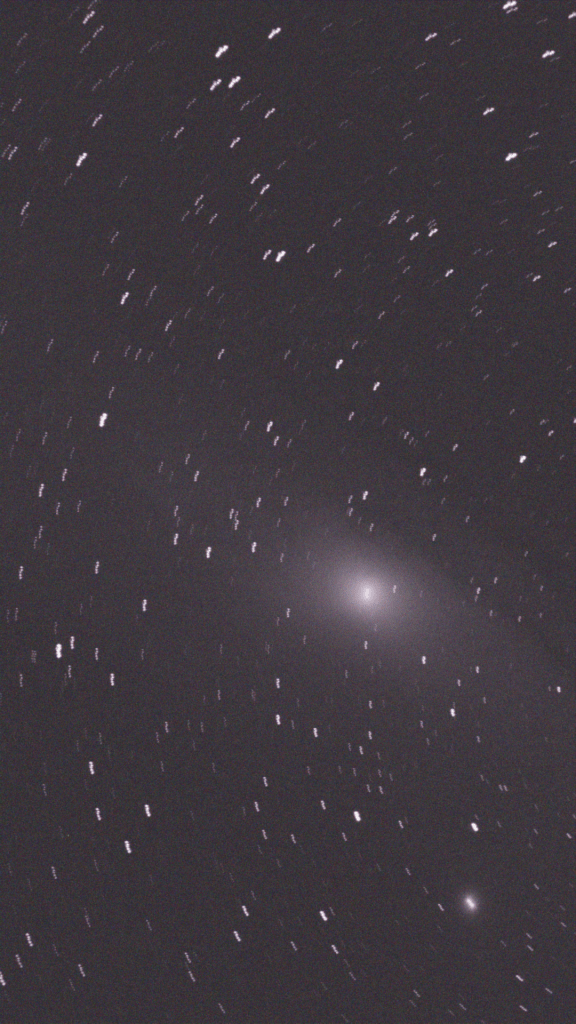
This is shown in this image on the right, which I stacked from a few SeeStar Subs to show the image rotation.

How does the SeeStar cope with all this to produce a nice image?
It takes very short exposures of 10 seconds, which minimise the amount of trailing visible in the image.
This is why you are unable to adjust the camera exposure. Longer exposures will start to show trailing.

Each sub image that the SeeStar takes is rotated and aligned on the star positions on the images to stack them together.
As the images stack up and are added together, fainter objects gradually brighten and more detail is revealed on the screen.

Added to this, another problem is that the SeeStar is not tracking the sky accurately. It can’t.

As an astrophotographer I am so used to equatorial mounts and autoguiding to get really good results, but these smart scopes work totally differently.

Between each image, the SeeStar takes an image to check whether the object is located on the imaging chip and adjusts the position of the scope, if necessary.

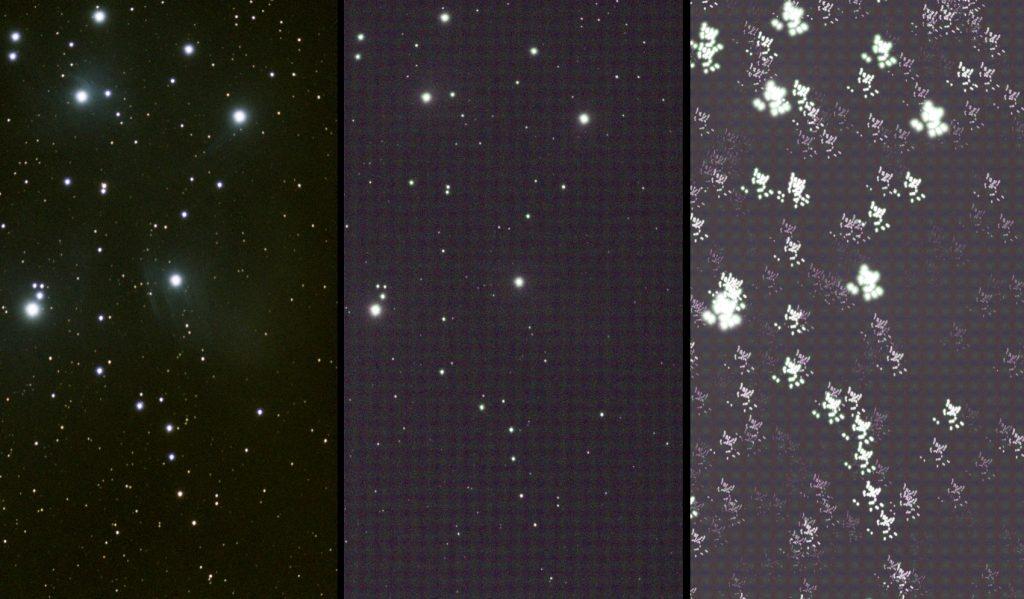
The image below is The Pleiades image created by SeeStars by stacking a number of 10 second subs together.
The centre image is one of the raw subs it took.
In the right-hand image I have taken a number of the subs it took and created a stack without aligning each image on the stars.
As you can see it’s a right mess. It reveals just how much the SeeStar moves between each sub.
The SeeStar has coped admirably with the rotation and this to produce the final image.
Comparison M45

That’s enough about how it works, you really want to know what are the images like.
As well as some bright targets, I deliberately chose others that should challenge it a bit.
The first set of images below are as they were produced from within the app.
I’ll show later how the images can be further improved.

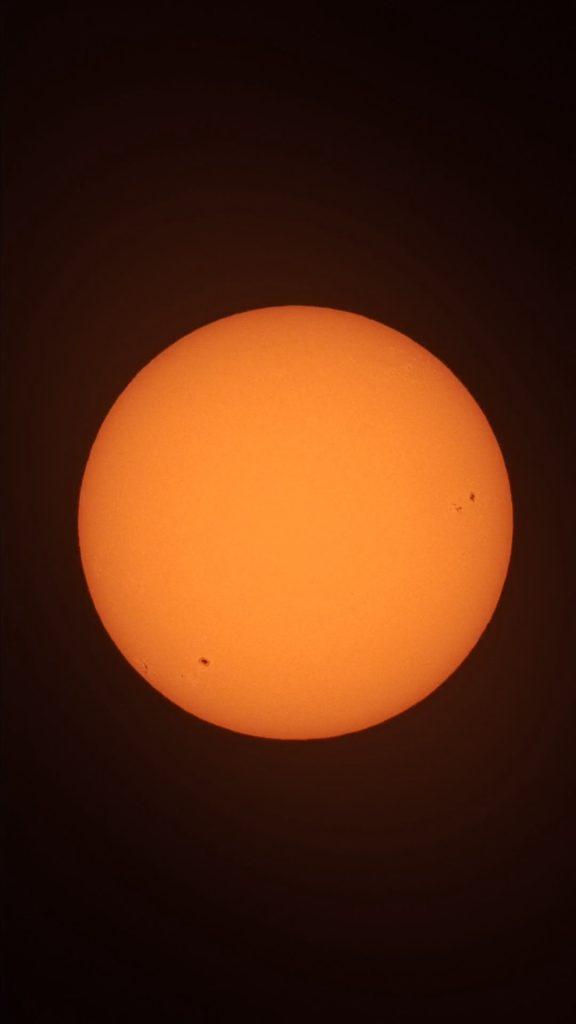
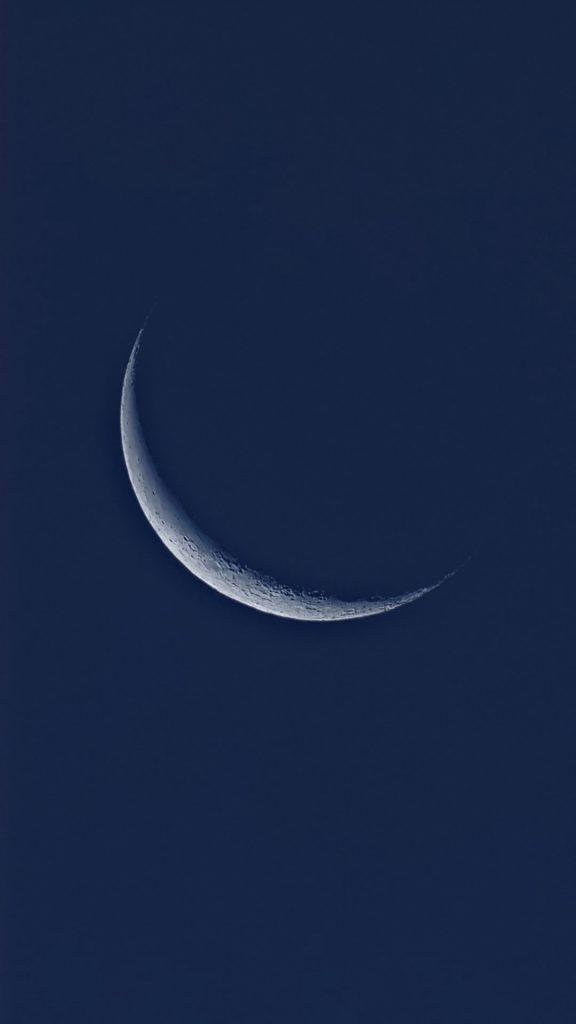
The Sun & crescent Moon in a bright morning sky.
S
eeStar finds these itself, but make sure you put the solar filter on when pointing at the Sun.
The Moon could not be found in the bright twilight I tried, but I could use the on-screen controls to get it in the field of view and adjust the image brightness to match what I wanted to capture.
1699008414565

1699599107228

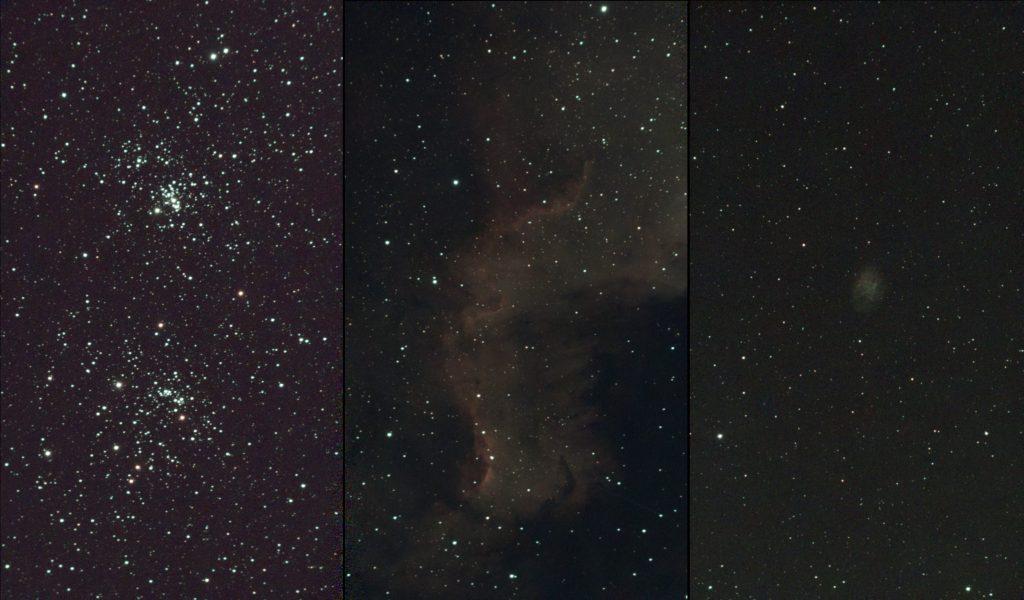
The Sword Handle in Perseus, The Cygnus Wall and The Crab Nebula.
3 Objects Steestars50 2

Three parts of the Veil Nebula in Cygnus.
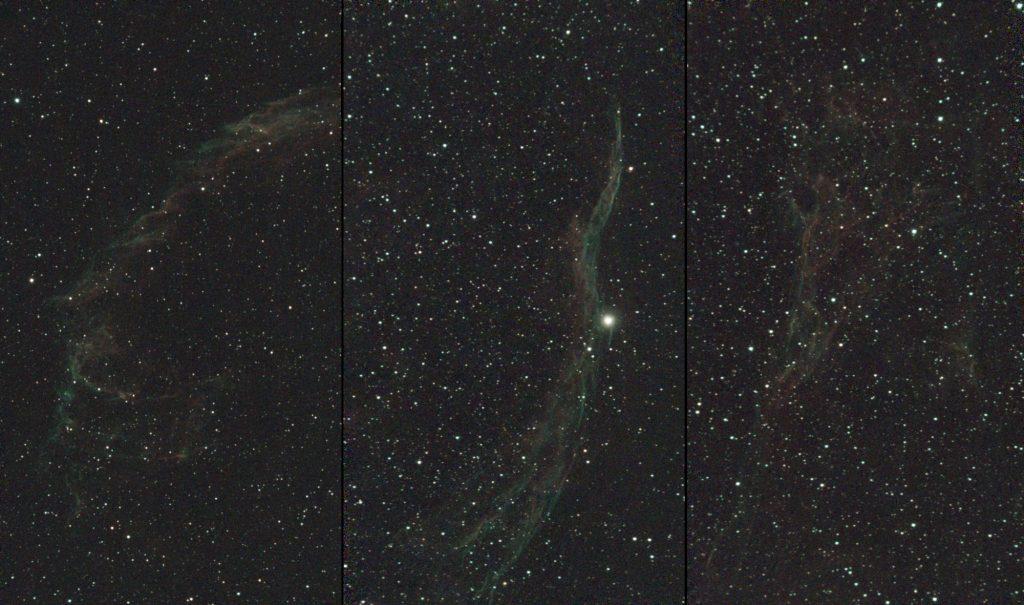
3 Veils Seestars50

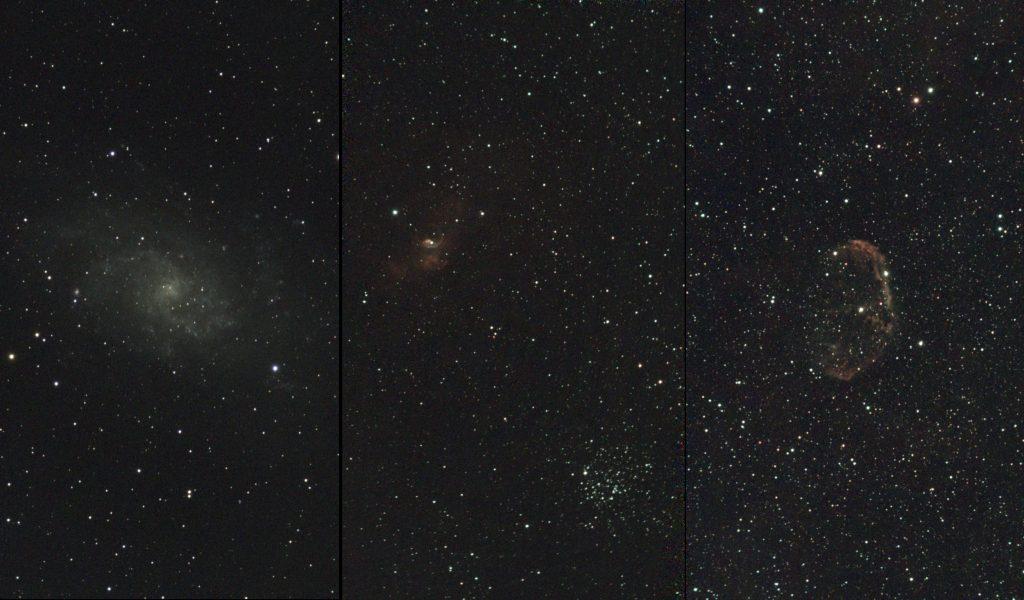
Messier 33, Bubble Nebula and Messier 52, The Crescent Nebula.3 Objects Steestars50 1
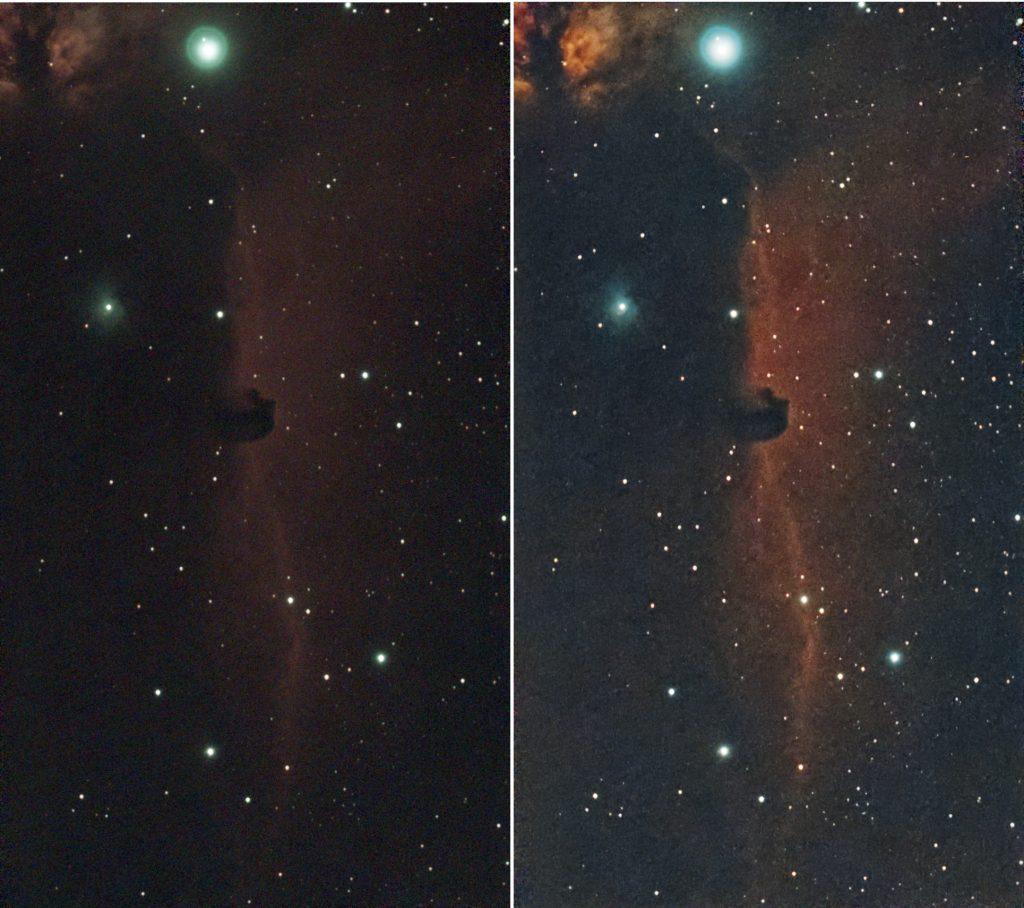
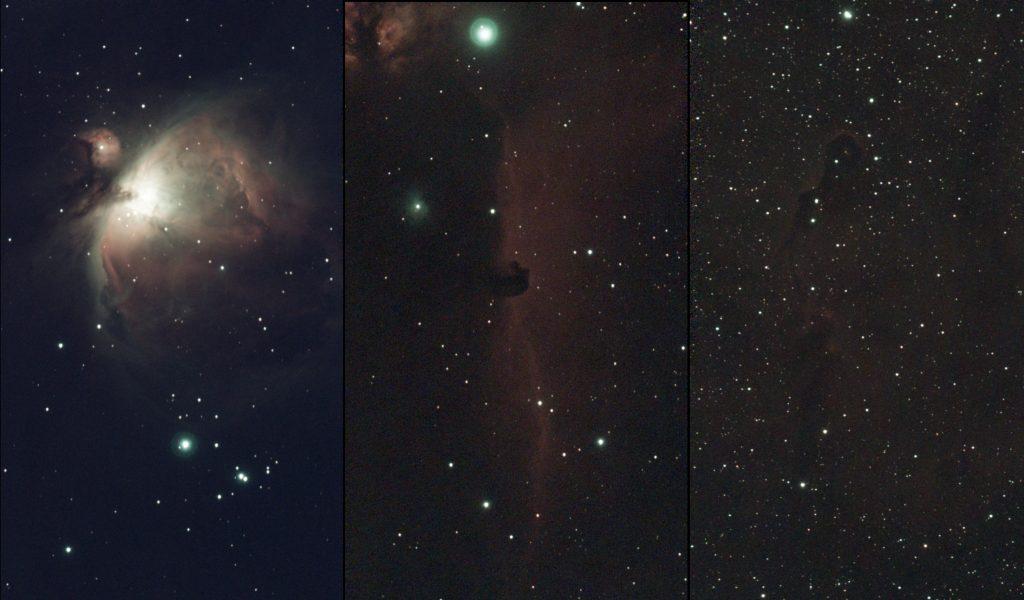
The Orion, Horsehead and Elephant trunk Nebulae. 3 Objects Steestars50 3
Something I really was not expecting was to point it at Uranus and be able to reveal two of its Moons, Titania and Oberon.
That shows it has really good optics.
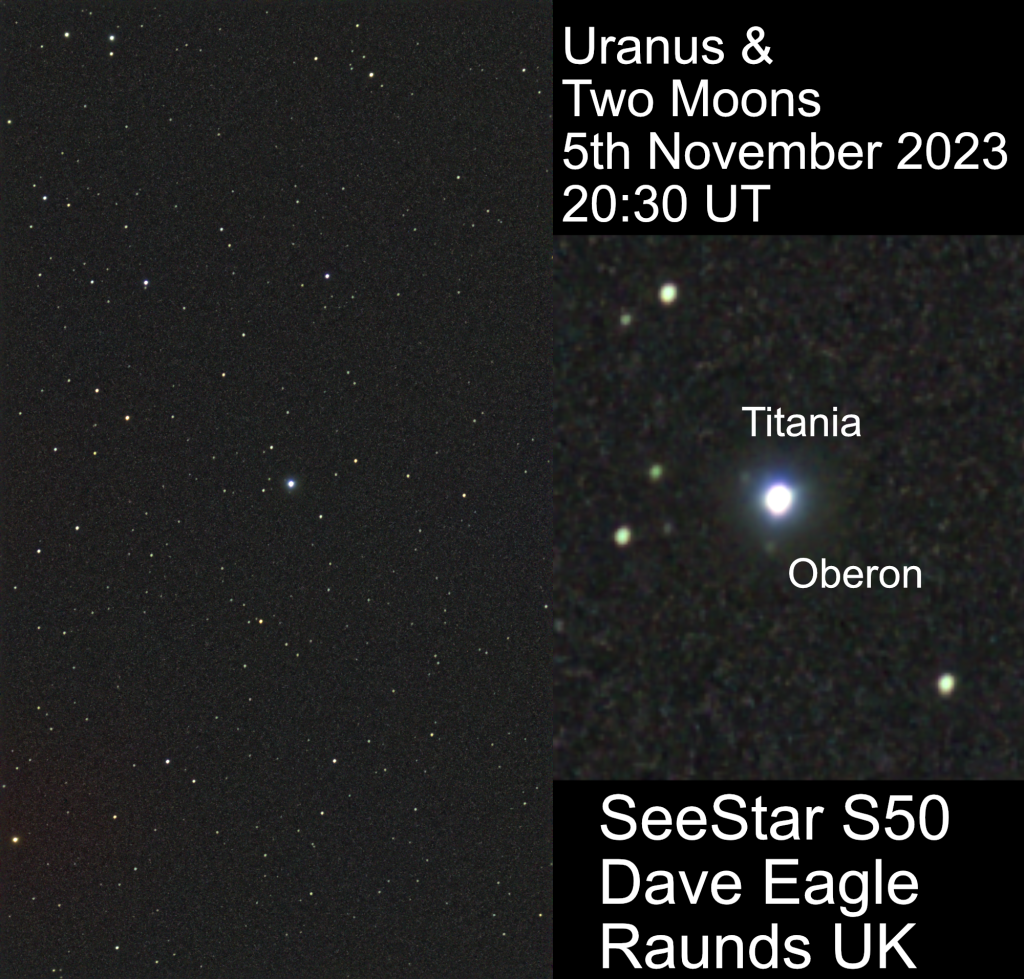
Stacked Uranus Plus Moons 10.0s Ircut 20231105 203041

My Conclusion.

I found the SeeStar S50 very easy to use and anyone wanting a highly transportable imaging system, it does produce very pleasing images.
I did encounter a couple of finding and tracking issues, but generally it did behave itself.
It could not image around Jupiter, as the flare from the planet swamped the image, so it could not pick out any guide stars.
Anyone would be loving the results it can give them just using their smartphone or tablet, even on their first night.
It’s so simple to set up and use, without all the faff normally associated with astrophotography and all its complications.
For a single cost, it’s ready to go and most importantly works most of the time.

More seasoned astrophotographers and pixel-peepers will poo-poo these devices, as they don’t produce the best quality images.
But for this cost and such convenience, it is after all aimed to appeal to the beginner who wants a convenient way to catch images of our universe.

It won’t appeal to everyone, but the SeeStar far surpassed all my expectations, and is an amazing bit of kit that really impressed me.

As long as it attracts more people into our amazing hobby, especially the younger generations that are used to doing everything on their phone, that has got to be a good thing.

Can the SeeStar S50 be improved?
I’m sure as ZWO develop the software to manage the captured data, the images can only get better (See my processing results below).

If they had a way that the imaging chip could be rotated, this would allow you to rotate the imaging chip to get the framing you want.
In many cases you will find that the object you are trying to image will not lie in the correct orientation to make a nicely framed image.
A couple of hours can make a big difference in the orientation of the object, so that is something to consider when taking an image of a particular object.
A mosaic feature would also be quite nice to capture wider parts of the sky.

Some people have speculated if ZWO are working on producing a longer focal length version.

A longer focal length telescope will give a smaller field of view and a higher magnification.
This would show up the sky rotation a lot quicker than 10 seconds, limiting the exposure length even further.

Have an imaging chip that rotates as the exposure is taken or an equatorially mounted version would allow it to take much longer exposures without image rotation problems showing.

Either of these would be a real game-changer and if that does transpire, I reckon we are seeing a glimpse of the future of astrophotography.

Improving SeeStar Images.
The SeeStar has an option in the menu to save the raw data it takes in its memory. These are saved as fits files.
If you have the SeeStar networked, or connected to a computer with the supplied USB cable, you can browse to the folder called “EMMC Images/MyWorks” where these files are stored and transfer them to a computer to stack and/or process them yourself.

I found I was able to get quite a bit more out of the images using my normal image processing methods.

The SeeStar has two folders for each image subject it takes, such as M42 and M42-sub.
The finished stacked image (but not processed) is in the subject folder.
The Subject-sub folder contains the individual 10 second subs that were taken and used to create the stacked file in the other folder.

The following images were produced by processing the raw final stacked images using Affinity Photo.
The images as produced by the SeeStar S50 uploaded to the phone is on the left, my processed images are on the right.

With some of the subs, I was not able to stack these.
The stars on the images were too faint for the stacking software to detect enough for it to stack them.
Longer enhancement runs may get round this problem.
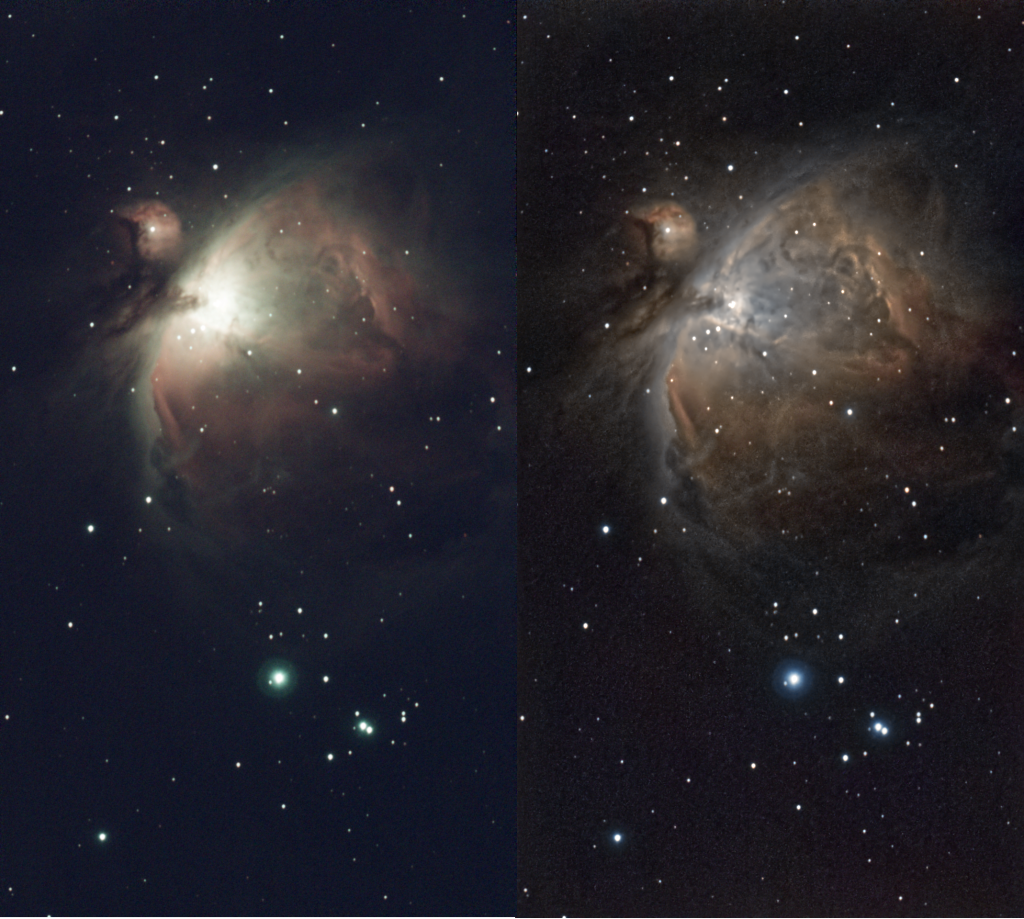
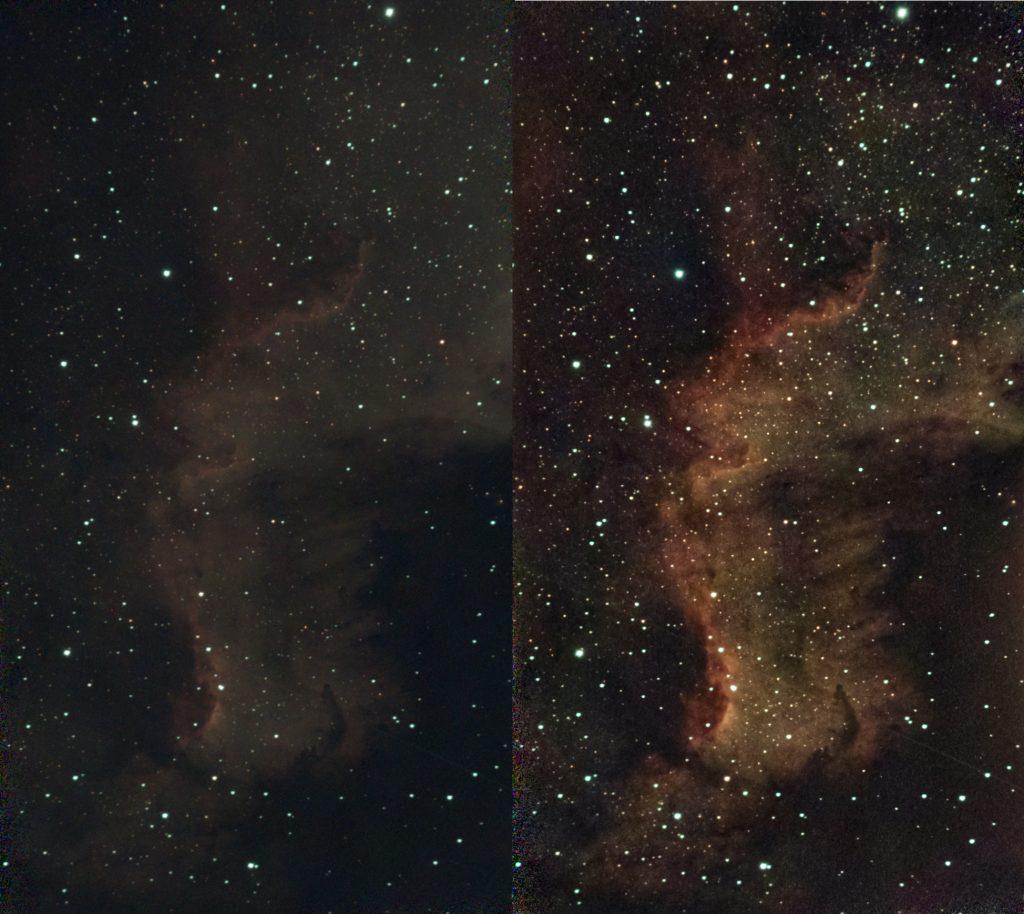
Conpared Process M 42 10.0s Lp 20231111 010823 4

Cygnus Wall Comparison

Horsehead Compared Ic 434 10.0s Lp 20231111 012651


Animation of Venus Occultation – 9th November 2023

Despite persistent and thin clouds trying to spoil the view, I managed to capture the ingress and egress of the occultation of Venus by The Moon on the morning of the 9th of November.

I couldn’t upload the full animation to social media as it was too big, so here it is.

https://www.star-gazing.co.uk/Images/Venus-Occultation-20231109/2023-11-09-0945.gif

Comet 12P / Pons-Brooks

Another comet has recently had yet an other outburst, just like 29P / Schwassman-Wachmann and 2P / Encke.

This is Comet 12P / Pons-Brooks.

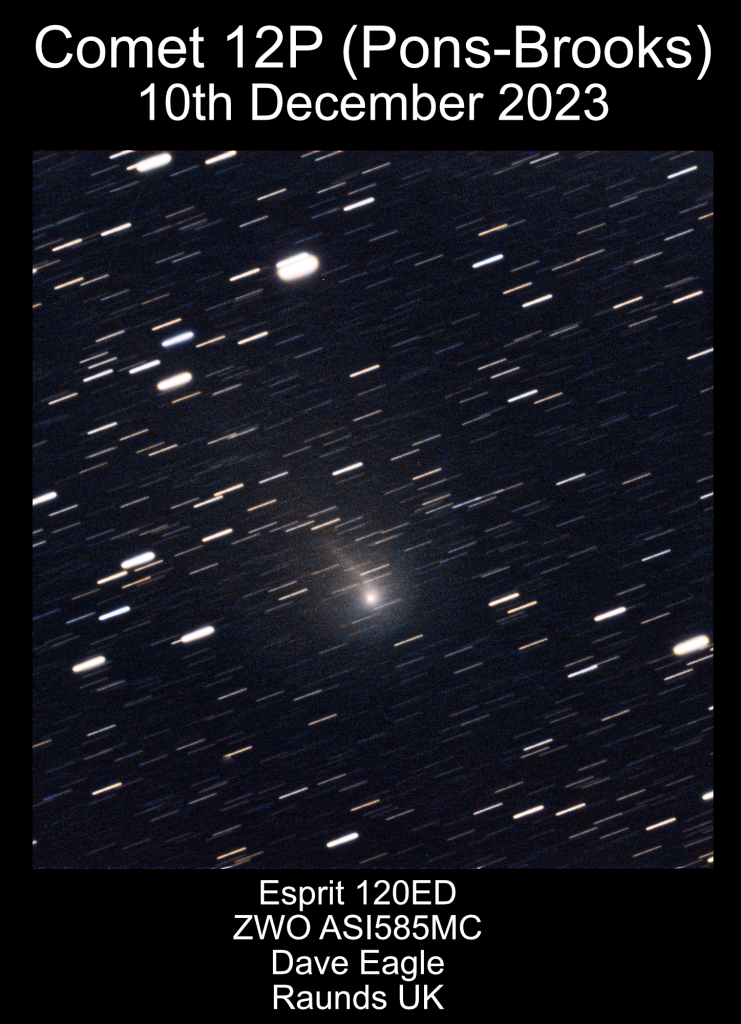
Comet 12p 20231210 Annotated Web

Currently located in the northern part of Hercules, not too far west of the head of Draco, the comet is now about 9th magnitude (updated 15th November 2023) after yet another cryovolcanic outburst.
Comet 12p Pons Brroks 20231115 Autosave Web

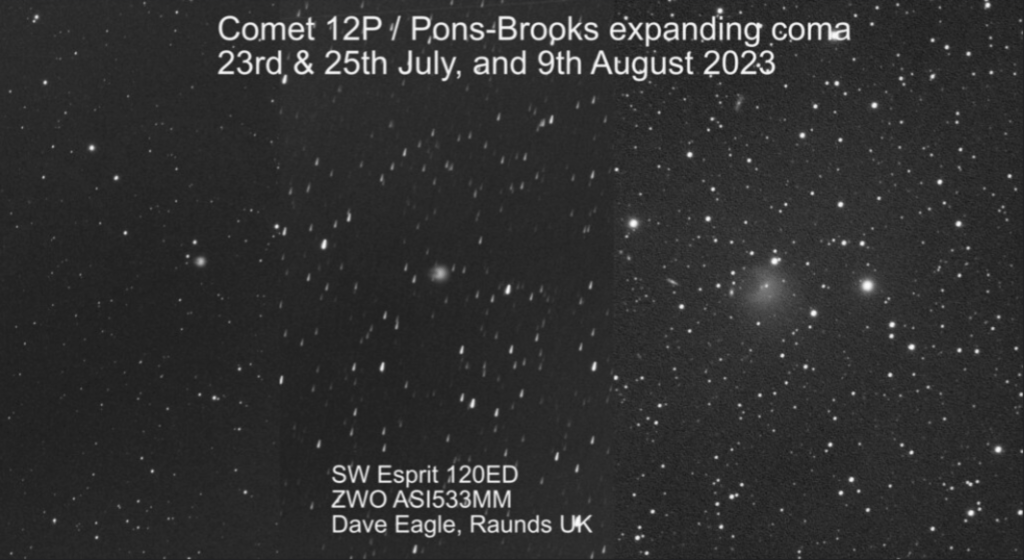
I also managed to take a few images of the comet during July, August and October.

The “Millennium Falcon” shaped cloud can be seen expanding between these three images.

12P_Expanding-Shell

It will be well worthwhile keeping an eye on this one to see if it does have another outburst.

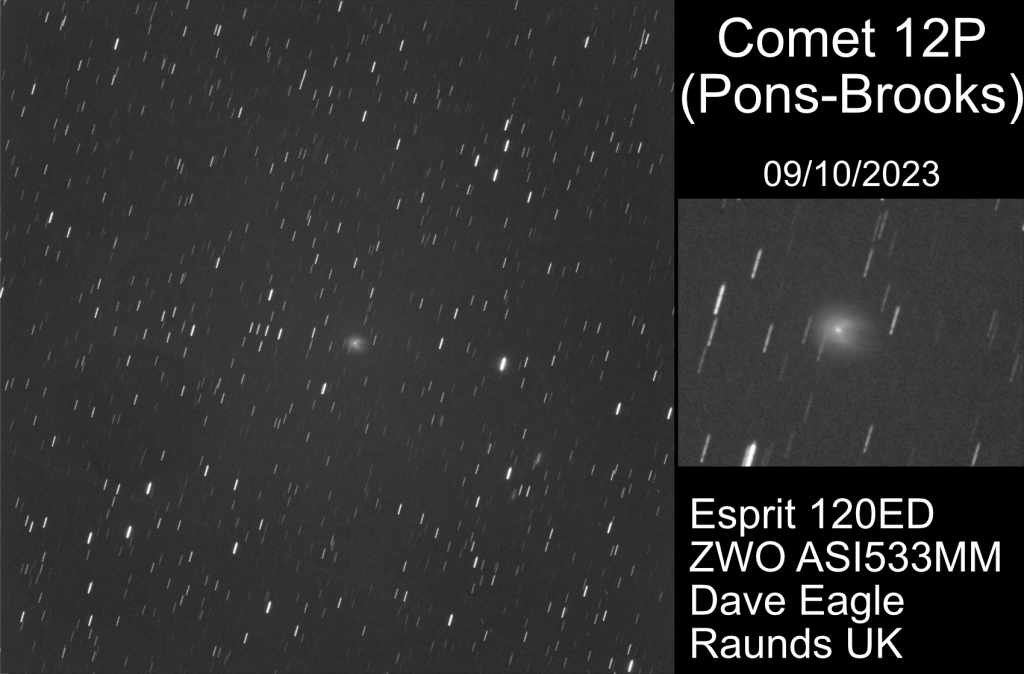
There was another outburst at the start of October. I captured this image on the 9th of October.
The shape certainly resembles The Millennium Falcon from Star Wars.

Comet-12P-Pons-Brooks-20231009-Autosave002_Web

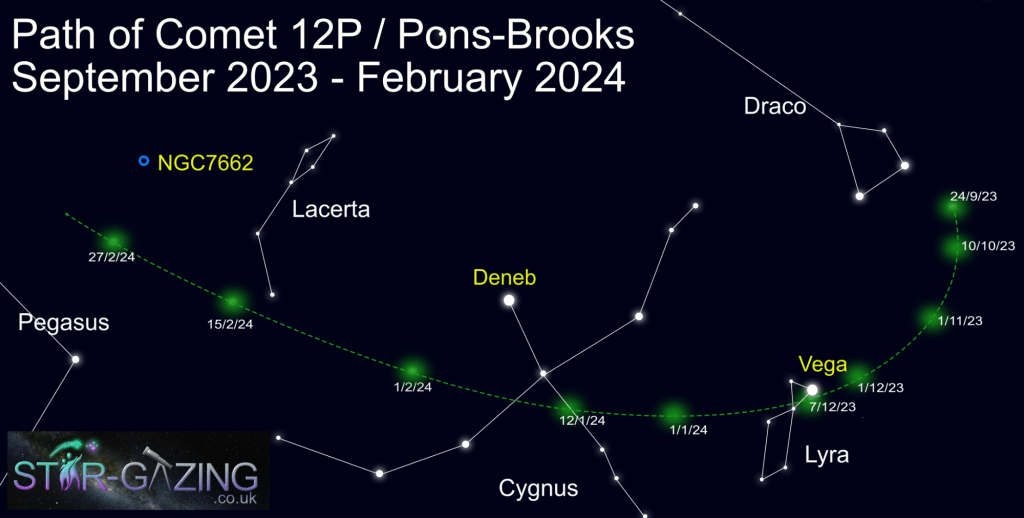
The comet will be visible for a while yet, as it moves through Lyra, Cygnus and Lacerta into next year.
It is circumpolar (never sets) for a while.

It passes a number of objects as it goes.

On the 7th of December it passes the bright first magnitude star Vega in Lyra.

On Christmas Day is is moving directly over the open star cluster NGC6791.

On the 12th of January, the comet lies close to the Crescent Nebula, NGC6888 in Cygnus.

Three days later the comet passes south of the open cluster Messeier 29, also in Cygnus.

As the comet moves westwards, it will start to get lower in the north western sky early evening after Christmas.
On the 27th of February the comet is passing south of the bright planetary nebula NGC7662, but you’ll probably need a good north western horizon to catch it in the evening sky before it sets.

At this time it does rise in the early hours, but as dawn starts to break, it is only 19° above the north eastern horizon.


Comet-12P-Pons-Brook2023-2024

Comet 103P / Hartley 2

There are three comets to look out for the next few months and into next year.

These are, Comet 2P / Encke, 29P / Schwassman-Wachmann and 103P / Hartley 2.

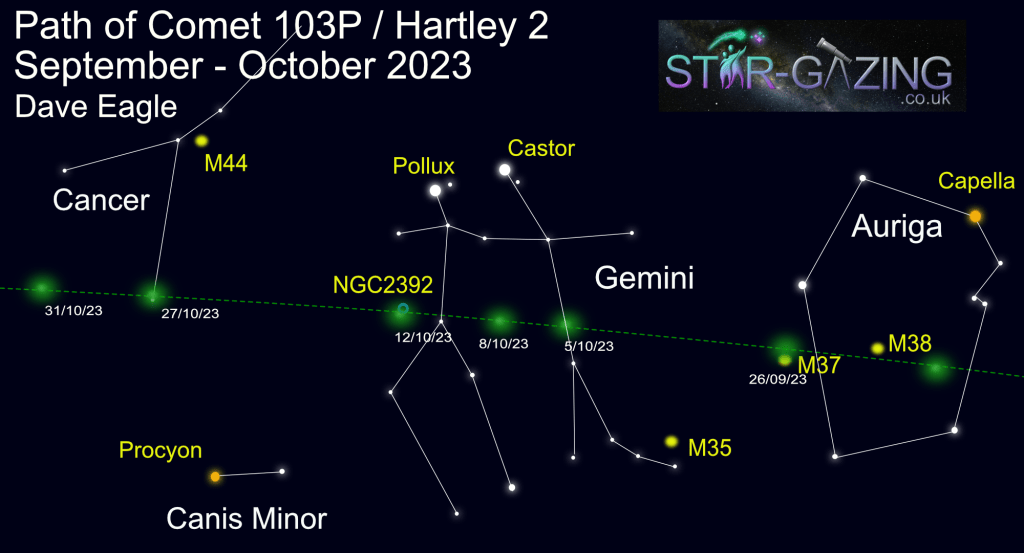
Here’s the details and map for Comet 103P / Hartley 2.

103P / Hartley 2 is currently moving away from the constellation of Auriga, into Gemini.
It is very high up at 70° just before dawn so should be easy to follow for quite a while.

The comet is currently about 11th magnitude, but it could reach a peak brightness of magnitude 7.9 by the end of October.

The comet passes a few objects along the way, which should make it a bit easier to find.

On the 5th of October, 103P is right on the body line of Castor in Gemini.

After passing between the twins on the 8th, it passes very close to the planetary nebula NGC2392, the Eskimo Nebula.

As the comet brightens we can follow it into the lower part of Cancer and onto Hydra (Not shown)

After this, the comet heads south, but as it slows, it should remain visible until next April.

Please Note: The Comet appears bigger on my map than it will (in the rear view mirror? 😁).


Comet-103p-Hartley2-Sep-Oct-2023-3


Comet 29P / Schwassman-Wachmann

There are three comets to look out for the next few months and into next year.

These are, Comet 2P / Encke, 29P / Schwassman-Wachmann and 103P / Hartley 2.

Here’s the details and map for Comet 29P / Schwassman-Wachmann.

29P / Schwassman-Wachmann unlike Comet 2P/ Encke is going to be a round for quite a while.

This a very exciting comet, as it has recently had an outburst. It does this fairly regularly.

It is usually around 16th magnitude, but these outbursts can make it a lot brighter.

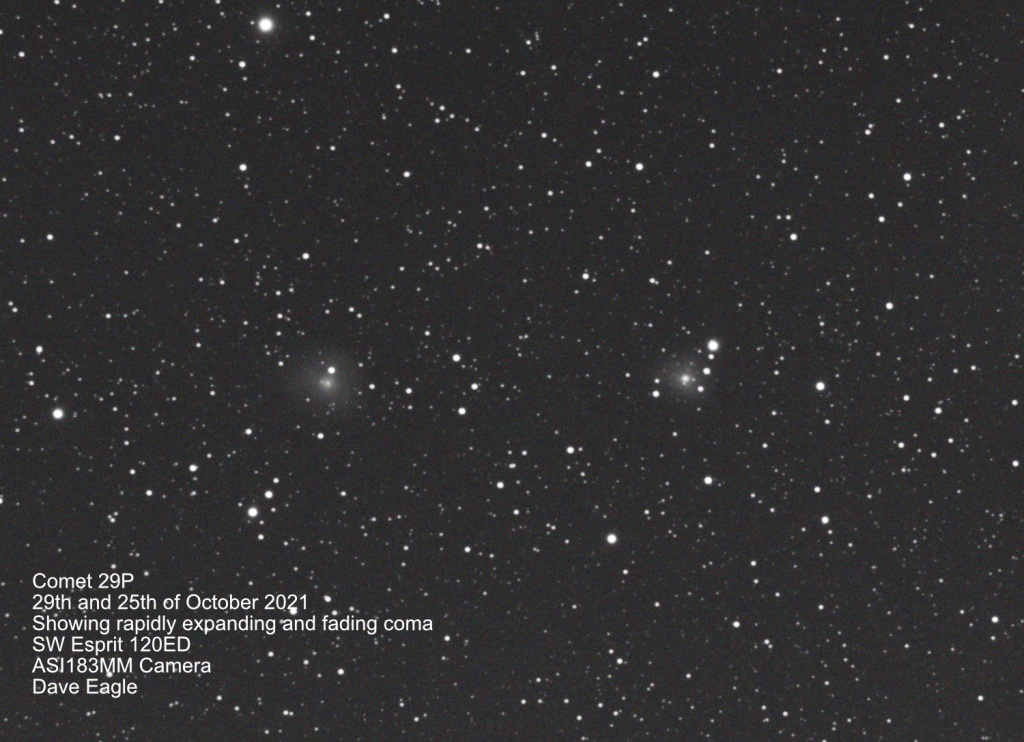
I took the two images below on the 29th (left) and 25th (right) of October 2021, which shows a recent outburst.

This is a comet well worth keeping an eye on.

Autosave-Comet29P-Comparison-Web_Annotated

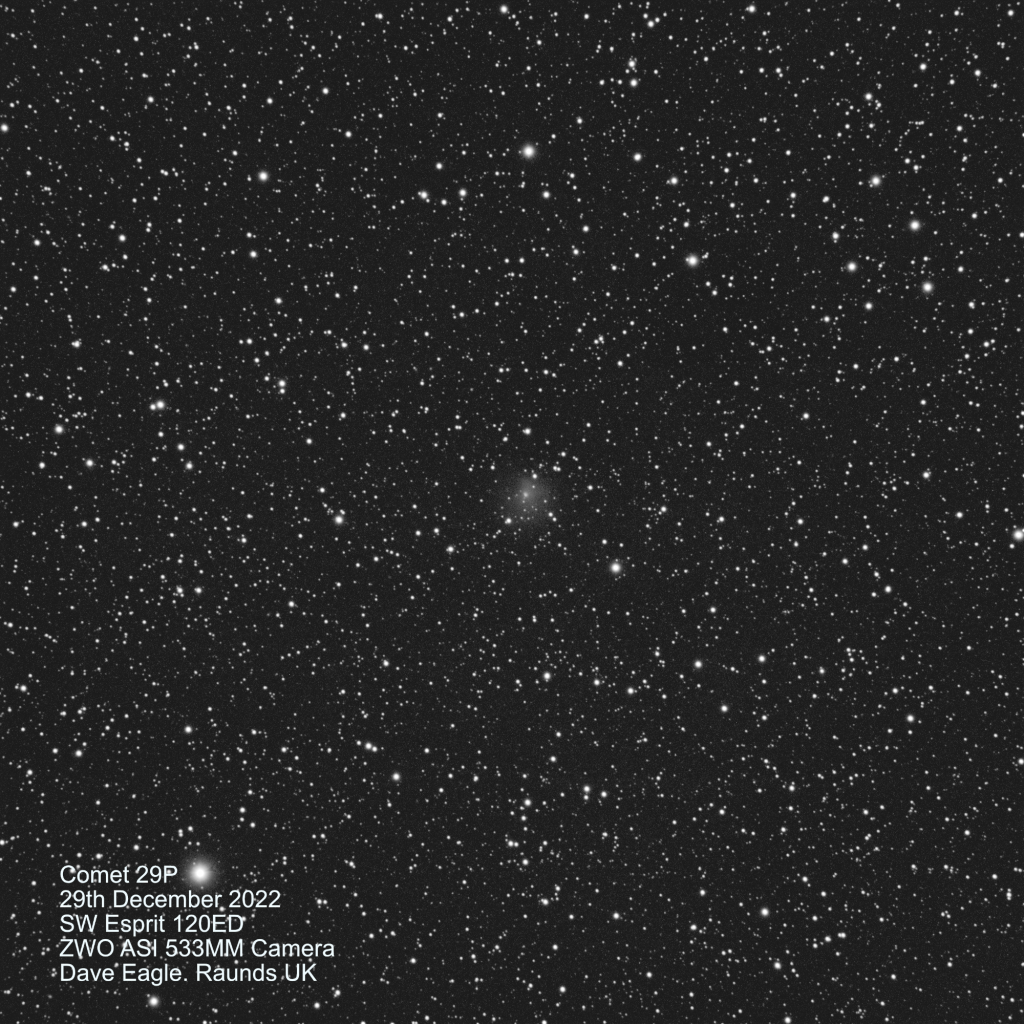
I managed to capture another outburst in December 2022.

Comet-29P-20221229-Web

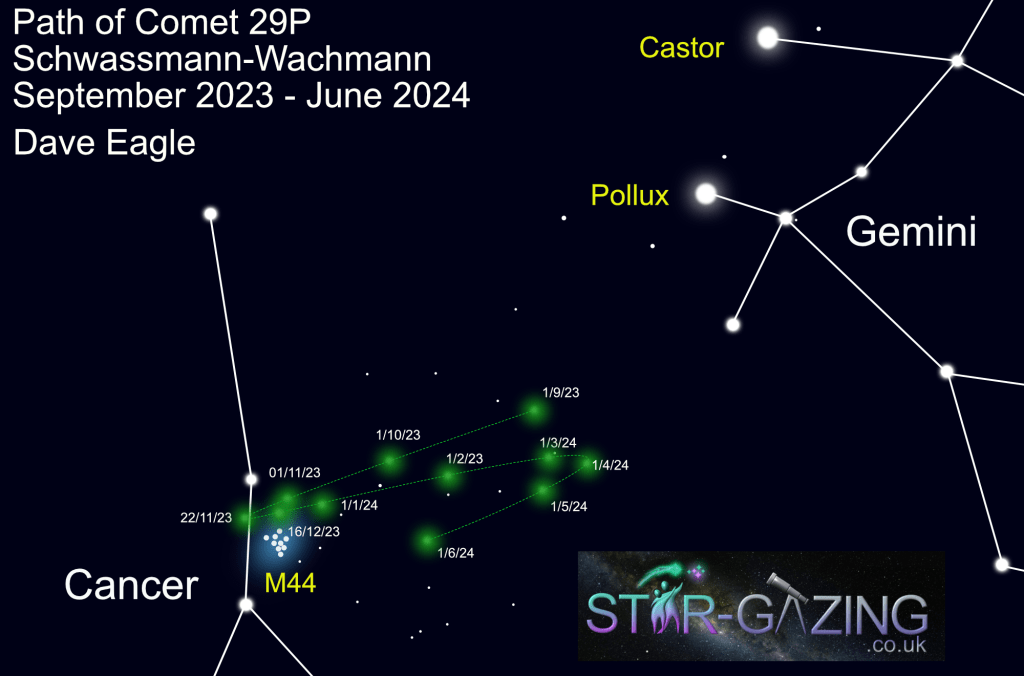
The comet is tracing a slow retrograde loop between Gemini and Cancer.

Over the next couple of months it moves deep into Cancer, passing just north of the bright open star cluster Messier 44, The Beehive, during November and December, when it starts moving retrograde from the 11th of November.

At the end of March and the beginning of May it reverses direction again and starts it’s proper motion.
By this time, the comet is getting lower in the western sky.

The First Quarter Moon will be close by on the 15th of May.

Please Note: The comet looks bigger and brighter on my map than it will be in reality.


Comet-29P-SW-Oct2023-Mar2024

Comet 2P / Encke

There are three comets to look out for the next few months and into next year.

These are, Comet 2P / Encke, 29P / Schwassman-Wachmann and 103P / Hartley 2.

Here’s the details and map for Comet 2P / Encke.

Comet 2p / Encke.
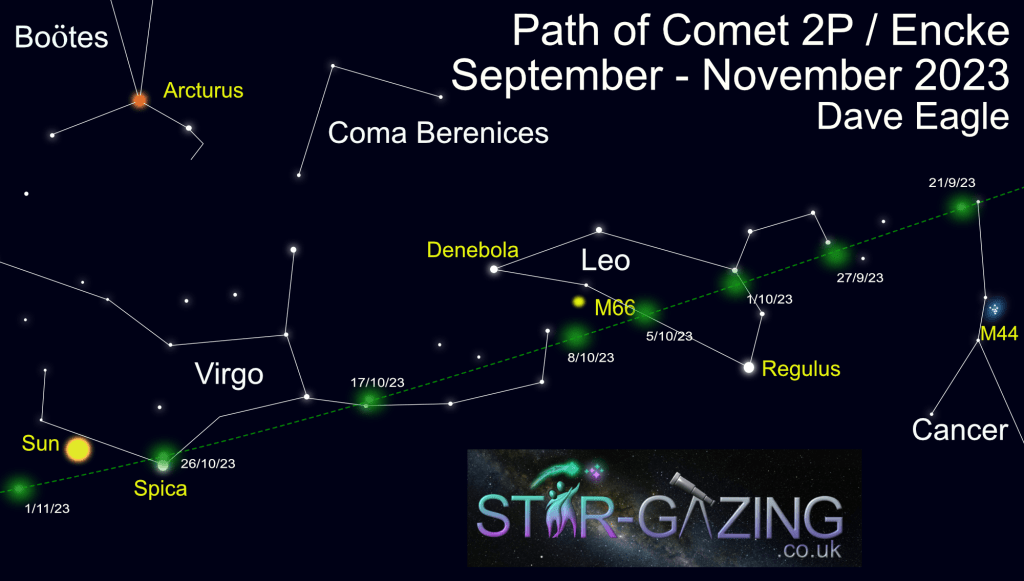
This comet is currently moving from the northern part of Cancer into Leo.
It is currently about 10th magnitude, so is a relatively easy target for astrophotographers.
It has an orbital period of 3.3 years, and comes to perihelion on the 22nd of October, when it could get as bright as 7th magnitude.

The comet passes a few distinct stars and objects as it approaches perihelion and will be visible in the early morning sky.
On the 27th of September, it lies close to the 3rd magnitude star Ras Elasid in the top of the Sickle of Leo.
The comet passes close to the 3rd magnitude star Gamma Leonis, Algeiba in the neck of Leo on the 1st of October.
It passes through the lower part of Leo on the 5th of October, passing south of the spiral galaxy Messier 66 on the 8th of October.
But it is getting a lot lower in the pre-dawn sky and starting to move down into the light of dawn.
The comet speeds up as it approaches The Sun as it moves into Virgo. The comet is soon lost in the bright morning sky.
On the 26th of October, it lies very close to the first magnitude star Spica, 4 days after perihelion, but there’s no chance of seeing anything as The Sun isn’t that far away. I added the position of The Sun on the 26th.
We will not be able to spot it when it comes out the other side of The Sun, as the orbit of the comet keeps it fairly close to The Sun as seen from Earth for quite a while, so we are unlikely to catch up with this comet again until at least July next year.

Yes, I have exaggerated the size of the comet in my map. It won’t be anywhere near as big as it is shown here.

Comet-2P-Encke-Sep-Nov2023-2


Jupiter & Uranus

Jupiter is very prominent in the night sky at the moment.

It rises late evening in the northeast and is almost at its highest very high in the south just before dawn.
It is so bright you cannot mistake it for anything else, much the brightest object in the night sky at magnitude -2.7.
Until Venus rises in the early hours, which is much brighter at magnitude -4.57.

Jupiter reaches opposition on the 3rd of November when it will be closest to Earth and at its biggest and brightest at magnitude -2.9 for the year.
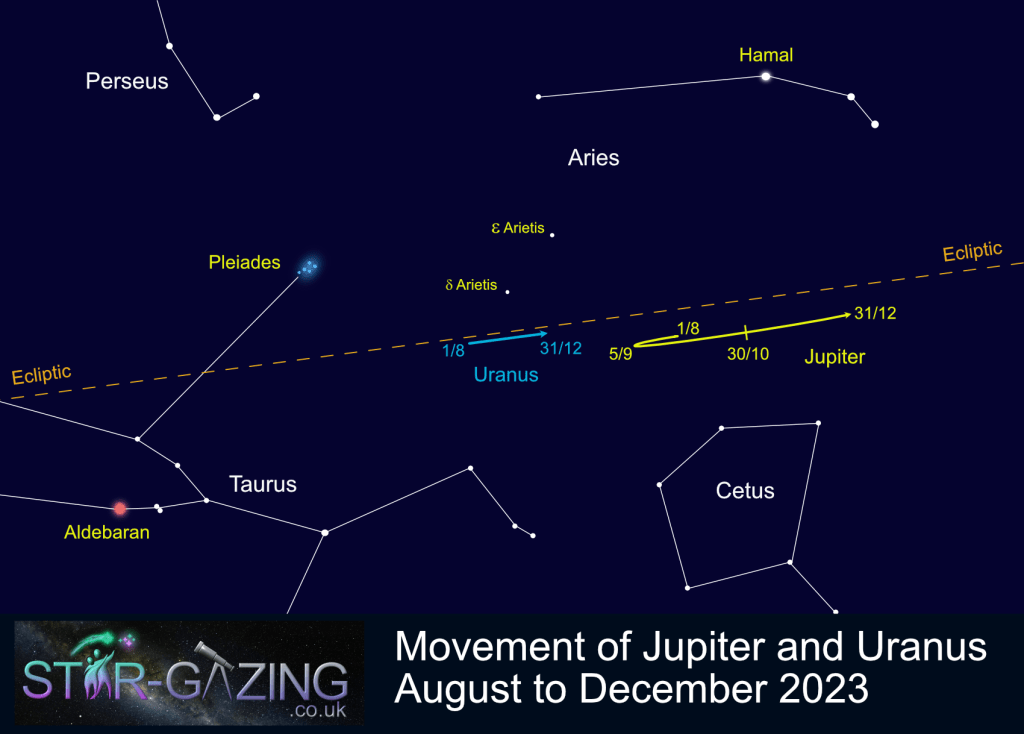
In the diagram below, I have plotted the path of Jupiter from the 1st of August to December the 31st, shown in yellow, just south of the ecliptic as it moved through Aries.
Jupiter is now moving retrograde (east to west) as the Earth overtakes it.

Not far away to the east of Jupiter is the much fainter distant ice giant Uranus, also in Aries.
This is much fainter at magnitude +5.4, so will require binoculars or a small telescope to identify it.
A telescope reveals it as a very small blue-green disk.

Uranus, which reaches opposition on the 13th of November is also moving retrograde.
I have shown its path as a blue line, just south of the 4th magnitude star Delta Arietis, which will help guide you to it.

Jupiter-Uranus-Sept-Dec-2023

Comet C/2023 P1 (Nishimura).

This bright comet is starting to get quite exciting.

It is currently (7th September 2023) visible low in the north-eastern sky just before sunrise as it moves through the constellation of Leo and it is brightening.

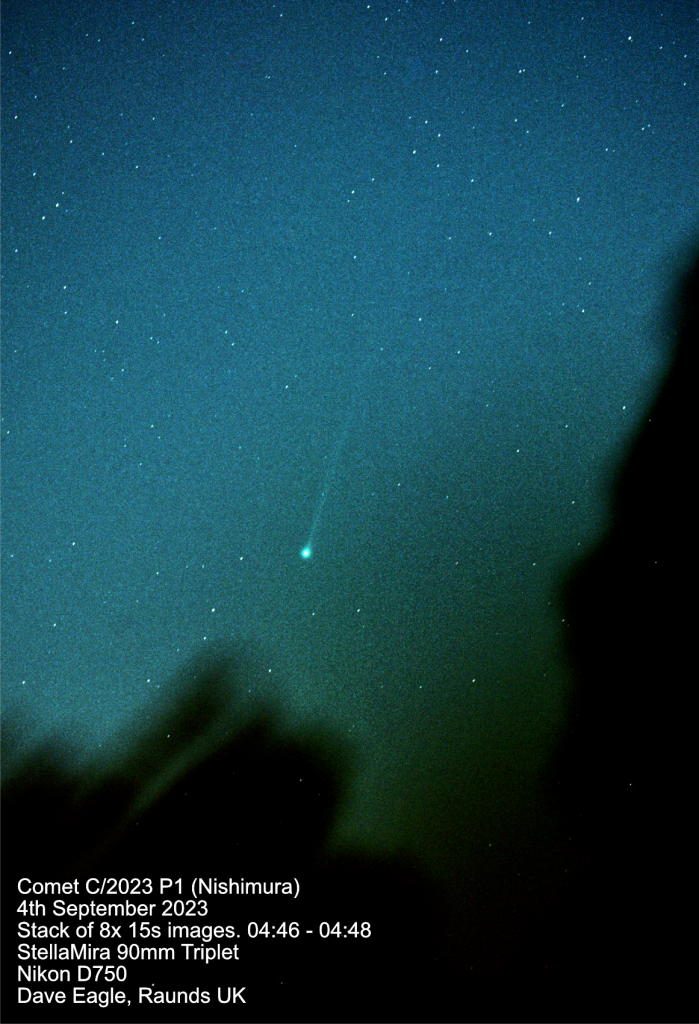
I captured this image of it on the morning of the 4th of September.

.C_2023-P1-2-Luminance-session_1-2-Web

Currently at magnitude +5.8 the comet is theoretically just becoming bright enough to be visible to the naked eye.
But as it is in deep twilight at that time of the morning so it is best viewed with binoculars or a small telescope.

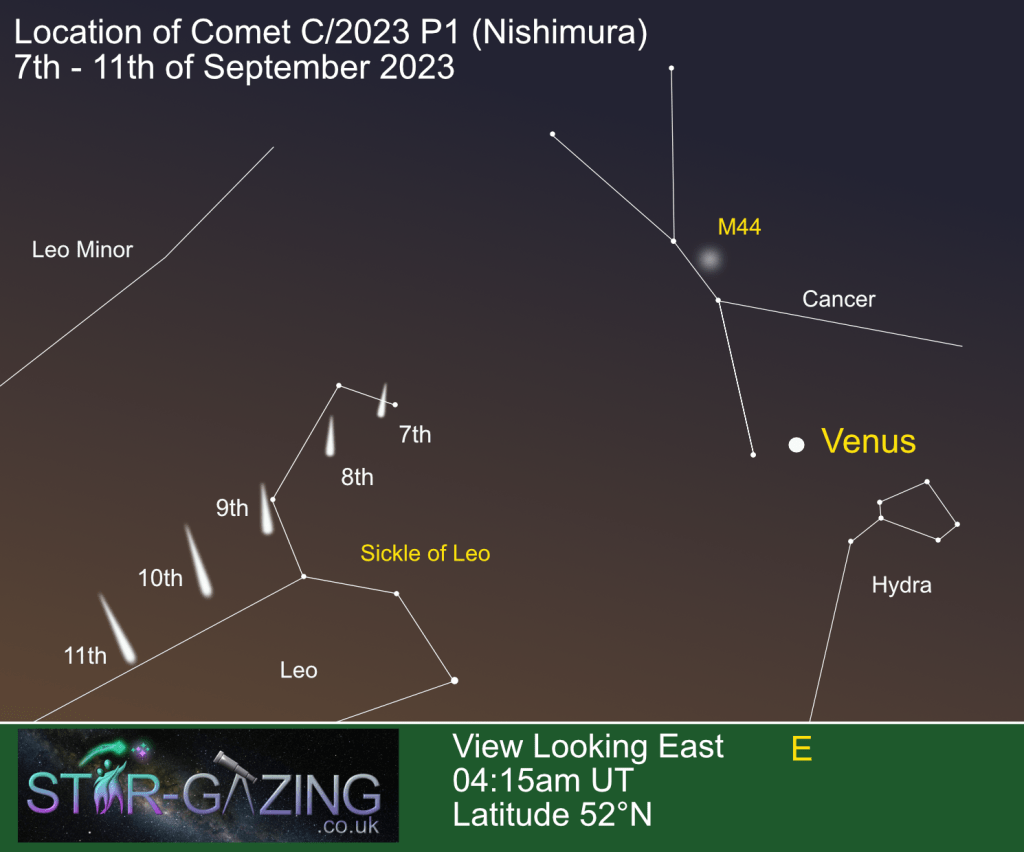
This finder chart shows the path of the comet in the morning sky from the 7th to the 11th of September 2023.
It is getting lower in the sky each morning but is brightening and getting bigger as it approaches perihelion on the 17th of September..
Click on the image for a bigger view.

Nishimura-Finder-Chart-7th-11th September 2023

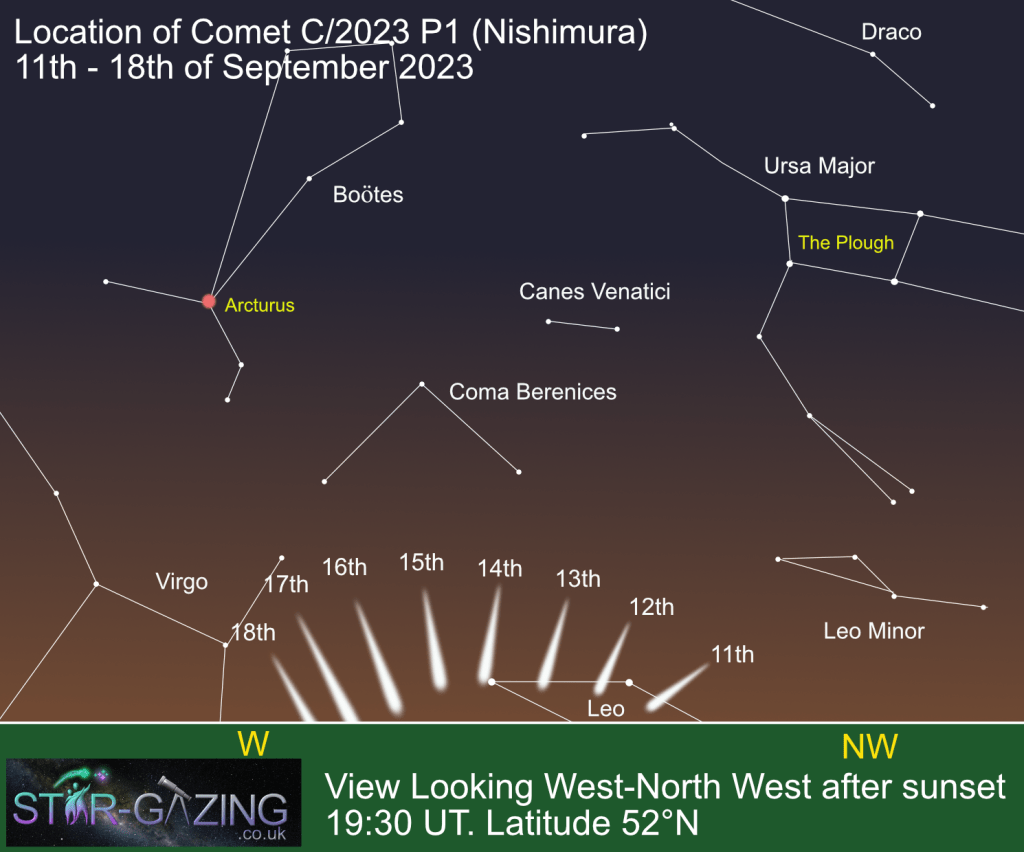
From around the 11th, Comet Nishimura will now be visible in the evening sky, low in the West-North-Western sky just after sunset.
It will set very quickly after the Sun though, so get out and make the most of it as the sky darkens before it sets.
If the tail is long and bright enough, this could be visible long into the darker sky after the nucleus of the comet has set.

This finder chart shows the path of the comet in the evening sky from the 11th to the 18th of September 2023 as it passes from Leo into Virgo.
Click on the image for a bigger view.

Nishimura-Finder-Chart-11th-18th September 2023

It will be even lower in the sky at that time, but just how bright will the comet get, and how long will that tail be?

The great thing about comets is that we just do not know, they can be very unpredictable.
It is predicted to achieve just greater than 3rd magnitude, and the tail has already been imaged extending up to 10° degrees.

The only way to make sure to see what happens is to get out and have a look and if it does perform, we could be in for a real treat.

Whatever happens, Enjoy!

Keep Looking up (but fairly low down for this one).

Dave


Supernova 2023ixf in Messier 101

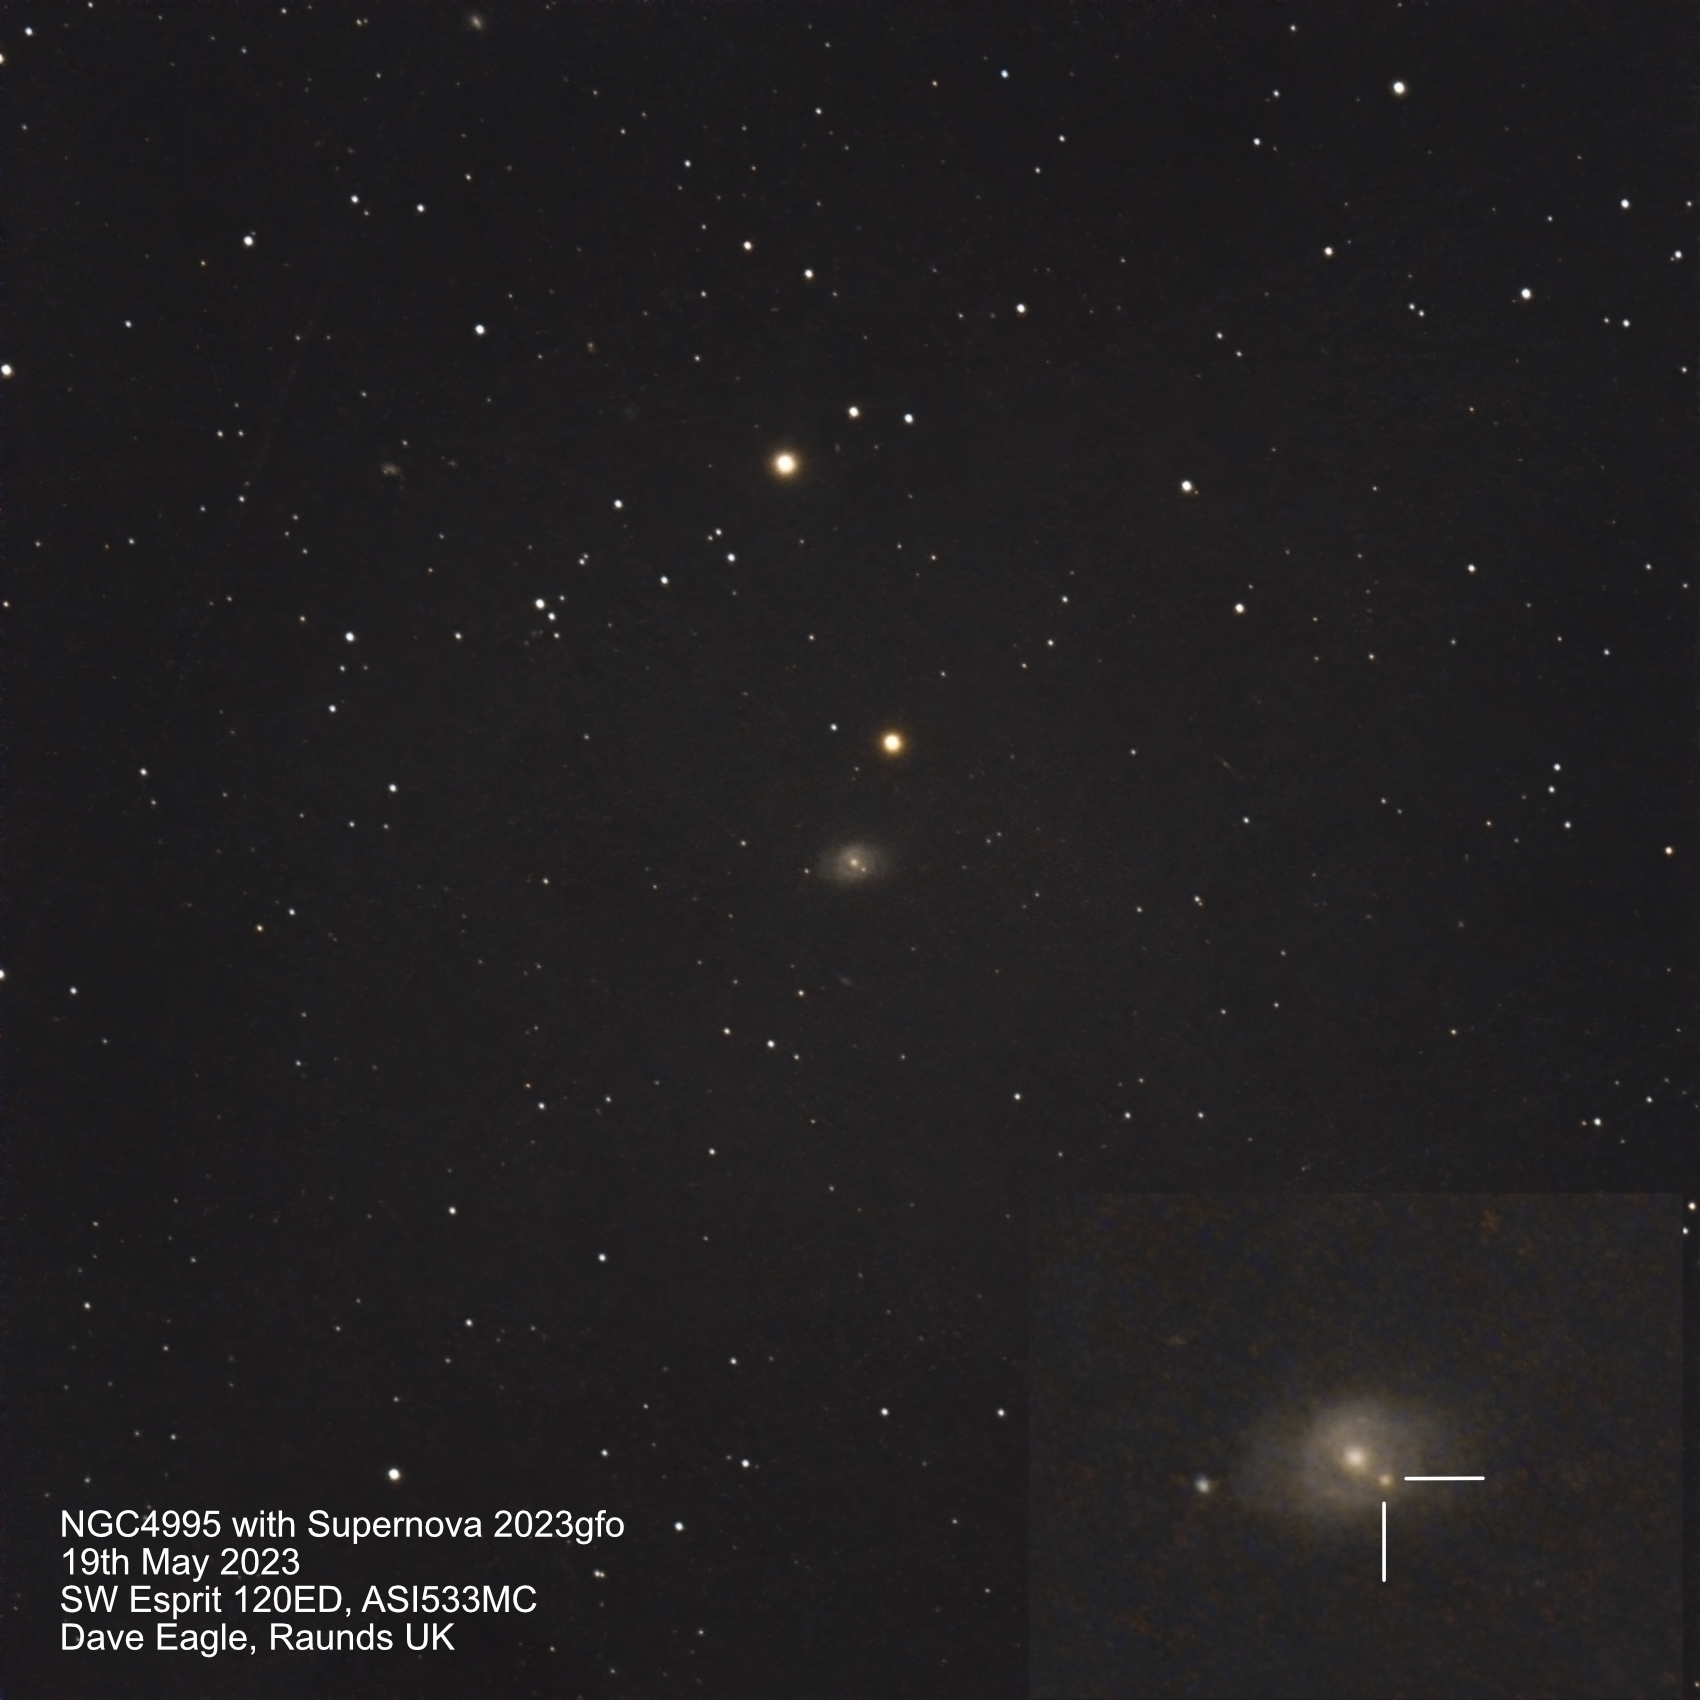
ON the 19th of May, I was taking an image of a supernova in a distant galaxy NGC 4995.

The results of that image is below.

While processing the image the next morning, I learnt that another supernova had gone off in the spiral galaxy Messier 101 in Ursa Major. The last time I imaged a supernova in this galaxy was in September 2011, but my images I took then left a lot to be desired with the equipment I had at that time.

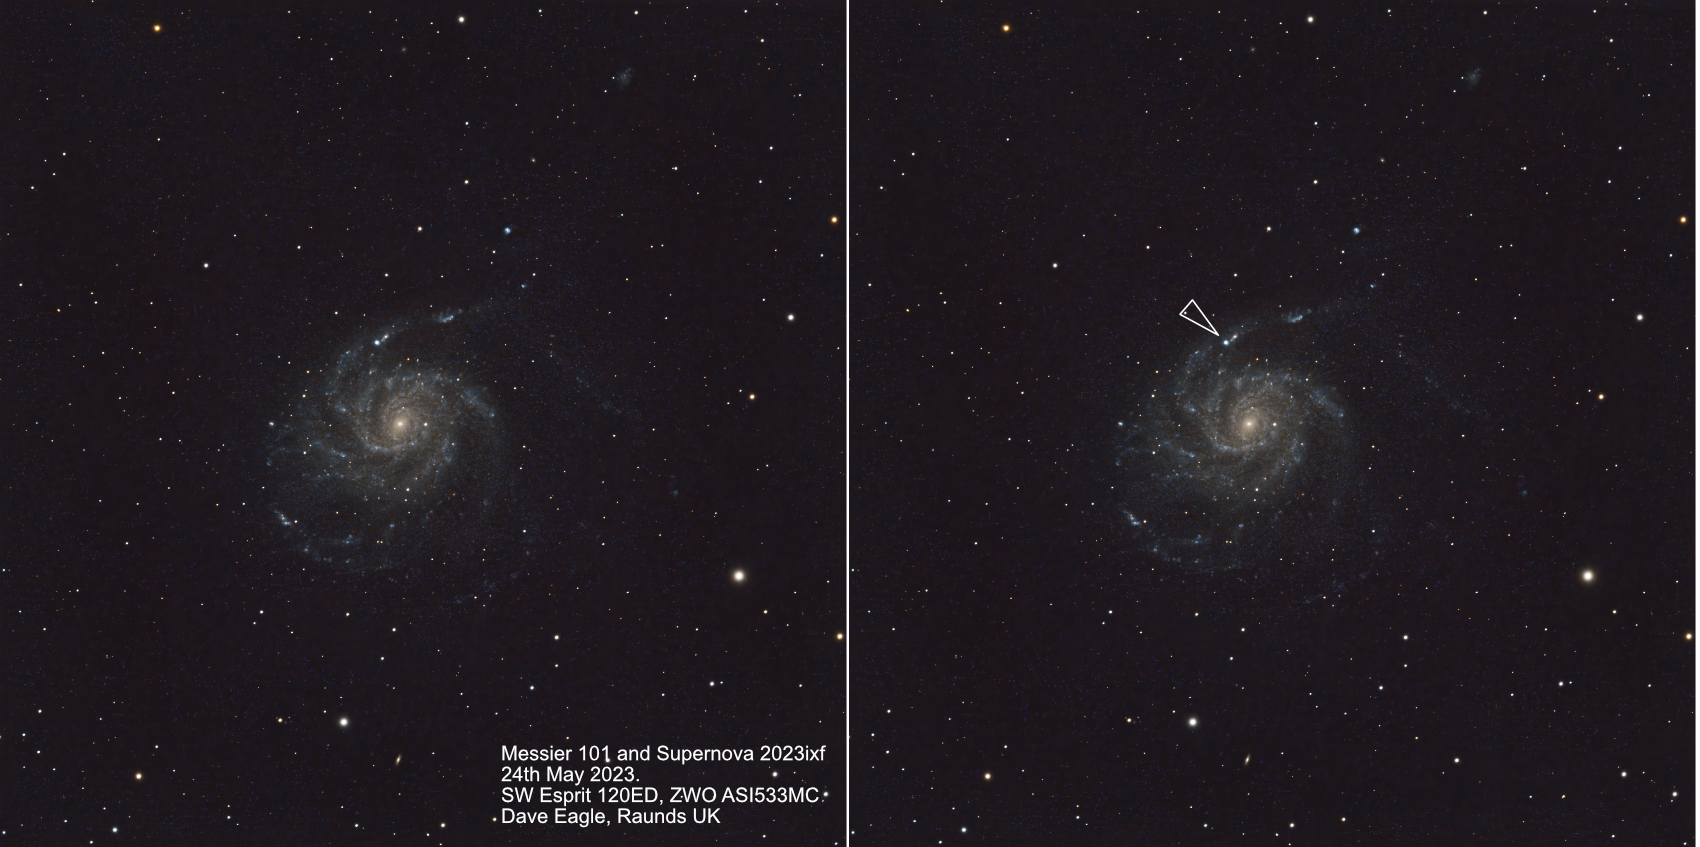
I had to wait a few days for clear skies, but, clouds finally permitting, I got a decent image on the evening of the 24th of May, using a one-shot colour camera.

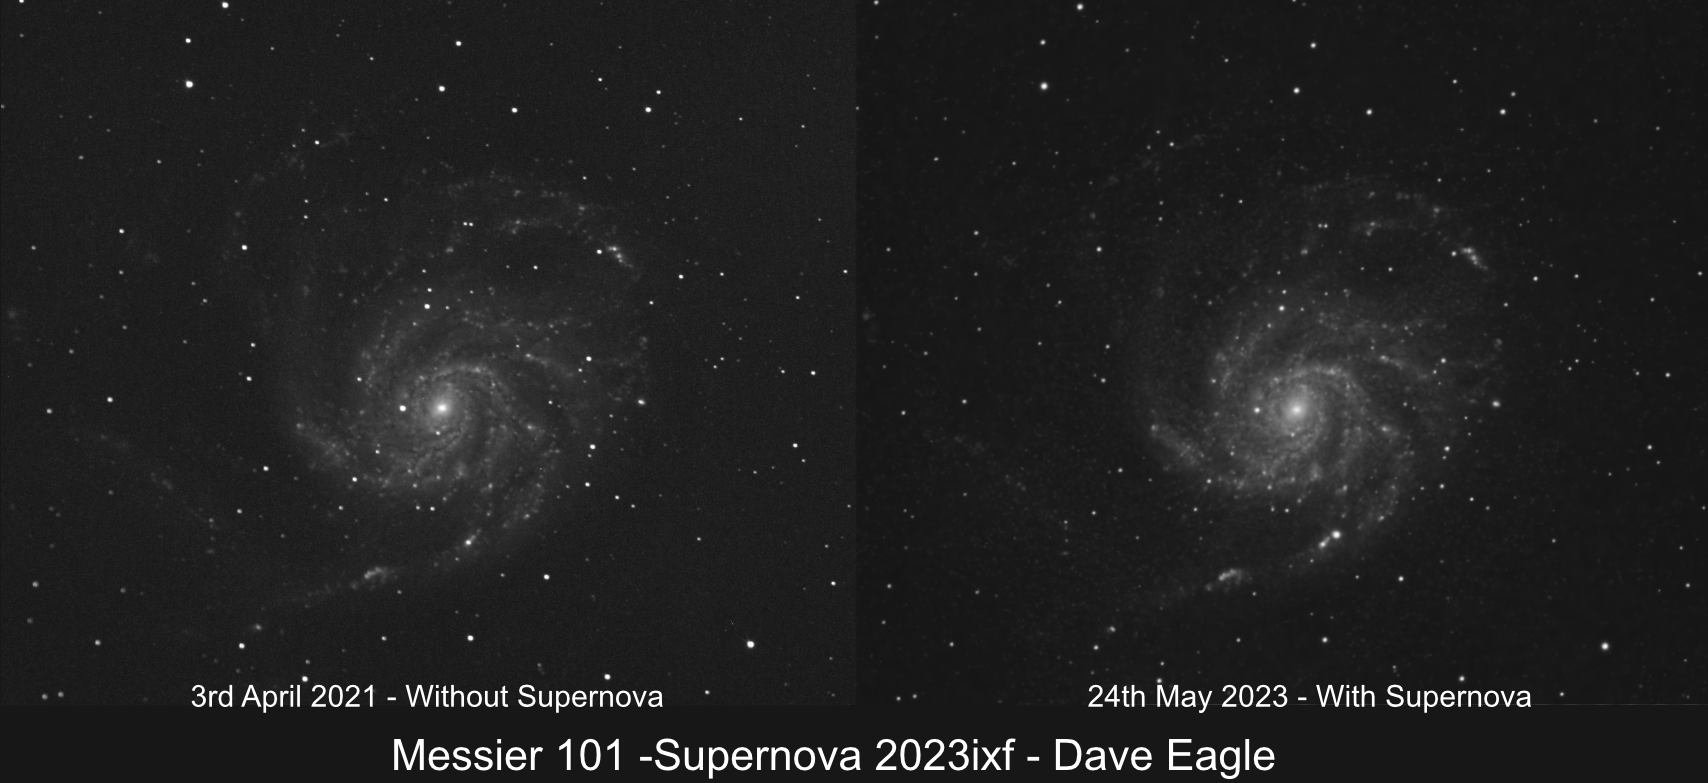
Trawling through my previous images, I had another fairly decent monochrome image taken on the 3rd of April 2021.
I have placed the two images together below.

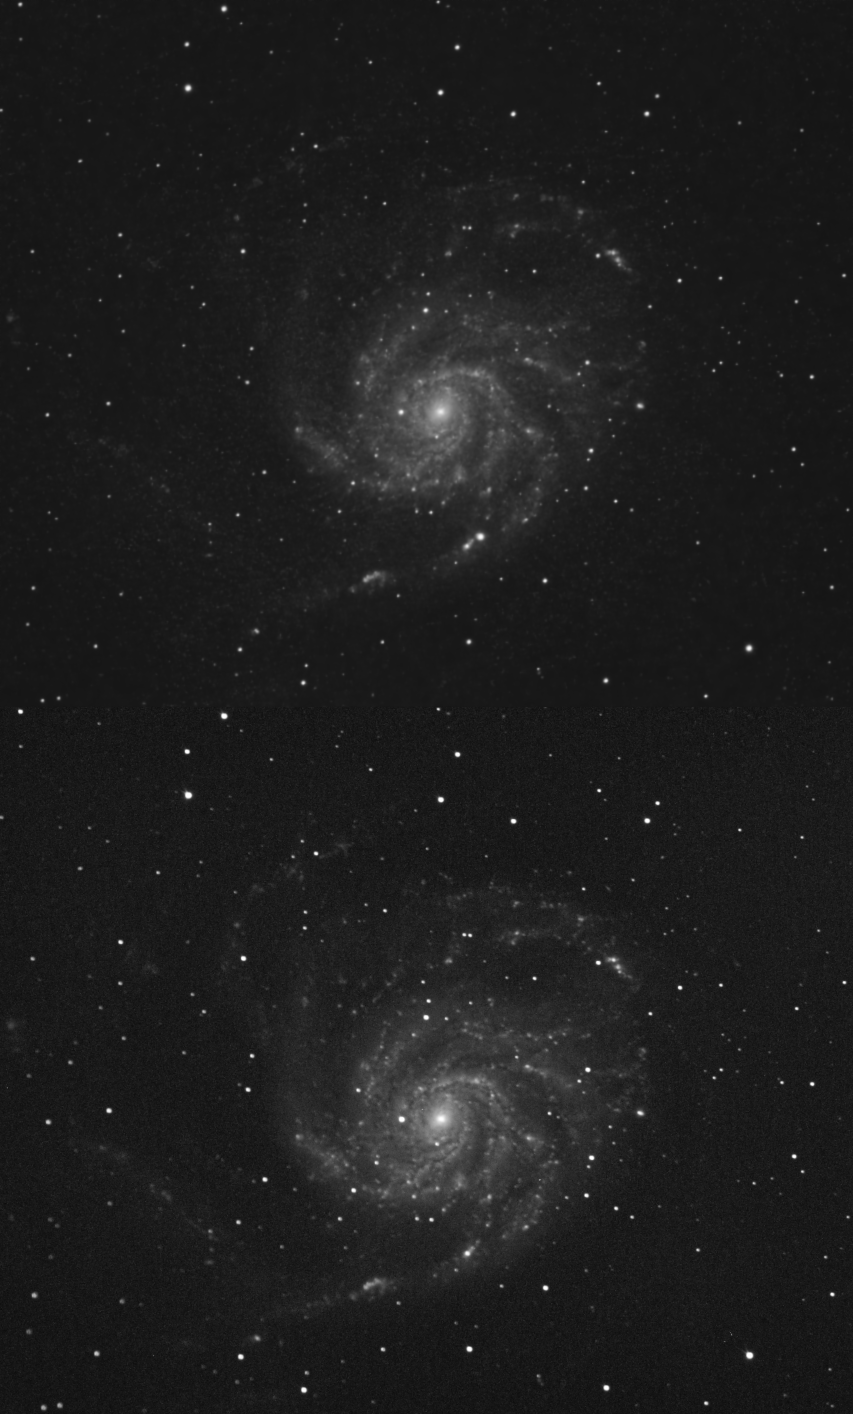
I then made an animation of the two images to show the difference.

So what are we seeing?
The supernova was a massive star, much, much bigger than our Sun.

It has come to the end of its life, running out of fuel.

As the pressure from within the star has lessoned, the mass of the star is no longer supported.
Once this outward pressure stops, gravity becomes the over-riding force, pulling the stars mass toward the core.
The star collapses onto itself, producing a massive implosion.

The resulting massive shock waves rip through the star where it explodes in energy as the star is ripped apart.

It becomes a type II Supernova, outshining the galaxy itself, which is composed of at least 100 billion stars. 🤯

As if that isn’t enough, let’s get our head around more.
Messier 101 lies 21 million light years away from Earth.
So the supernova actually occurred 21 million years ago.
Light from the galaxy and supernova, travelling at 186,282 miles per second, is only just reaching after all that time.

This galaxy is also a relatively near neighbour compared to many we can see in the night sky.

It’ll be interesting following this over the next few weeks or months to watch as it fades back into oblivion.


Testing ZWO’s AM5 Harmonic Mount

We are seeing a revolution, or even a series of revolutions in our hobby, with “Smart” telescopes, ever better optics and the new Harmonic mounts.

Harmonic (or Strain Wave) Mounts really are a very different experience from traditional equatorial mounts.

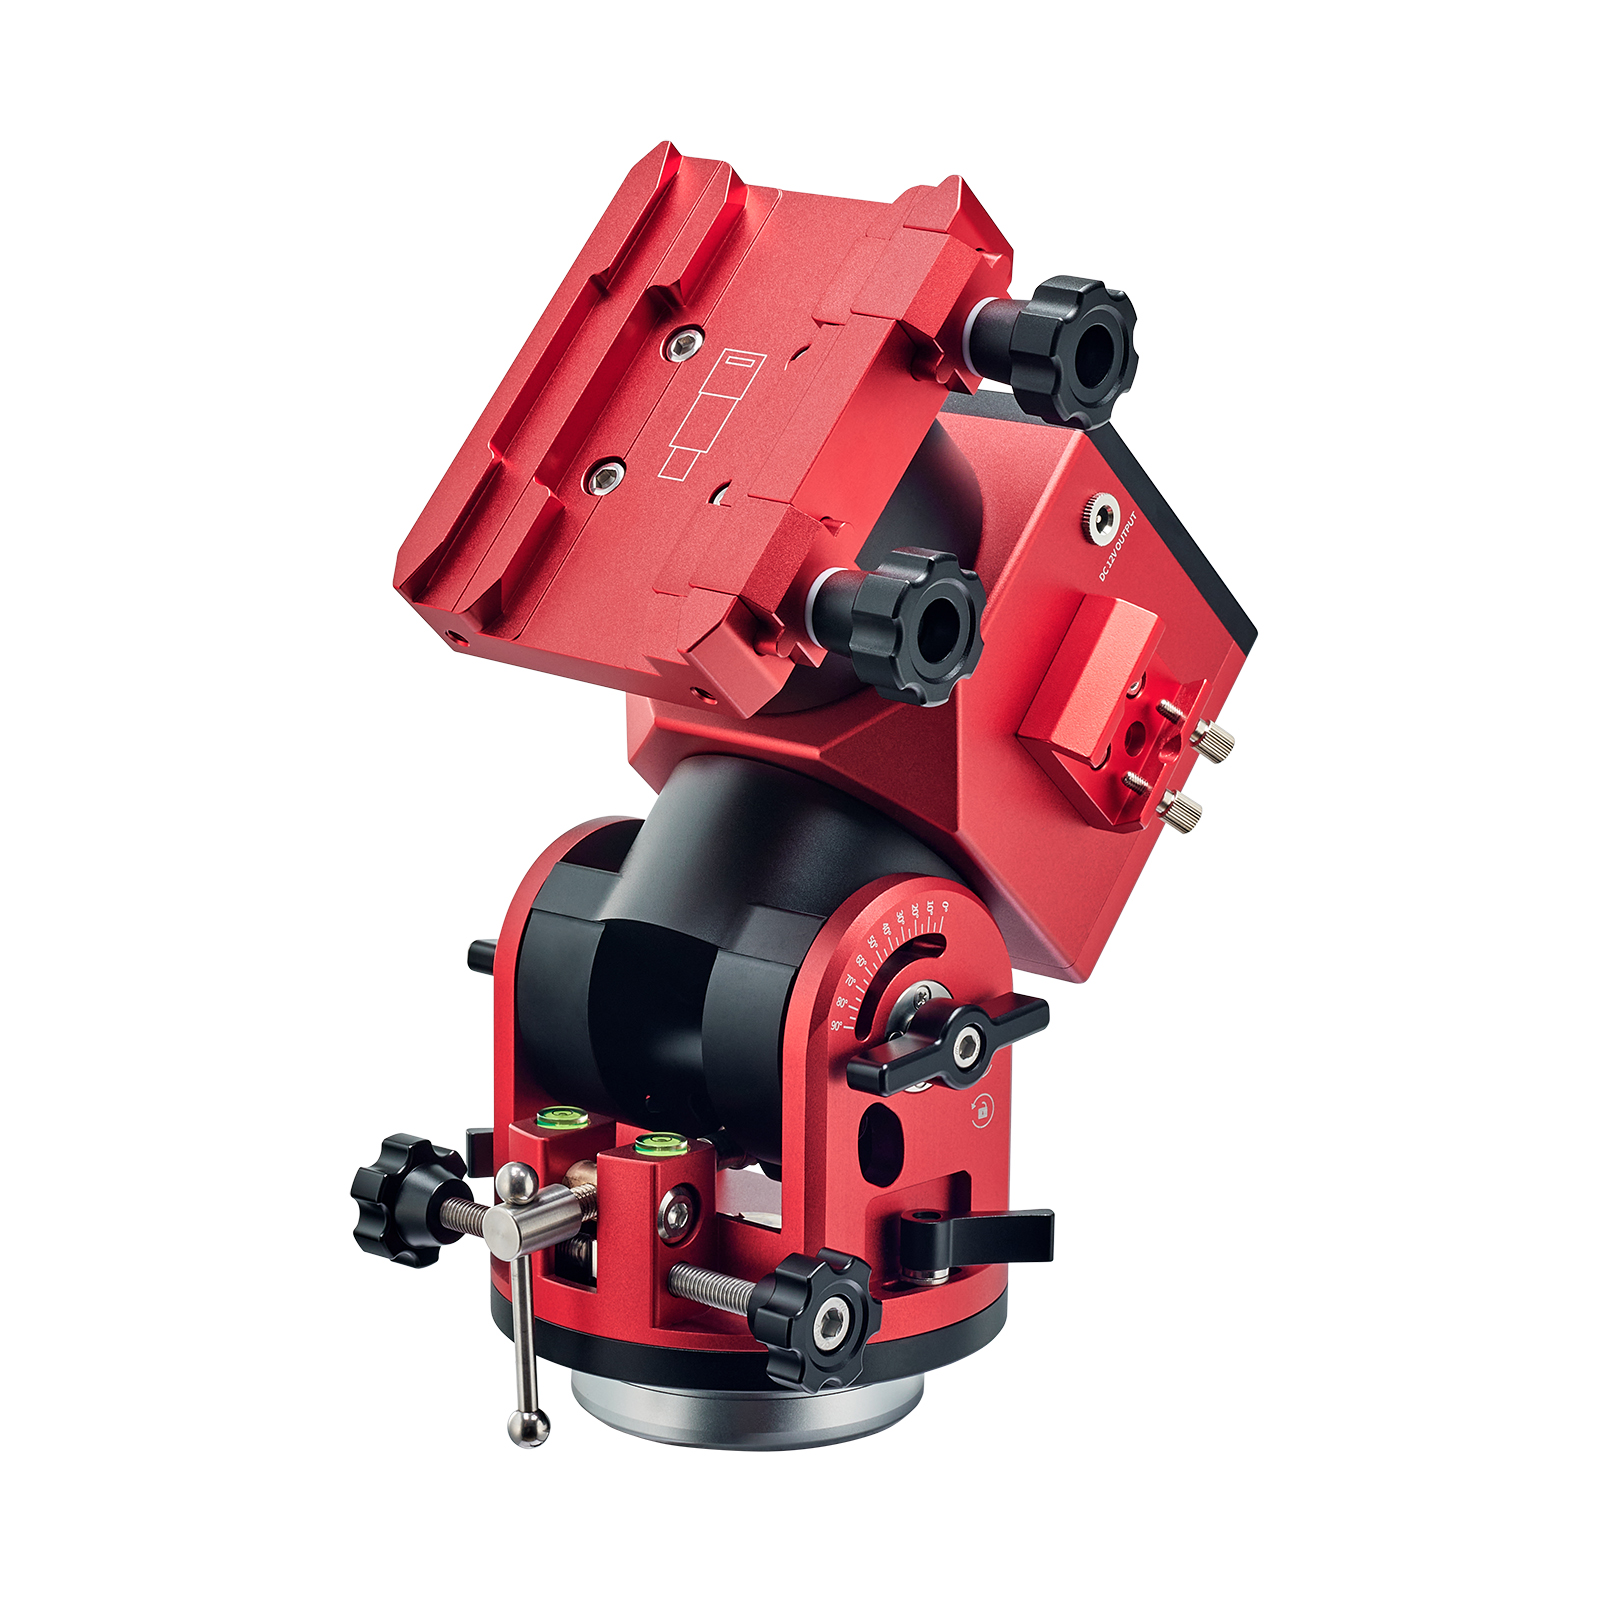
I was fortunate enough to be allowed to test ZWO’s AM5 mount, courtesy of First Light Optics.

The mount also came with the TC40 carbon fibre tripod.
This comes with a change of metal feet, for use on different surfaces.
In the specs, ZWO claims that this amazingly lightweight tripod, at only 2.3kg, can support a payload of up to 50kg. 😲
Being so lightweight, it would be excellent for travelling, but it is still quite low, even when the legs are fully extended.
There is a Pier Extension available if you need the setup to be higher.

ZWO also claim that weighing just 3.9kg, the AM5 itself has a payload of 8kg-13kg without requiring a counterweight.

For such a lightweight mount and tripod, I really wanted to put it to the test, both for imaging, payload and focal length.

It easily managed my Sky-Watcher Esprit 120ED imaging rig, which is just under 13kg.
I got some very nice images of the recent comet using it, even managing to get it to auto-guide on the comet itself, as it was bright enough to be seen in the guide scope.

So far so good. The mount is easy to carry about, set up and use and so far has performed beautifully.
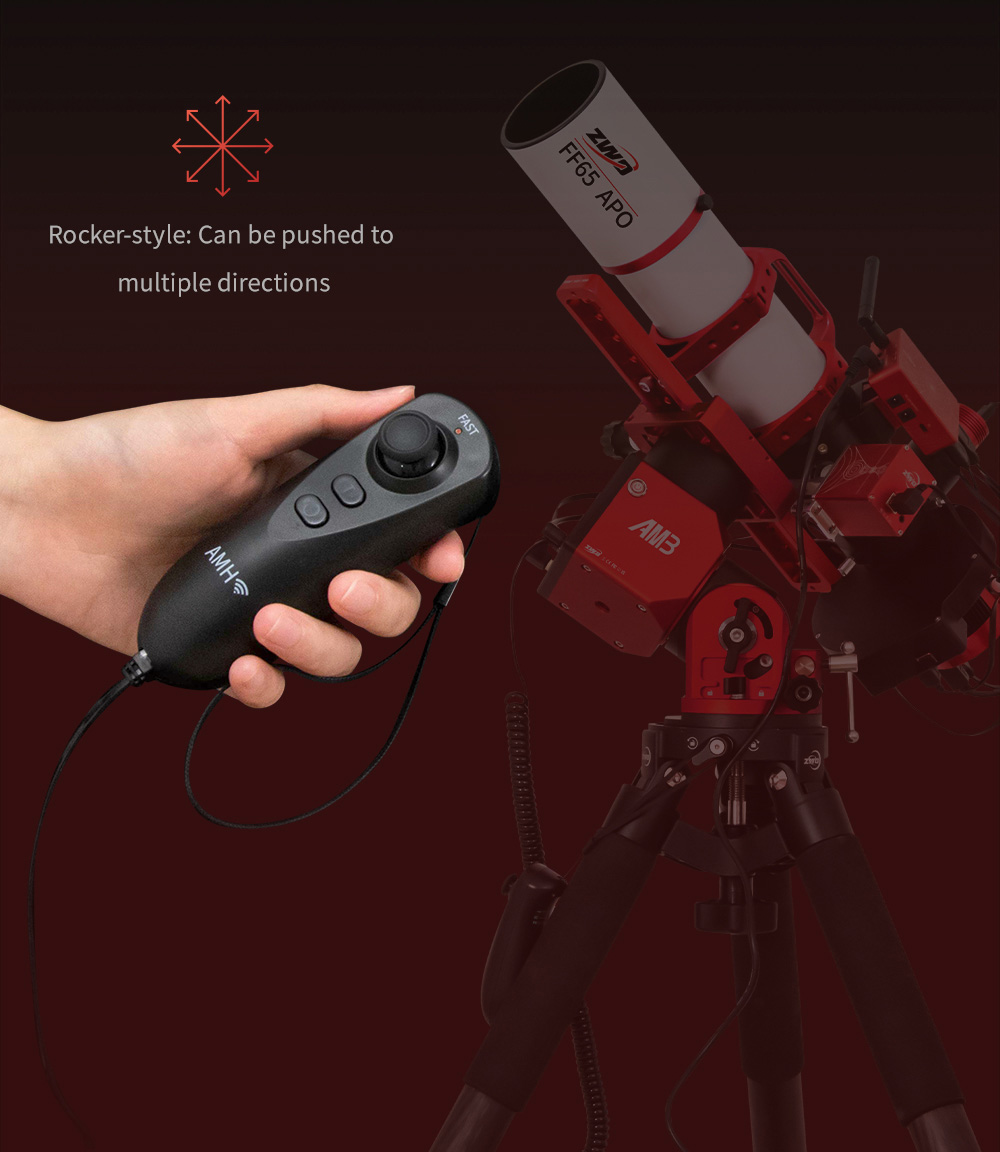
The handset disposes of the traditional screen, just a couple of buttons and a joystick and is a joy to use.

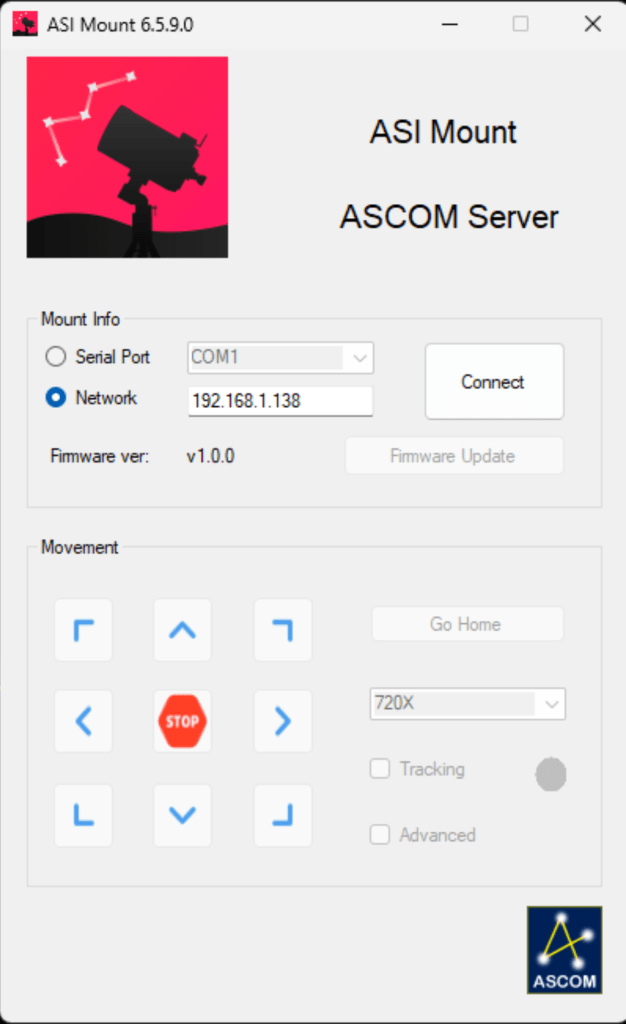
As expected, I found that I could get everything working nicely together with the ASIAIR, but also using a USB cable to the PC, with just a few clicks was being controlled using various planetarium software via ASCOM. The ASI mount app for a smartphone or tablet is also extremely good and very easy to use.

Using the built in WiFi, I could also attach it to the ASIAIR and my home network, so every device on my network could connect to and operate the mount if needed without having to use any wires.

ASI-Mount-ASCOM

As with most ZWO products I’ve had a play with so far, it just flipping works. 😃

If I was being picky and looking for a niggle, the mounts WiFi will not work unless the handset is attached to the mount.
But that’s not too big an issue.

ZWO recommend that the AM5 is suitable for imaging with scopes of up to 900mm focal length, so I really wanted to put it to the test. All the scopes I have used so far on the mount were of shorter focal length than this.

My Celestron C11 has a much longer focal length of 2,800mm, so this would really test the mount well beyond the recommended limits.

The C11 weighs a little over 13kg. So with the guide scope and cameras attached, it was above the mounts 13kg payload.

If a counterweight is added, the payload of the AM5 can be increased to 20kg.

Making the tripod heavier, by adding a weight to the weight bag (supplied with the tripod) will help, but to be safe a counterweight shaft and counterweight is recommended.

Unlike conventional mounts, there is enough torque in the gears not to have to counterbalance the scope as is tradition.
So why add a counterweight?
If a heavier payload is put onto the mount, when the scope is over to one side, and too much weight is over to one side of the centre of balance, the tripod could tip over.

With Harmonic mounts, you really do have to get into a different mindset about getting the scope balanced correctly.
You just don’t need to.
In fact, because the axes of the mount are not moveable manually, it is impossible to even try to get the scope balanced in the traditional sense.

But it does take a while to get your head around that. Old habits die hard.

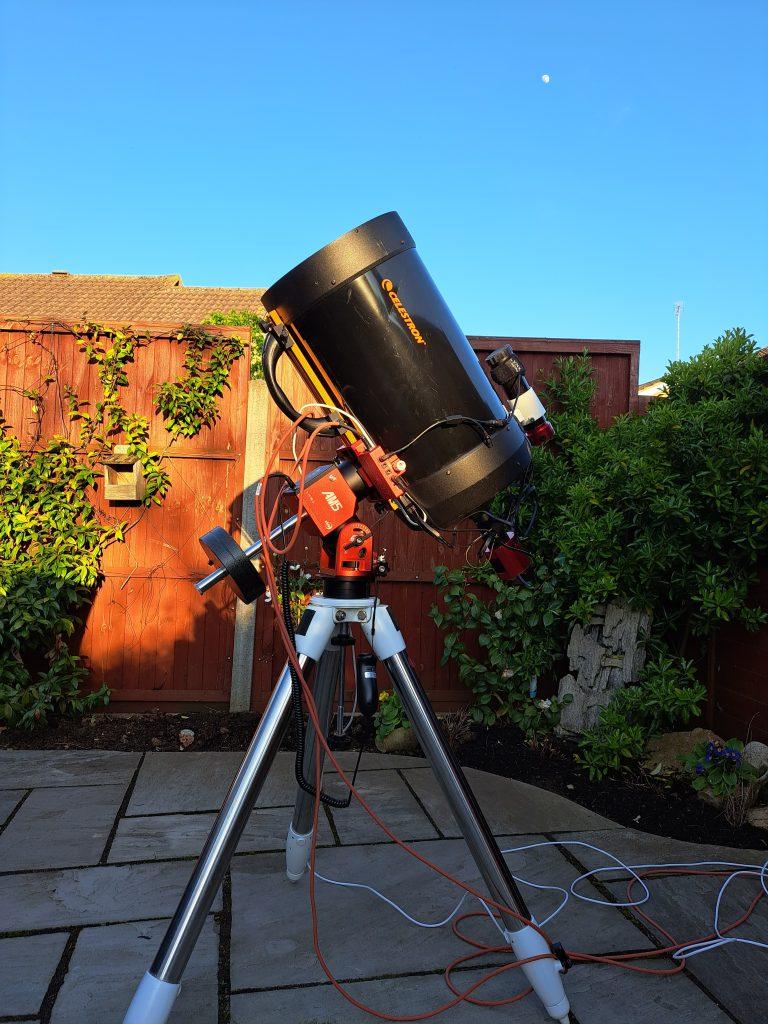
After adding the counterweigh shaft, I put on a 5kg counterweight, so I could mount my C11 for a very long focal length test of the AM5’s guiding.
I also put the mount onto my EQ6 tripod to give it extra stability (and a bit more height for convenience).

C11-AM5-20230501_191927I then managed to get the mount polar aligned using the ASIAIR PA routine.
This was a challenge in the bright twilight, but adding a larger chipped camera helped me obtain a wider field of view with the scope.
How accurately did I polar align?
Well, I got close enough to polar alignment, within less than a degree, but I wasn’t going to spend loads of time getting this absolutely exact. If you want to see my view on achieving very accurate polar alignment, see my post Here

I set the ASIAIR to take a series of images of different lengths to see how long the mount would track for without producing star trails.

I also purposely used the simplest and shortest focal length guide scope I had, a converted Sky-Watcher 9×50 finder.

While imaging, the guiding figures were between 0.2 and 0.7, which was excellent.

But of course, the real test is always in how the images looked.
Was there any star trailing? No there wasn’t.
So all was going well with the 60 second exposures.

That night I was going to do progressively longer exposures, to see how long it could successfully guide for, but this was soon ruined by the clouds rolling back in.

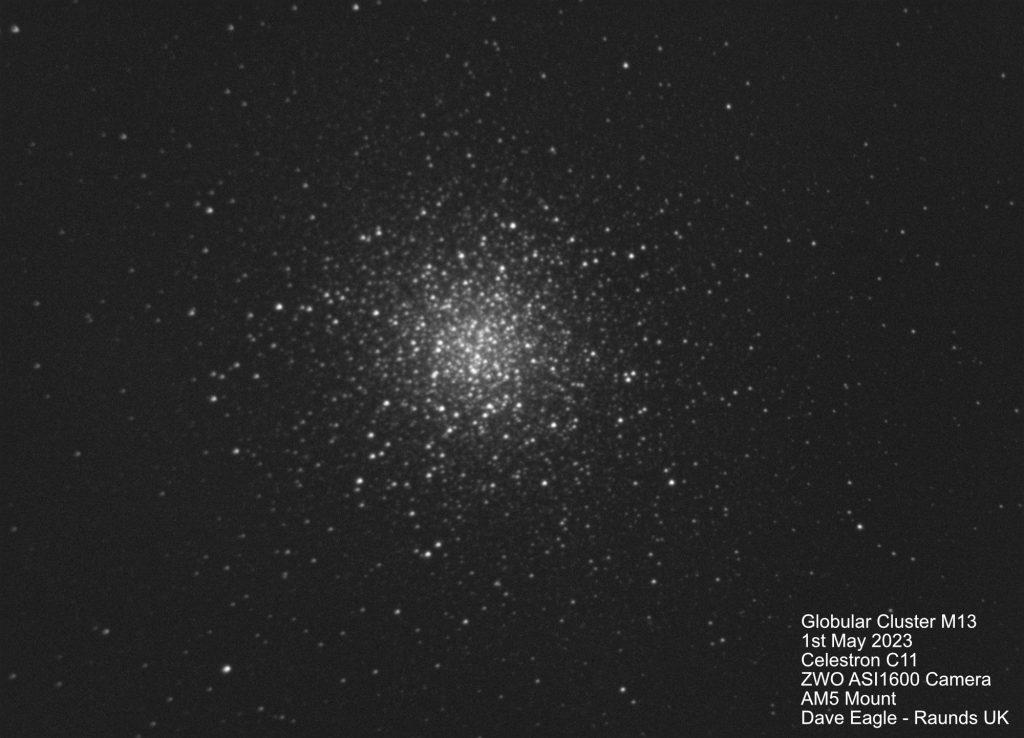
I managed to get 5x 60 second exposures on M13, which was in a clear part of the sky.

This is the result of that stack, with not a star trail to be seen.
So all in all, this mount is certainly exceeding all my expectations.

I wonder if FLO want this back? 😉

I would certainly recommend this mount to anyone in the market for a new mount and if you travel, another added bonus is its extremely portable.
M13-C11-20230501-Annotated


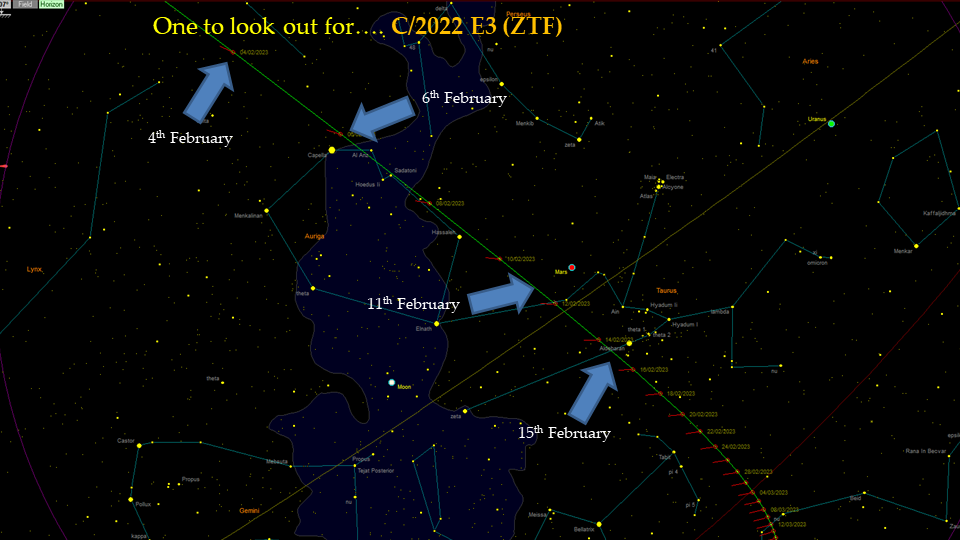
Imaging Comet C/2022 E3 (ZTF)

Comet C/2022 E3 (ZTF) is starting to brighten, and could give us a great display over the next couple of months.
See my previous blog entry here for maps and what we MIGHT expect:

Comet C/2022 E3 (ZTF) Naked eye in the new year?

With this in mind, I thought I would write down the method I use to capture as much detail in comet tails as possible in my images.

C2022E3-ZTF-20230106-Three-Stack-Autosave003

First Problem – A moving target.
As a comet goes round The Sun, it, just like the planets, is constantly moving.
As a comet gets closer to the Sun, its proper motion increases, being at its fastest at Perihelion (closest to The Sun).

When a comet is in closer proximity to Earth, its apparent motion across the sky also increases.
The closest it is to Earth, the greater the apparent motion.
Over the next few weeks the motion of this C/2022 E3 accelerates rapidly, passing Polaris and down through Taurus within a few weeks

Second Problem – A rapidly changing target.
Comet tails are extremely tenuous and in constant change.
Being buffeted by the solar wind, kinks and disconnections can form in the tail very quickly and move swiftly away from the comet.

You can probably surmise by this, that comets are a very active objects. All this movement results in blurring our images.

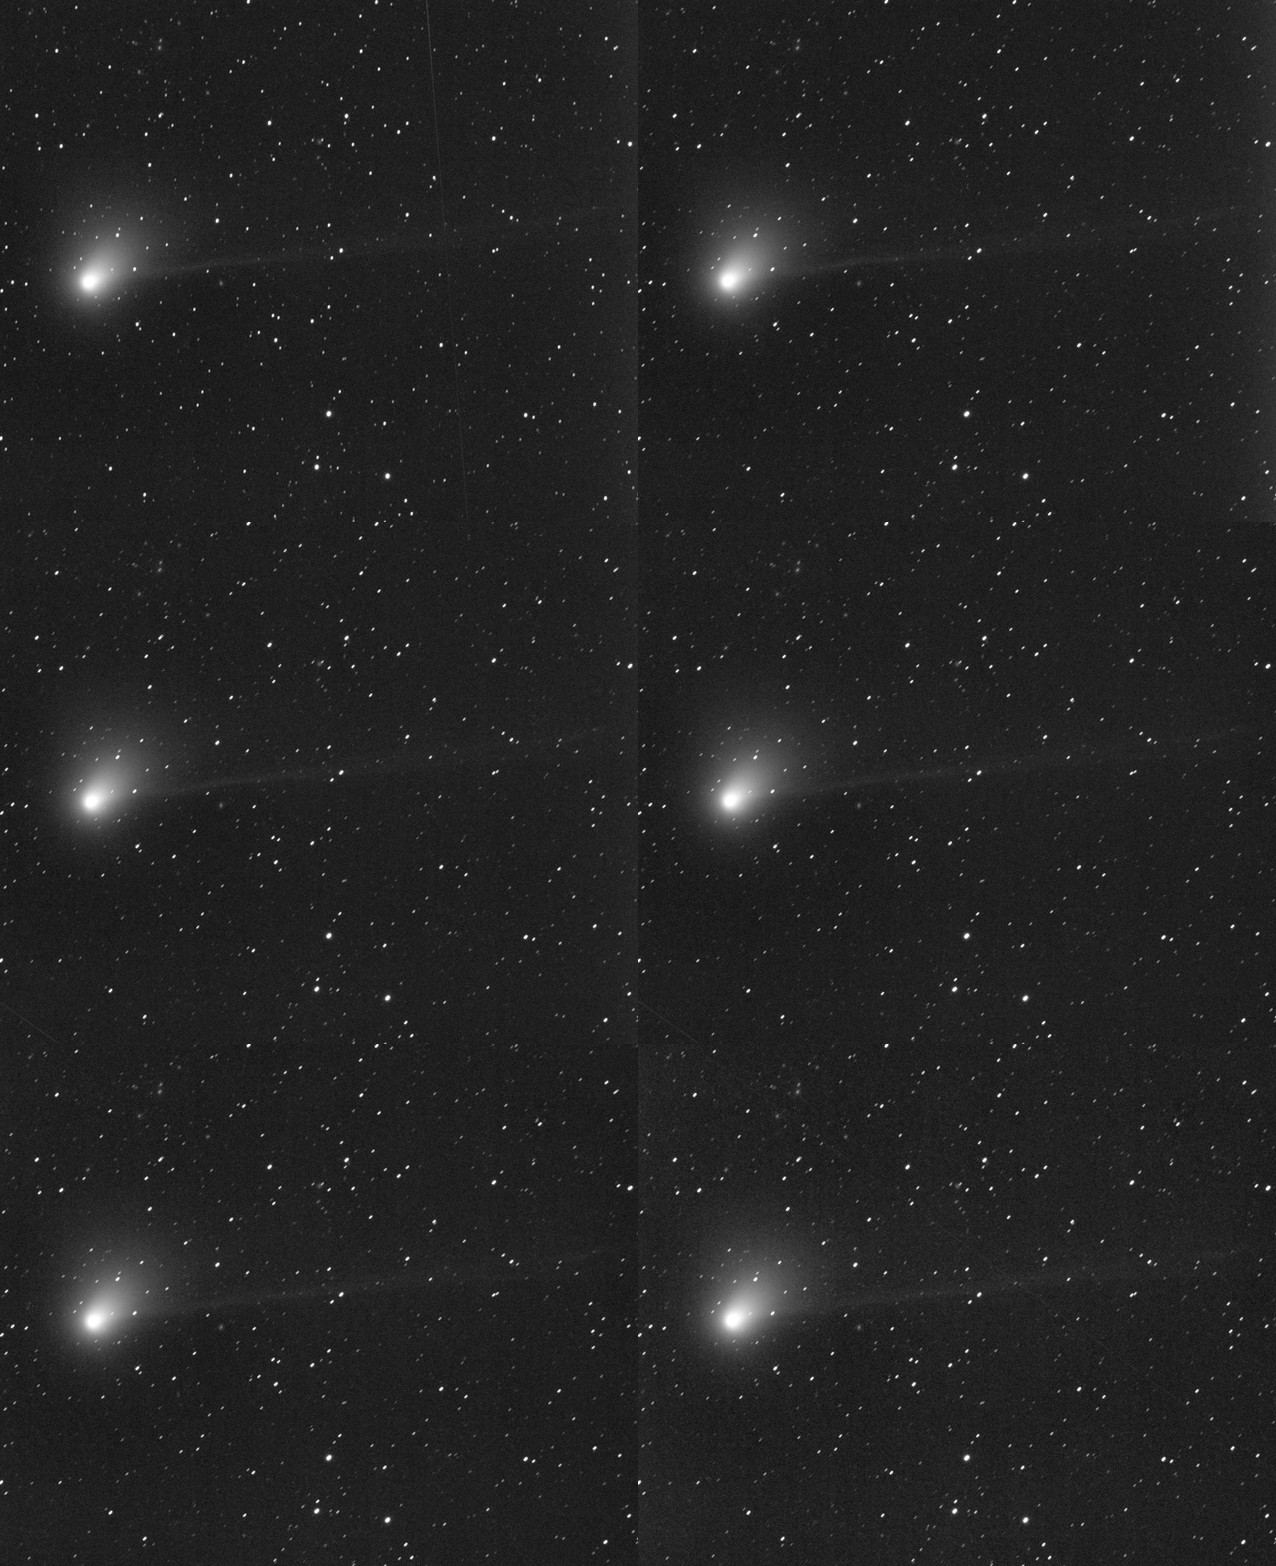
See the animation posted on the 6th of January to see what we are dealing with:


The images used for this animation were taken over just 5 minutes.
You can clearly see the movement of the comet against the stars, and the kinks moving down the faint ion tail.

How can this blurring be avoided?

Cancelling Movement.
The proper motion of a comet gives its own problems. Most auto-guiding systems lock onto background stars.
Any long exposure guided on stars could reveal the comet moving and blurring as it moves in front of the stars during the exposure.

If the comet is bright enough to guide on the comet itself, then this problem is solved.

But if not, the gain on the camera needs to be increased and take shorter exposures to minimise the movement during the exposure.
The shorter the exposure, the less the comet will appear to move.
The faster the apparent motion of the comet, the shorter the exposure you’ll need to freeze its motion.

Experiment by taking various exposures to see which exposure has the sharpest comet image without it trailing.
Once decided on the ideal exposure each captured sub should then have minimum comet movement and reduced blurring.

Freezing Tail Structure.
Details in the tails, especially the Ion tail can change within minutes.
If a kink or disconnection forms in the tails, these move rapidly away from the comet nucleus along the tails length due to pressure from the solar wind.

If a long exposure is taken, or lots of subs are used to stack over a long period of time, detail within the tail will blur in your images as this material moves.

When taking an exposure, or a number of shorter subs to stack later, it is best to leave the interval between start and finish to no more than a couple of minutes.

This will give you the best chance to freeze and capture those ephemeral tail structures.

Stacking Subs.
When stacking images, you really do need to stack on the comets position in each image otherwise the stars will be nicely stacked, but the comet, having moved between each exposure, will appear blurred in the stacked result.

Locking on the comets position and stacking the subs on that freezes the comets motion and draws the stars into trails.
The faster the movement of the comet, the longer the star trails will appear.

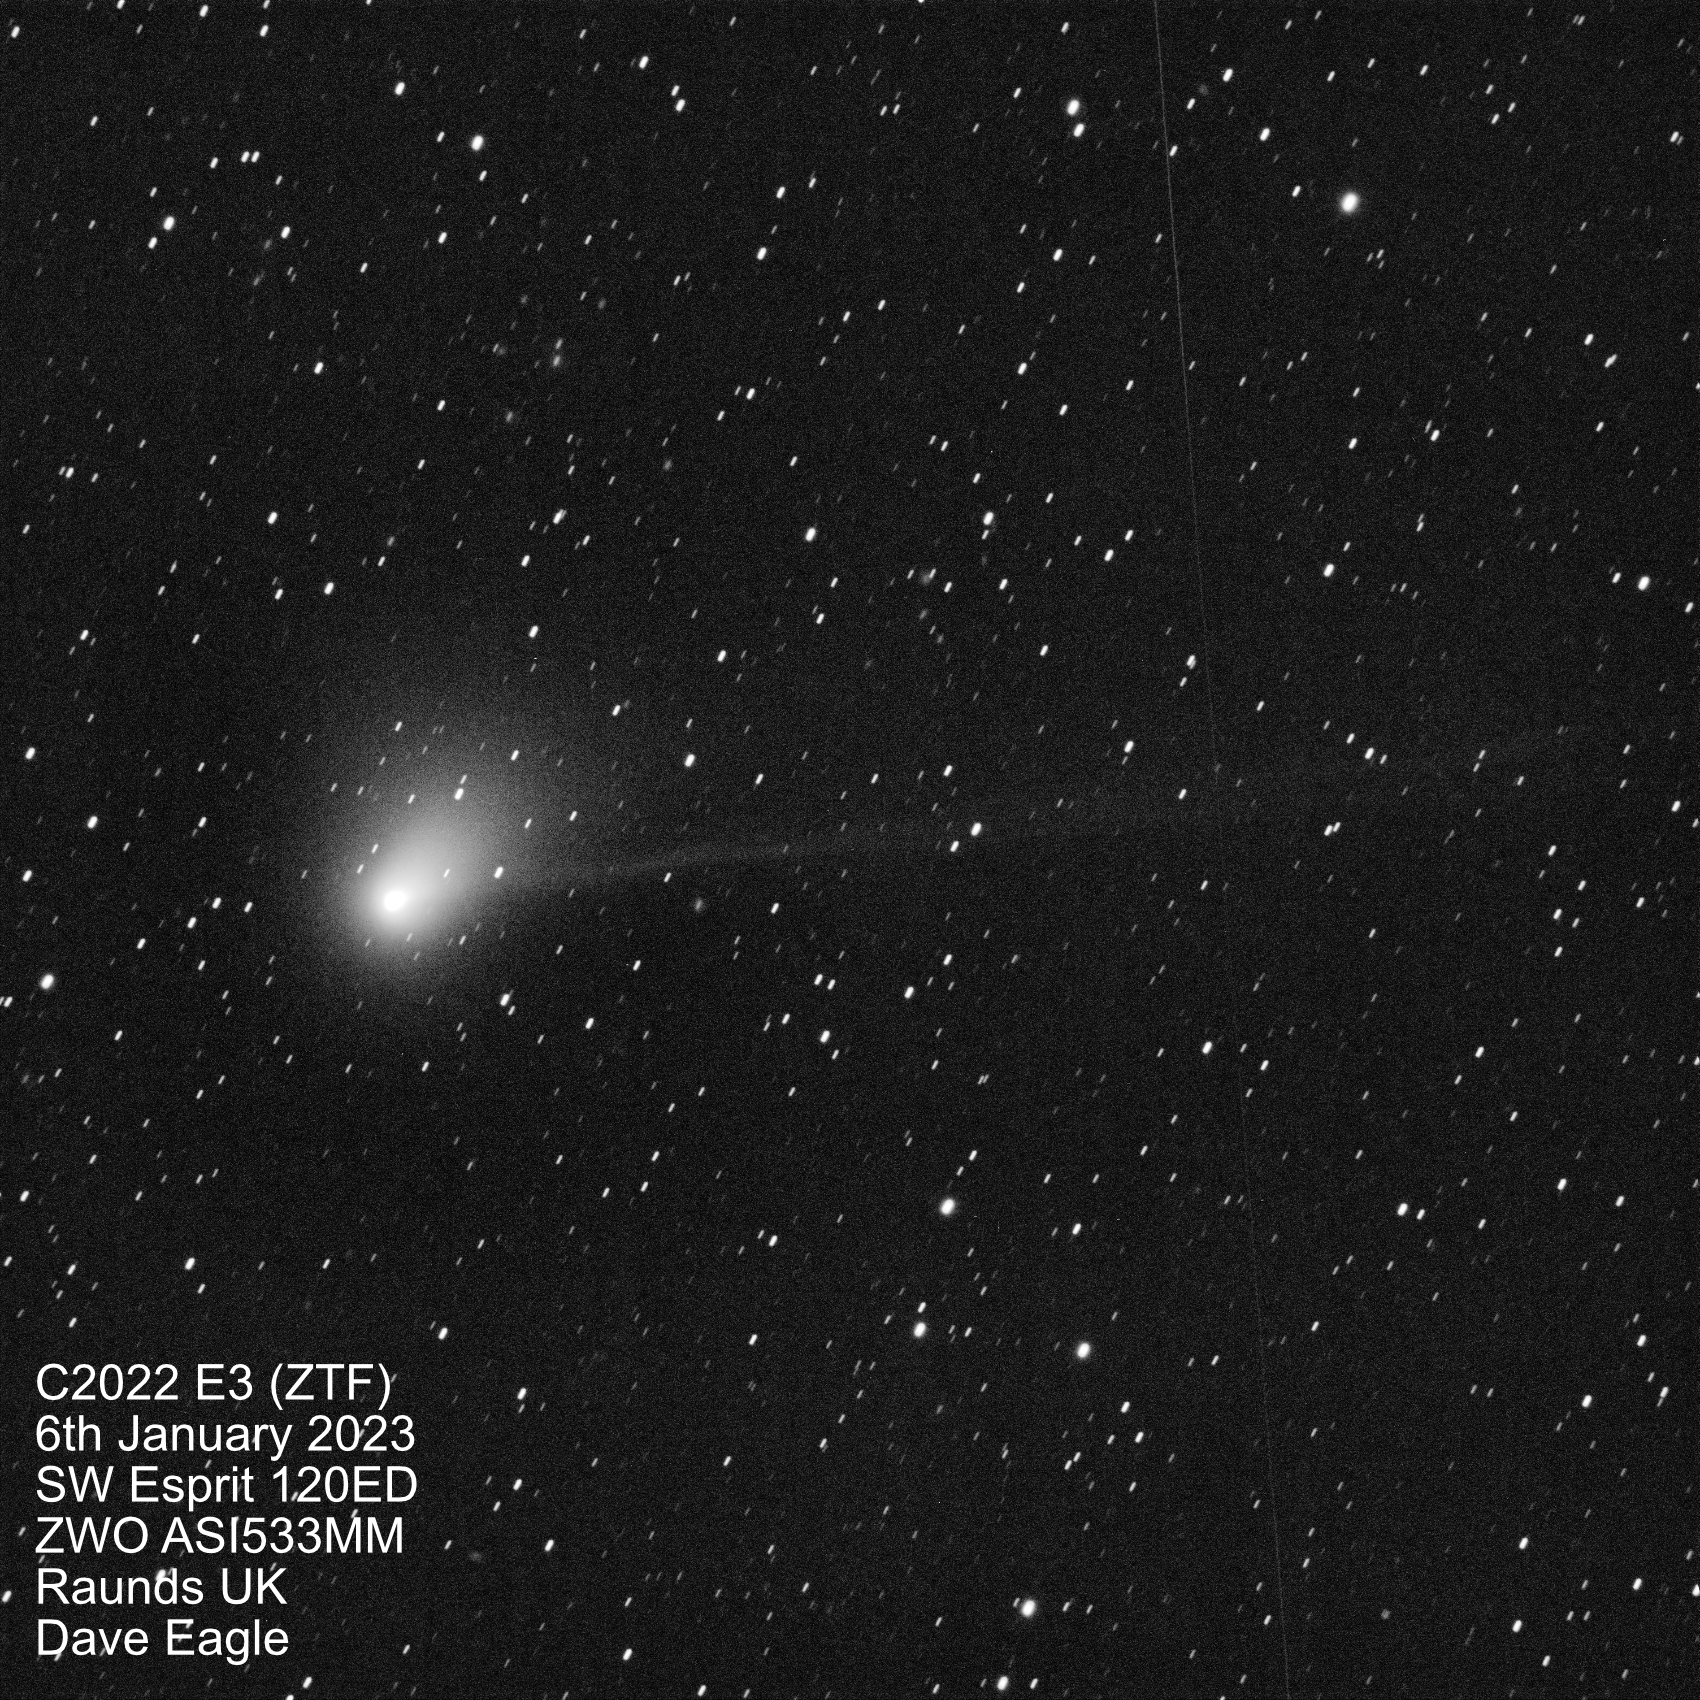
The image of the comet at the top of this blog entry taken on the 6th of January was a result of only 3x 60 second subs.
I was auto-guiding on the comet and increased the gain on the camera to 180 to pull out a bit more of the faint ion tail during the relatively short exposure.

I found that if I stacked 4 or more of the subs that were taken, the detail in the resulting image started to blur and detail in the ion tail was lost.
In this case I found using no more that 3 minutes exposure span gave me the best balance between a nice smooth stacked image with sharp tail details.
Like most imaging, it’s yet another balancing act on getting the exposure and timings right to freeze as much detail as possible.
Stack too many subs over too long a period of time and all that nice detail will be blurred out of existence.

Affinity Photo stacks astrophotography images, but it does not currently have a Comet Stacking mode, so cannot be used for moving comets:
https://affinity.serif.com/en-gb/photo
I hear that PixInsight has a comet stacking feature, but I haven’t used this software yet.
https://pixinsight.com

The software I use for my comet Stacking is…
Good old Deep Sky Stacker, which is of course free: http://deepskystacker.free.fr/english/index.html
(I never seemed to managed to get a very good image when using the combined comet and star stacking method).
The process I use is outlined in my Deep Sky Stacker Guide, which is available from my online shop:
https://www.star-gazing.co.uk/shop

It can also be done in Astro Pixel Processor:
https://www.astropixelprocessor.com
I made a YouTube Video a while ago showing how to do this in APP here:

Comet C/2022 E3 (ZTF) – 6th January 2023

Comet C/2022 E3 (ZTF) is brightening.

This image was taken on the morning of the 6th of January 2023, fighting the Moonlight.

C2022E3-ZTF-20230106-Three-Stack-Autosave003

I managed to get enough subs before the dawn sky brightened to create an animation of the comet moving against the background stars in Corona Borealis.

I have uploaded some maps to help you find the comet on my blog below:

Comet C/2022 E3 (ZTF) Naked eye in the new year?


Occutation of Uranus – New Years Day evening.

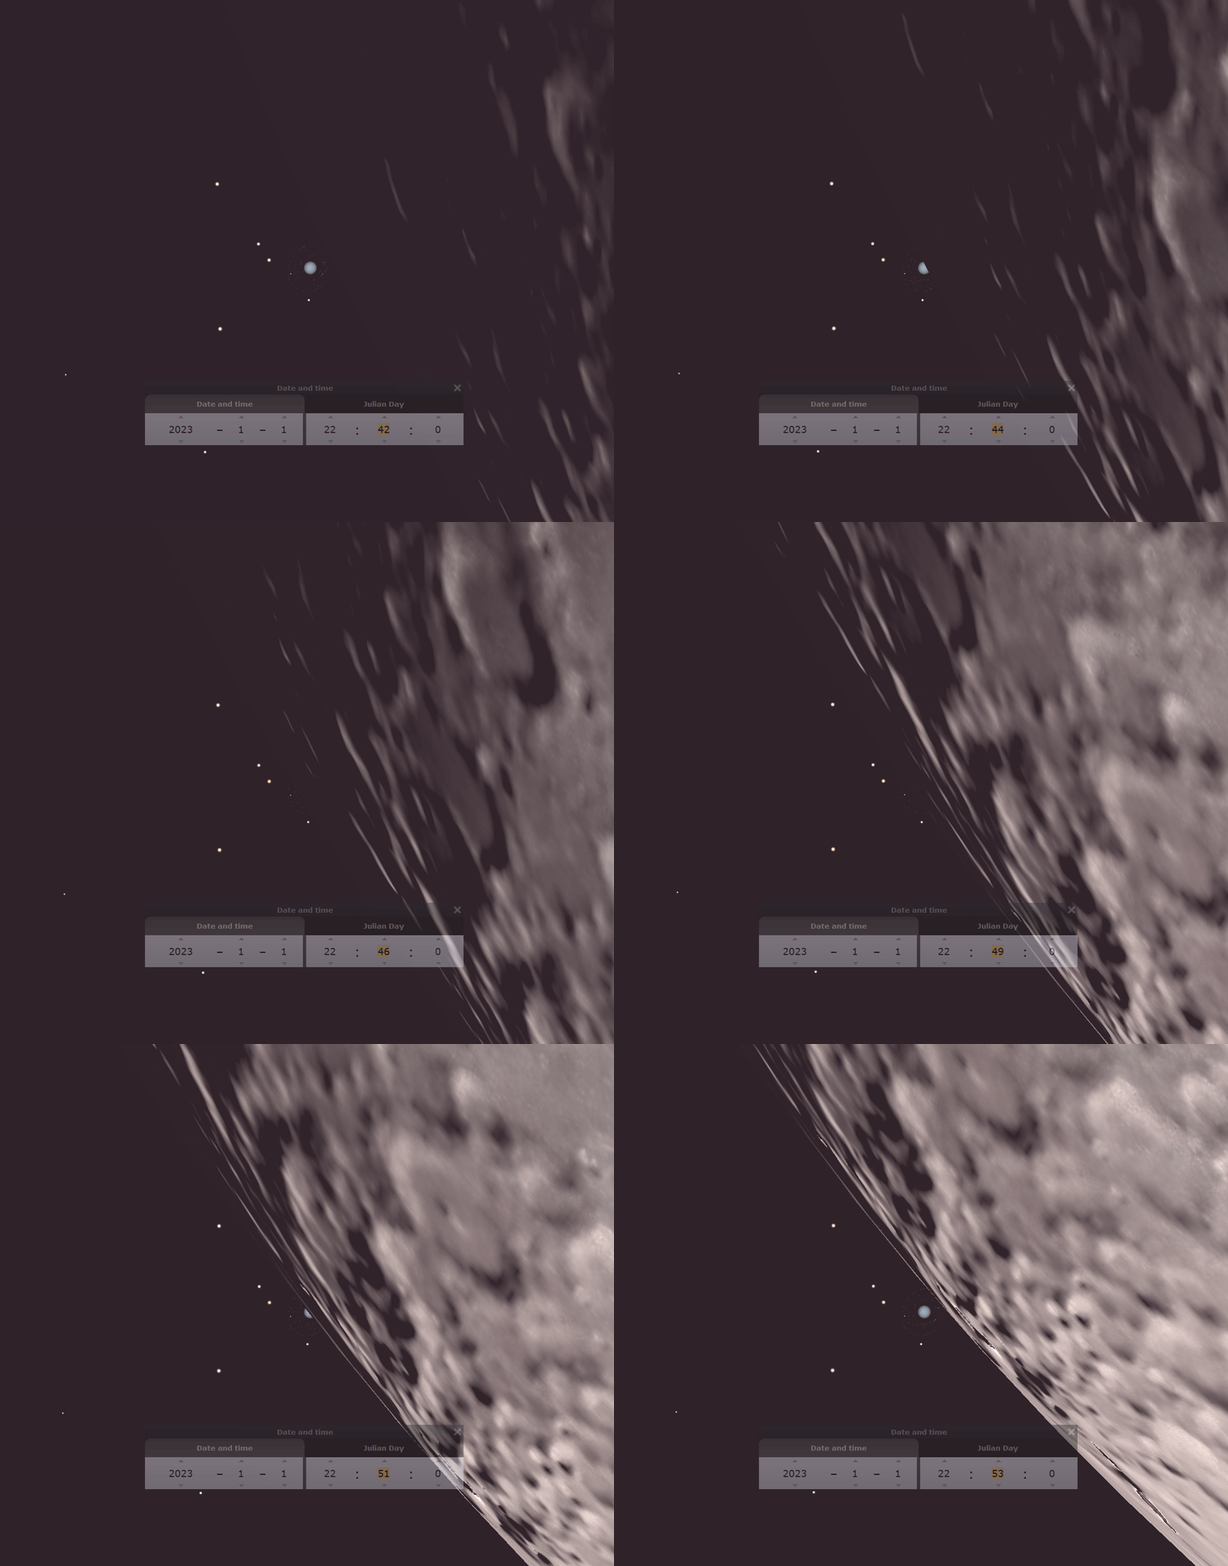
This evening, The Moon moves in front of (Occults) Uranus.

It won’t be as spectacular as December’s occultation of Mars, but will still be interesting to observe or image.

With Uranus being a lot smaller and fainter than Mars, the event will also be a bit more challenging.

From my location, the event starts at 22:43:30 UT, when the dark part of The Moon’s southern limb will start to move across Uranus’ tiny disk.

From my location, Uranus does not hide too deeply behind the southern limb of The Moon and reappears at the bright limb less than 10 minutes later.

The event is over for me by 22:51:55 UT.

If you are further north from me Uranus will disappear earlier and dive deeper behind the Moon and the occultation will last a bit longer.
If you are much further south from me in Northamptonshire, The Moon will either produce a grazing occultation or miss Uranus completely.

Start and end times will differ depending on your location.

The animation below shows the occultation as seen from my location
Animation produced using Stellarium.

Let’s hope we have some clear skies.

Mars Lunar Occultation – My Experience

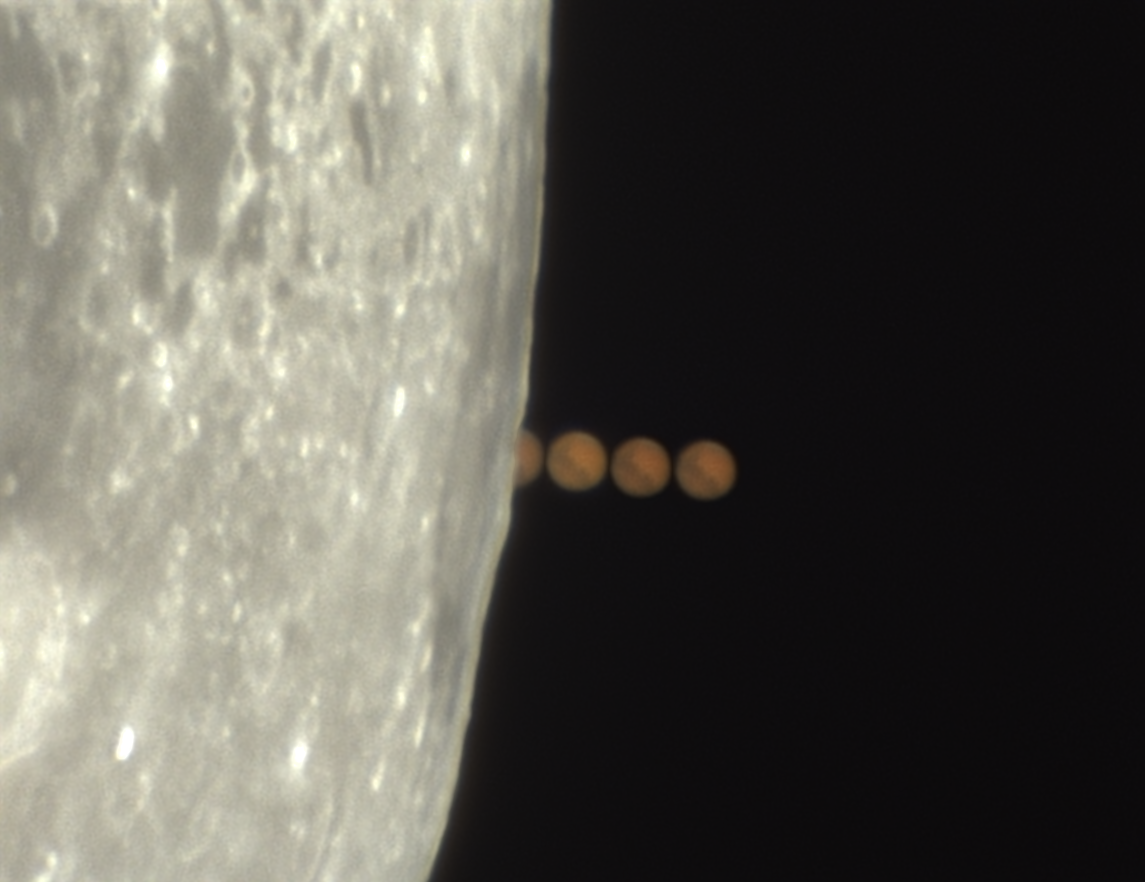
In the early hours of Thursday, the 8th of December 2022, The Moon moved in front of (Occulted) Mars. This rare event last occurred in 1952; the next one to be seen from my location will not be for another 20 years. So I had to stay up to see and capture this event.

I went out the night before to take some practice images using the setup I had decided to use.

I used my Sky-Watcher 120ED Esprit, with a 2x Barlow Lens and a ZWO ASI224MC camera.
It was an extremely cold night, with a sharp frost, but once everything was set up, focused and running I could monitor and control everything from my PC in the warm house.

All the processing I used is explained in my High Resolution Lunar & Planet Imaging Guide.

Mars was predicted to disappear behind The Moon close to crater Grimaldi and reappear on the opposite limb close to Mare Smythii.

My three practice images are shown below.

Once I was happy with all the settings used and the scale of the images, I went to sleep at about 23:00 UT to get up at 04:00 UT ready for the event to start just before 5:00 UT.

I got up well before time as Mars was starting to approach The Moon.
I started taking fairly short 30-second videos to capture images prior to the occultation.
Being a short length, this should give me fairly sharp images.

This was the result of one of those images.

Once The Moon was close to Mars, I started a long exposure to capture a complete video of it disappearing behind The Moon’s limb.

I knew this length of video would cause problems with extracting the individual images, as the relative movement of Mars and The Moon was fairly high.

I used the Limit tool within AutoStakkert! to cut the video into small sections and stack those.
As a result, the quality of the image isn’t quite as good as the first one as less individual frames were used in the stack to produce the image, as you can see below.

I used the sequence of images produced to create this animation.
(Pity it pixelates the images).

Mars-occultation-Ingress-Stack

And used some of the individual frames to produce the progress image below.

As egress approached I noticed that focus needed tweaking.
I soon found out why after checking outside. Mars was going through the neighbours tree.
Luckily most of the branches were bare.

I persevered, and right on cue and in the position shown in Sky Safari and Stellarium, Mars reappeared.

Animation with pixelated images.

Progress image.

As I started packing the scope up, clouds were starting to cover The Moon.
It doesn’t happen like that very often.


Occultation of Mars – 8th December 2022

In the early morning of the 8th of December on the day of Mars reaching opposition, The Moon moves in front of (occults) Mars.

Timing is roughly…

Disappearance: 04:58 UT.
Mars disappears near crater Grimaldi.

Reappearance at the bright limb, by Mare Australe: 05:57 UT.

The timings shown are as seen from my location, so your timings may be slightly different from these.

The speeded up animation below, created using Stellarium, shows what we might be able to see at disappearance and reappearance.

Lunar Occultation of Uranus – 5th December

On the evening of the 5th of December The Moon moves in front of (occults) Uranus.

Timing is roughly…

Disappearance: 16:45 UT. Moon and Uranus are low down in the eastern sky.
Uranus disappears at the dark limb, close to crater Pythagoras.

Reappearance at the bright limb, by crater Reimann: 17:20 UT.

The timings shown are as seen from my location, so your timings may be slightly different from these.

The speeded up animation below, created using Stellarium, shows what we might be able to see at disappearance and reappearance.

Comet C/2022 E3 (ZTF) Naked eye in the new year?

Comet C/2022 E3 (ZTF) is meant to become just about bright enough to be seen with the naked eye in the new year.

It is currently at about 7th magnitude (3rd January 2023) in the northern part of the constellation of Corona Borealis, low down in the early morning eastern sky.

Over January, it heads northwards, slowly picking up speed and brightening.

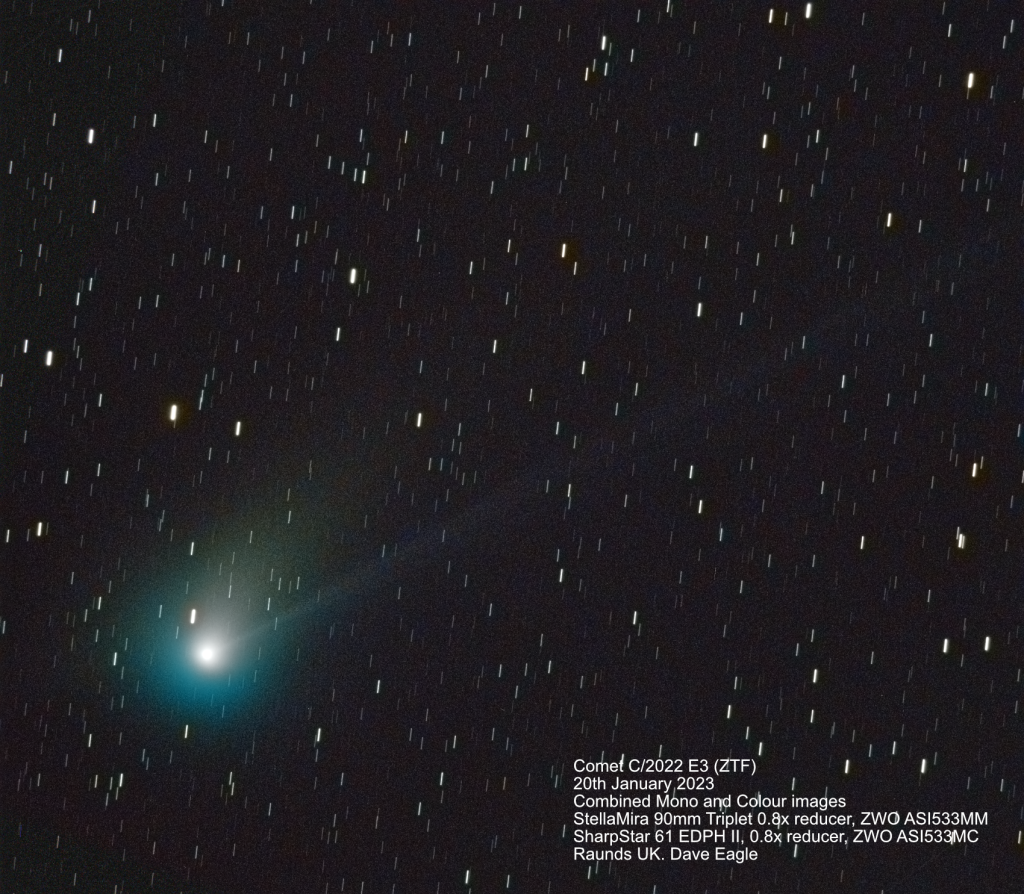
Image of the comet taken on the morning of the 20th of January.
C2022E3-ZTF-20220120-Autosave003-Small

Animation of C/2022 E3 (ZTF) moving northwards through Corona Borealis on the 6th of January in bright moonlight.

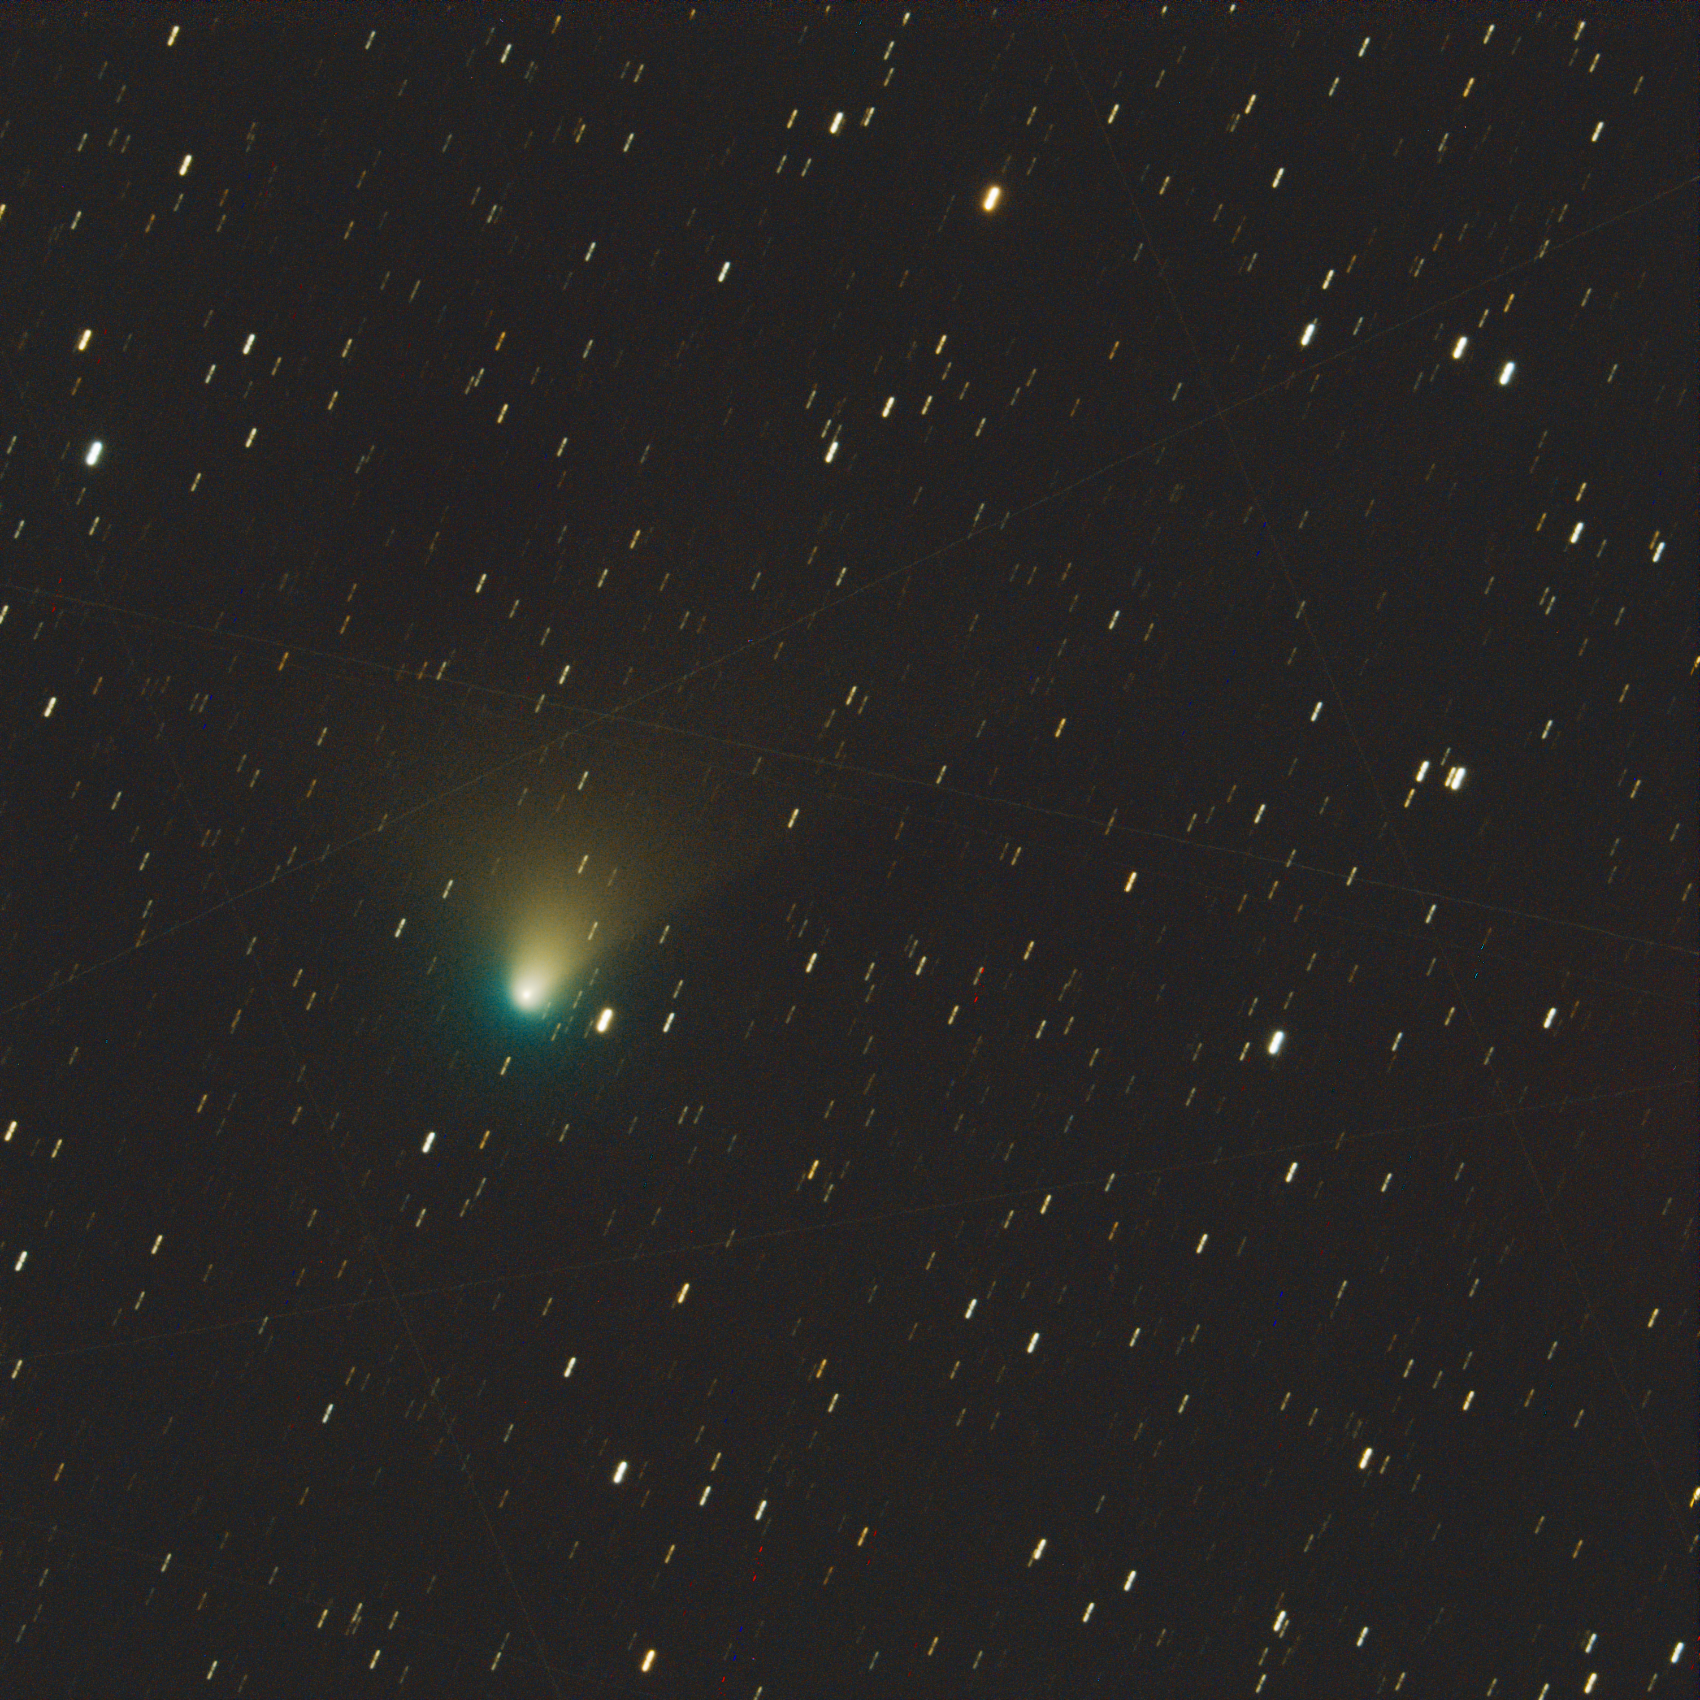
Colour image of Comet C/2022 E3 (ZTF) taken 3rd January 2023 through the murk.

CometC2022E3-ZTF020220103-Full-Stack-Small

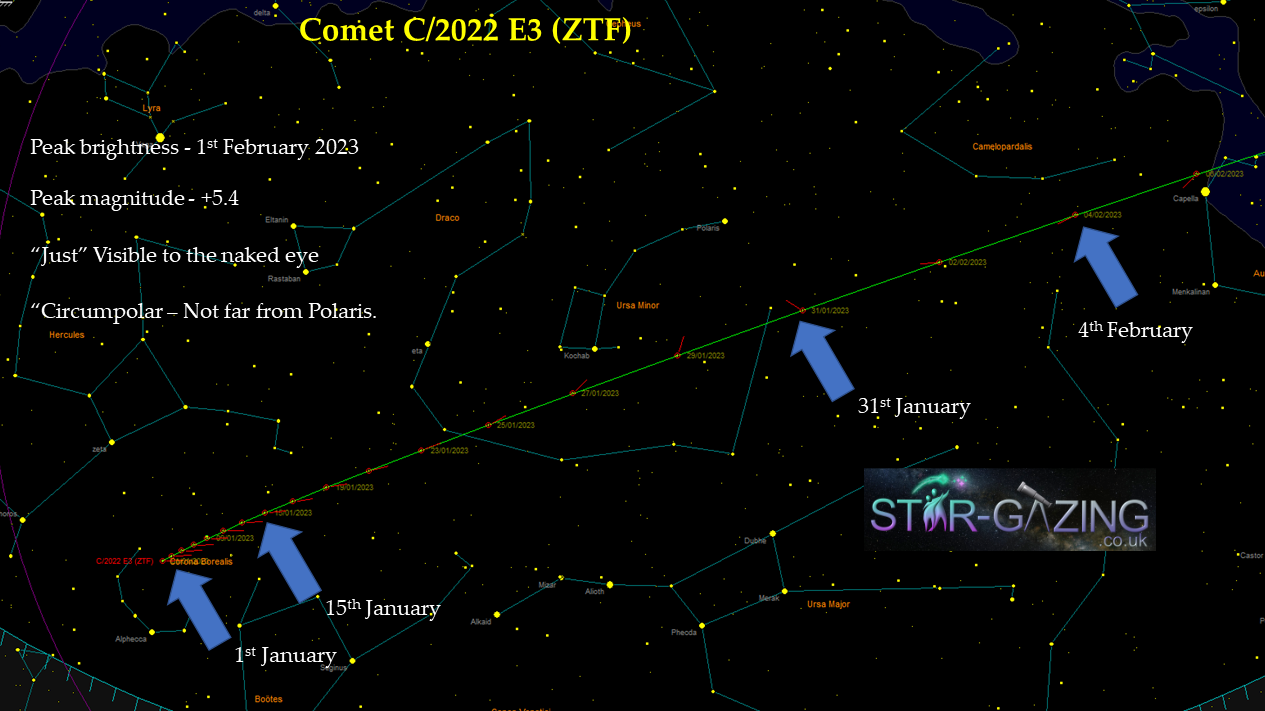
At the start of the new year it is located just north of Corona Borealis.

It reaches Perihelion (closest to The Sun) on the 12th of January.

It reaches the middle of Draco’s body by the 24th of January, where it should now be a lot brighter.

By the end of January the comet is passing close to Ursa Minor and Polaris, so will be at a respectable altitude throughout the night.

It reaches its maximum magnitude of +5.4 on the 1st of February, when it should “just” be visible the the naked eye from a dark sky.
The beginning of February is when the comet will be at its closest to Earth.

A bright gibbous Moon will be visible in the evening sky, so may be best to observe or image the comet in the morning sky, once The Moon has set.
It’s not going to be a spectacular comet, but should give us something nice to look at or image.

On the 6th of February the comet moves through Auriga passings very close to the first magnitude star Capella.
The Moon rises a little bit later that night, so get out before that rises fairly quickly after dark.

Moving southwards by the 11th of February the comet passes to the east of Mars in Taurus.
The Moon is now well out of the way and visible in the morning sky, so will not interfere with viewing or imaging the comet in the evenings.

A few days later on the 14th & 15th of February it passes to the east of the first magnitude star Aldebaran and the Hyades open star cluster.

After passing through Taurus, the apparent motion of the comet is now slowing as it fades.

It passes just west of the shield of Orion the last two weeks of March and then on into Eridanus.
The comet is moving in a large retrograde loop, which swings it just south of the first magnitude star Rigel in the foot of Orion towards the end of April.

It’s developing very nicely now, so let’s hope for a good show.

🤞

The maps below show the path of the comet from January until March.


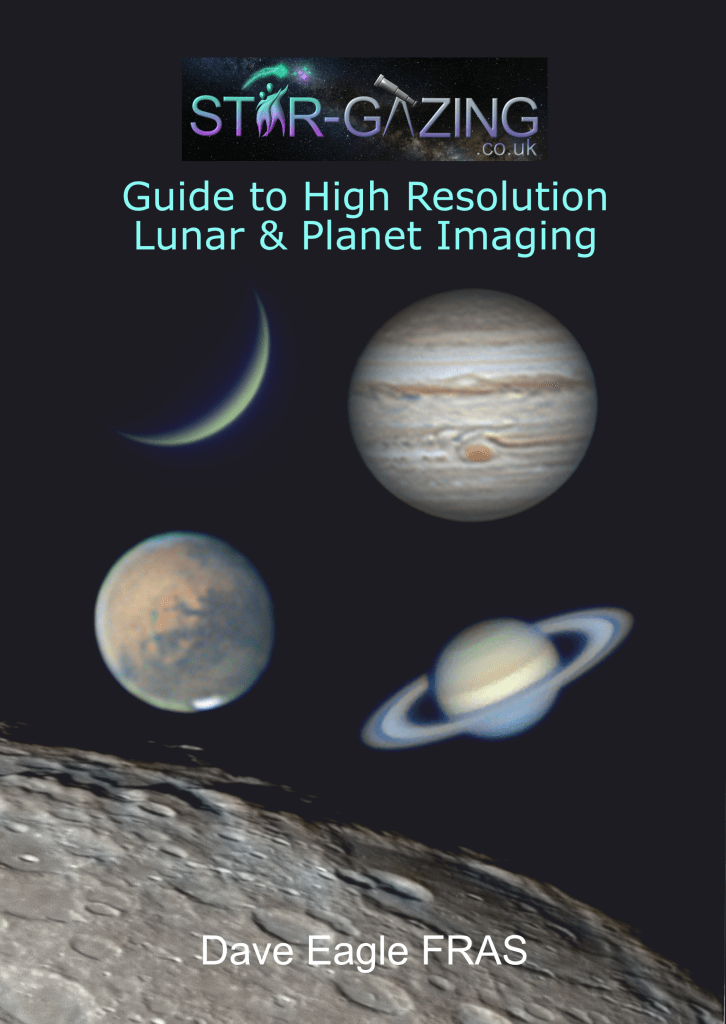
My latest astrophotography guide now available to order.

Star-Gazing Guide to High Resolution Lunar & Planet Imaging.
My latest imaging guide is now available to order from my online shop.
Click here to visit my online shop.

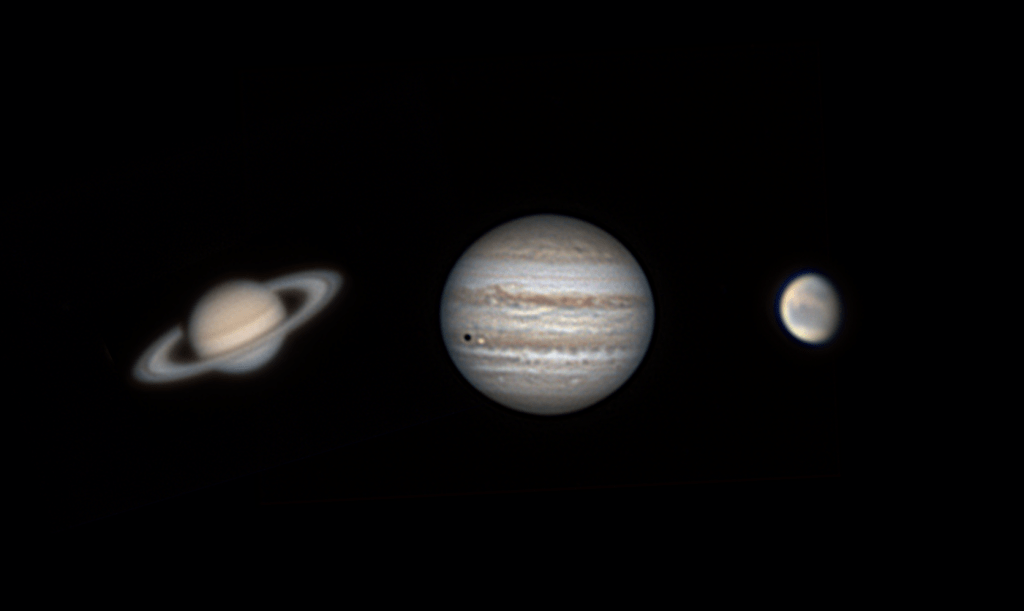
BookCoverWebCamImaging-Front-Cover-20221002  Saturn-Jupiter-Mars-2022-10-02-2233_6-Capture_____150r_40T_626regP2 

Almost 2 years in the writing, trying out lots of different techniques, this edition of my astrophotography guide leads you step by step through a number of tried and tested image capture and processing workflows to help you get the very best out of your lunar and planet imaging.

My guide covers the taking of video images and subsequent stacking and post-processing using a number of software packages.

Among the techniques covered within this guide are:

  • Introduction to the planets and Moon.
  • The equipment and accessories used to take images.
  • Why we use videos to capture Moon and Planet images.
  • Using SharpCap to capture Moon & Planet images.
  • Stacking the video files using AutoStakkert! and AstroSurface.
  • Sharpening the stacked images using Registax and AstroSurface.
  • Colour correcting images using Registax and AstroSurface.
  • Final image polishing using Photoshop and Affinity Photo.

Visit my online shop or the link below for more details:
https://www.star-gazing.co.uk/Shop

High Resolution Lunar & Planet Imaging

Mars Approaches Opposition.

Mars is approaching Opposition.
As a result the distance between The Red Planet and Earth is decreasing, so the apparent size is getting bigger.
It reaches opposition on the 8th of December, when The Moon will also move in front of it (an occultation).
More details about this later.

As the disk gets bigger, it makes it a bit easier to view and image features on the planets surface.
Mars is high up in Taurus as well, so that really helps, keeping the planet clear of most of the clag in the atmosphere lower down.

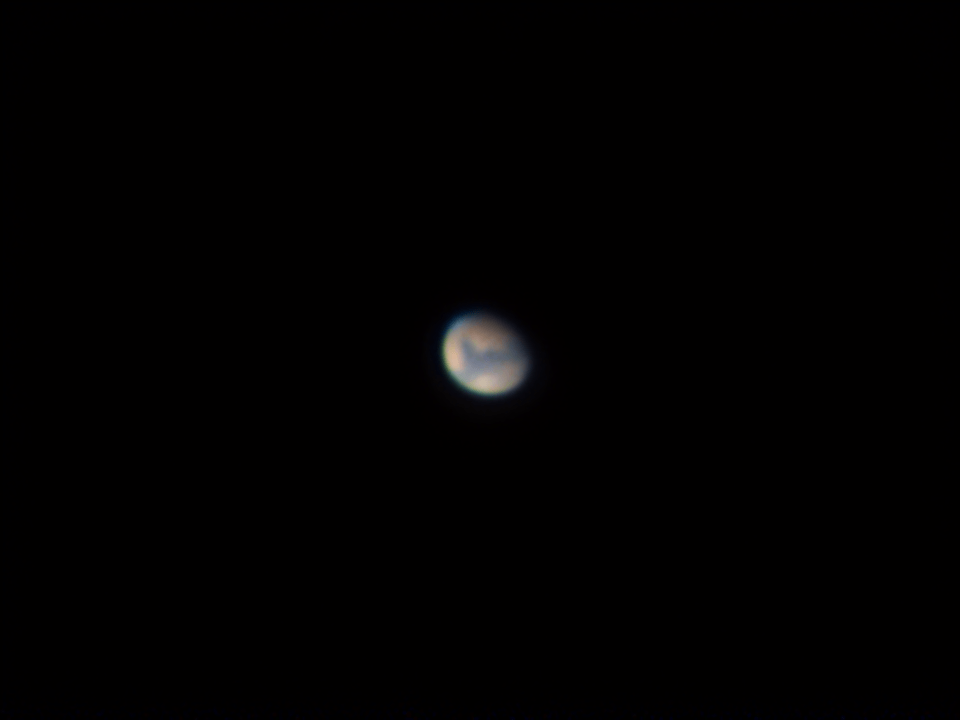
It still has a fairly small disk compared to Jupiter and Saturn, but you can quite clearly see the north polar cap and the dark triangular-shaped feature of Syrtis Major in my image of the gibbous phase below, taken on the 8th of September 2022.
Mars-2022-09-08-2318_7-CapObj_AS_p50_g4_ap25_Drizzle15-RGB-AS

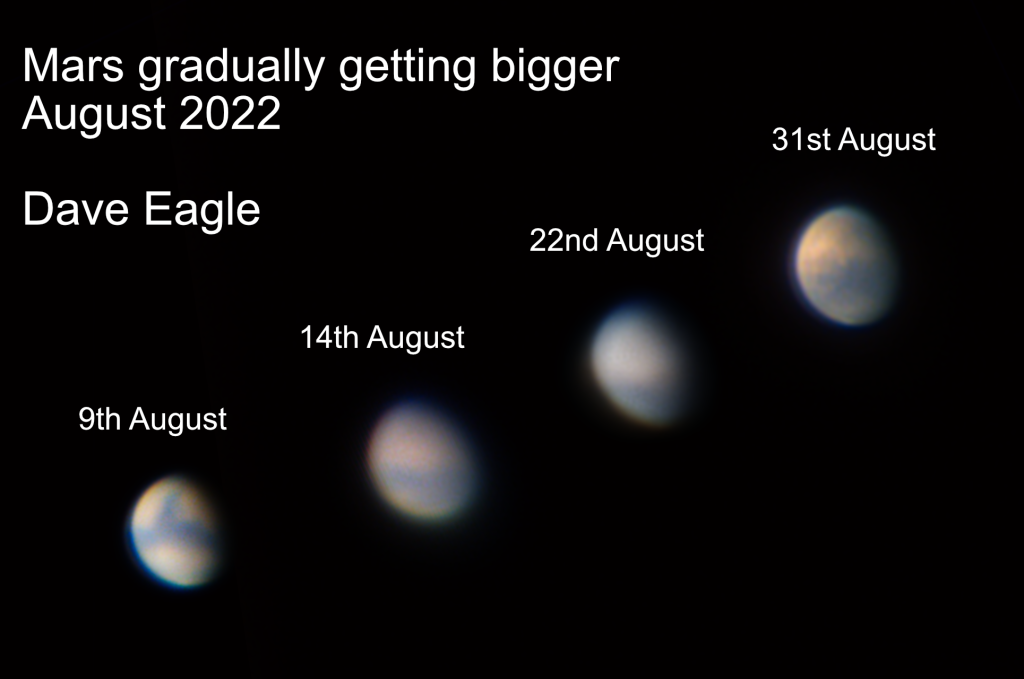
My images below taken under varying conditions, were taken in August.
This shows progress in growth even over just a month.
Mars-Growoing20220809-20220831

How big is Mars going to get?
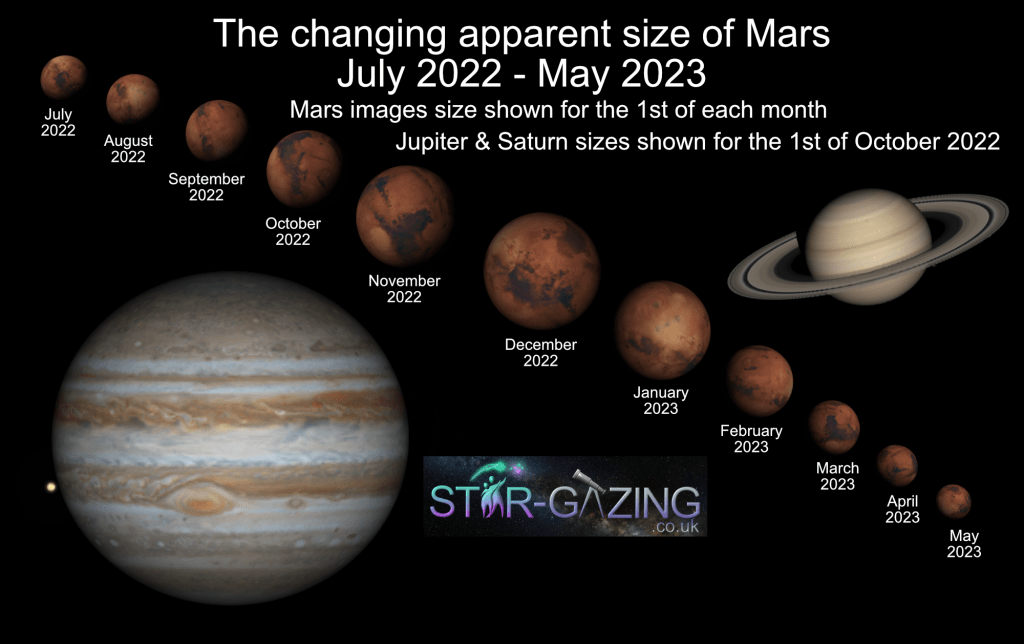
I have used Stellarium to create the diagram below to show just how big Mars will get over the next few months and the changing of its phase, as the angle to The Sun changes.

In December the disk will be about the same size as Saturn’s.
But you do have to be quick!
The distance increases rapidly in the new year, so by February it will be almost half that size, making features much more difficult to make out.

Here’s to a good Mars apparition, and let’s hope we have some good clear skies for us to view it.


Mars-Change2022

A morning of planets

I managed to wake in time to catch Jupiter and Mars before the sky started to brighten.
I could see Saturn just about to dip below the neighbours roof, so was too low for me to get in the scope.

I easily got Jupiter in my sights, being a lot higher in the sky.
As soon as my first images were starting to focus, it was obvious something wasn’t quite right.

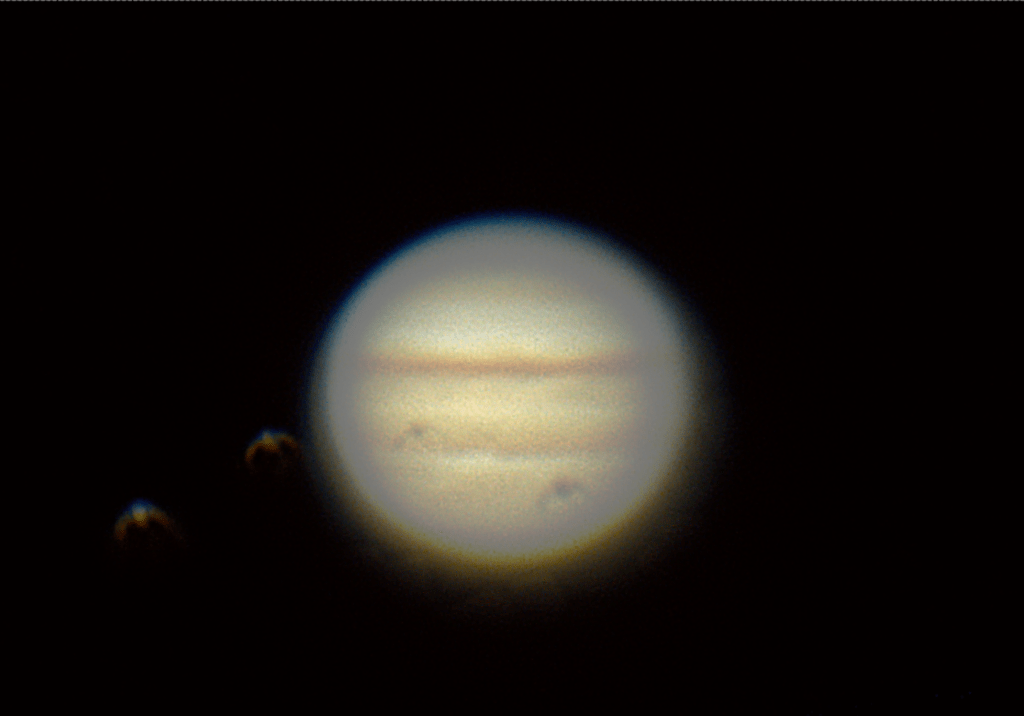
There were two shadow transits on the disk of Jupiter and I could clearly see that they looked strange.
In the over-processed first image below, arcs are visible on the satellite shadows and Io and Ganymede.

2022-08-09-0211_2-CapObj_AS_p20_g4_ap137_Drizzle15-Bad-Collimation-WP-Over

I’m definitely not going to get much detail with that right mess.

It was immediately obvious, that despite me thinking I had collimated my C11 the previous morning, it definitely needed tweaking again.
Collimation was was well out. SCT’s can be notoriously difficult to collimate.

I thought it was going to be one of those nights out with the scope when everything goes wrong as patchy cloud started to fill the sky.

Undeterred, I slewed the scope over to a bright star in the clear gap and de-focused to produce a bright ring.

Using the defocused star, I took quite some time using my trusted method to get the ring concentric, meaning that the scope was collimated.

I then sent the scope back to Jupiter, which was now peeking in and out of clouds.

Within half an hours, the clouds had mostly cleared. Game On!

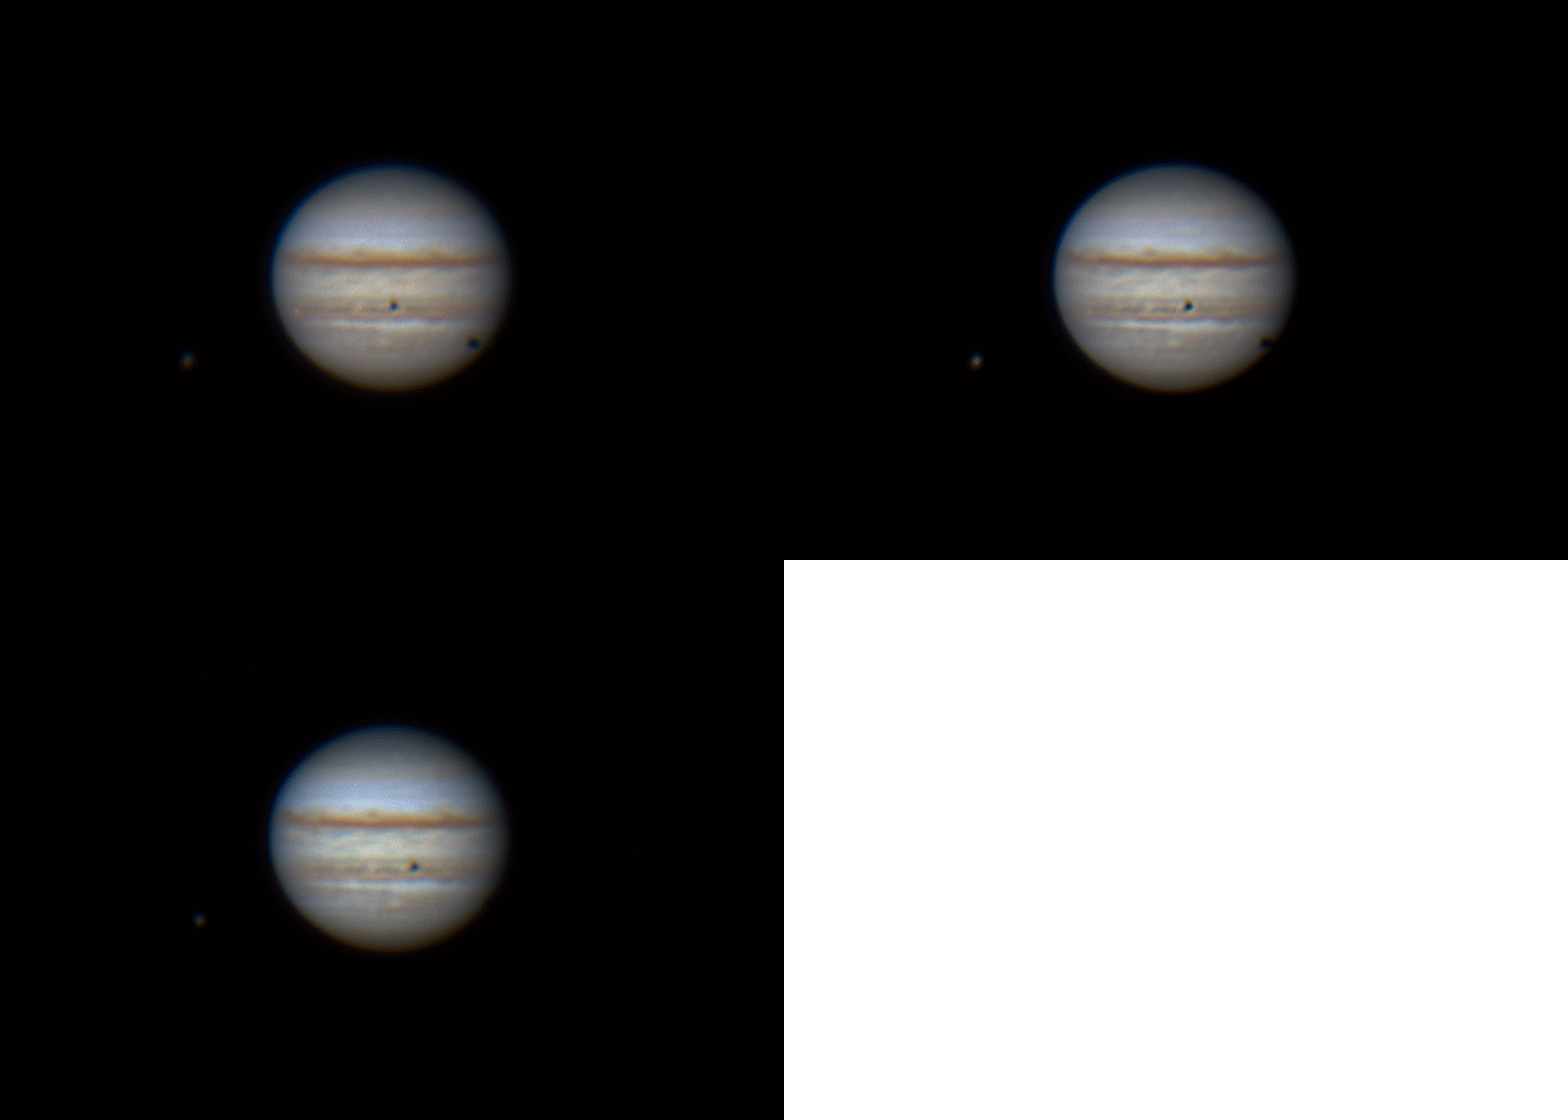
The image now looked much, much better. The satellite shadow and satellites were now nice and sharp.

I could see the twilight starting to creep in, so didn’t try and use the Atmospheric Dispersion Corrector (ADC).
Setting that up properly would have eaten up even more valuable time, when I could be capturing images.

But I was now running out of time…

I ran off a few videos, before putting in a 2x Barlow lens to increase the image size of the disk on the camera chip.

I was still able to see that the focused image was much better than the last time I tried that, so should be able to get some decent enough images.

Once I had captured a few videos of Jupiter, in the brightening twilight, I pointed the scope towards Mars, centering it easily in the Barlow camera view.

The dark triangular feature of Syrtis Major was showing very nicely on the gibbous planet.

I then took a few images of Mars, which had  then packed away.

I turned out to be a great morning, plus I didn’t lose too much sleep either. ?
Next time I’ll leave enough time to use the ADC to try and sharpen the images a bit better.

Below are my images and at the bottom I have put an image showing the relative sizes of Mars & Jupiter, to show just how small Mars is at the moment.


Webb’s Solar System Test Images

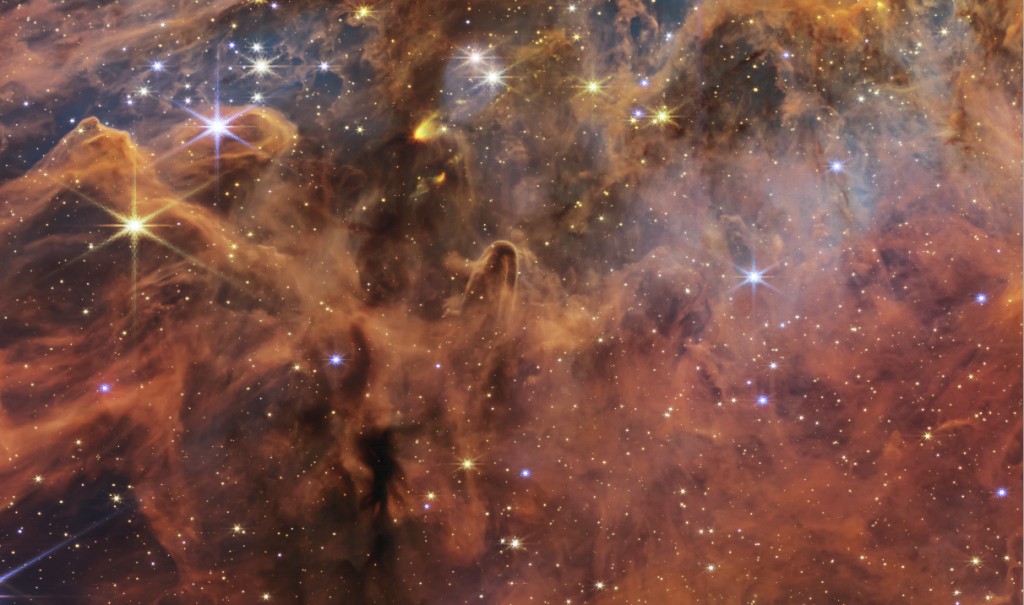
In a much quieter way, some images of some solar system objects were released by The Webb Space Telescope team.

OK, they may not be as spectacular as the deep sky images released a couple of days ago, but they do show just how capable The JWST will be at collecting data and imaging objects within our solar system. So it won’t only be exploring the deep sky. The telescope may be able to see signatures of the deposits on the surface from plumes on the surface of Europa and Enceledus and analyse them from afar.
It also told the scientists how accurately the telescope can track a fast moving solar system object.

Just remember that these are only test or calibration images taken as test images, and are not as refined as the previous released images.

But they are stil quite extraordinary, showing just how powerful and adaptable this telescope is for observing different types of objects.
Deep Sky and much nearer within our own solar system.

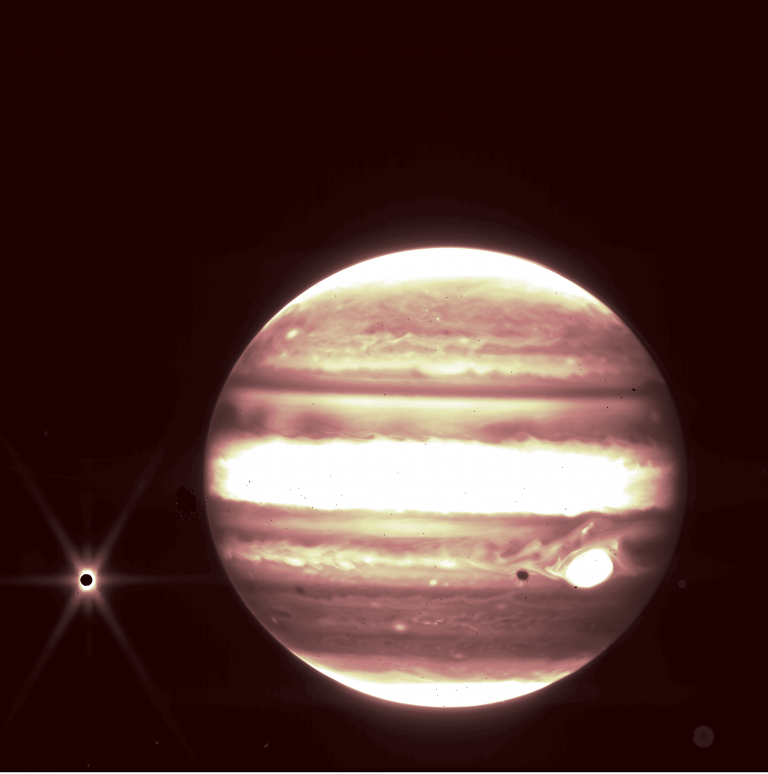
The first image below is of Jupiter taken by the NIRCam instrument with a 2.12 micron filter.
The bright moon Europa is also seen to the left of the planet.
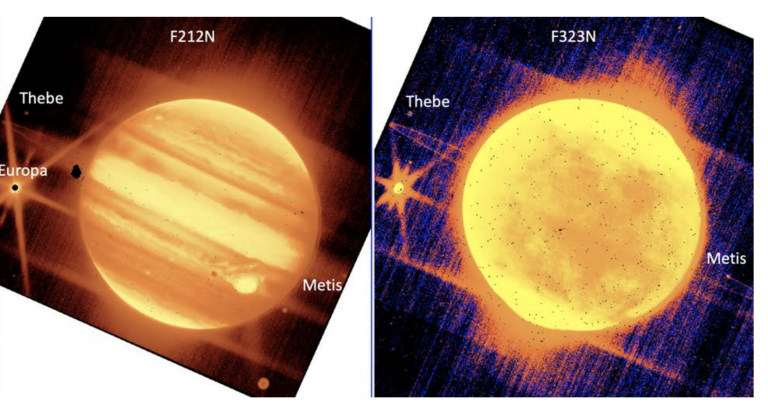
The second two images are also of Jupiter taken with the NIRCam instrument 2.12 micron filter (Left) and NIRCam’s 3.23 micron filter.

Not only are Jupiter and Europa visible, but the much fainter moons Thebe, and Metis, and look closely at the images for another feature.

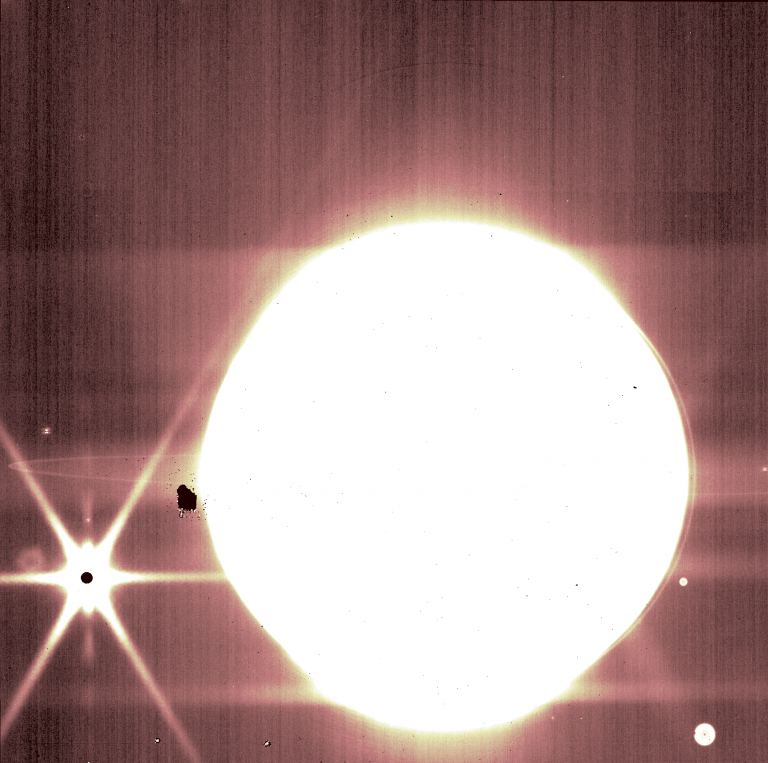
Yes, this enhanced image also shows the faint rings around Jupiter, which can also be seen in the images above.

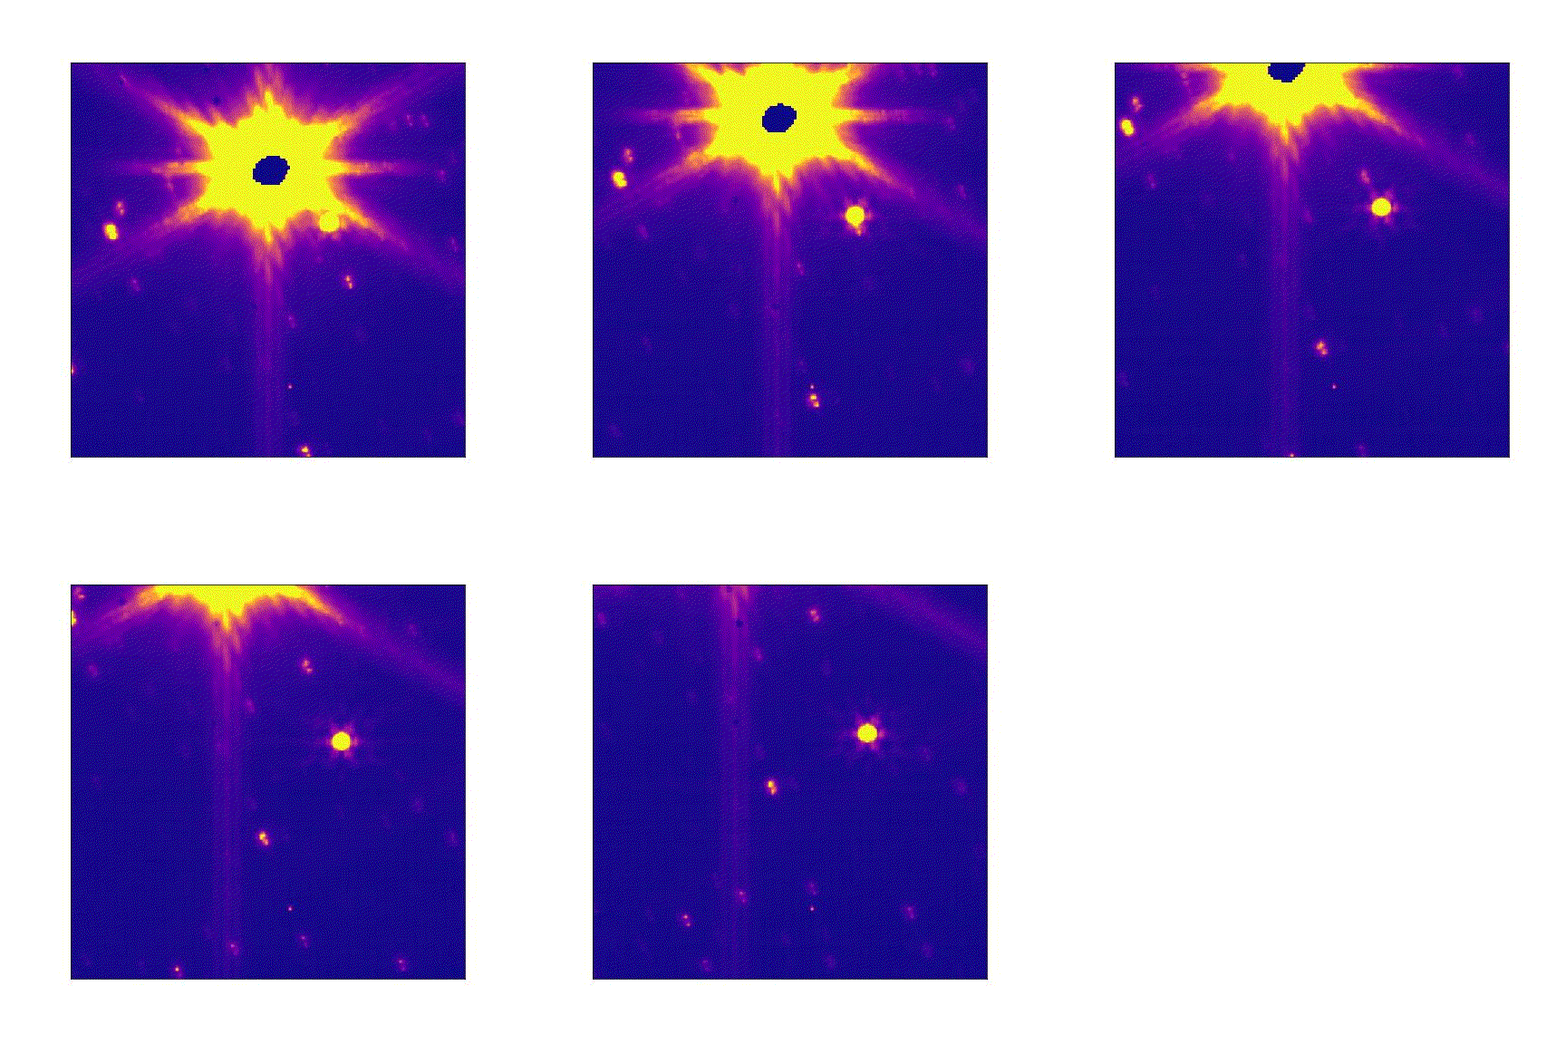
The last image is of the asteroid 6481 Tenzing, taken with the NIRCam instrument, tracking the asteroid accurately.
This is to see how accurately the telescope can track a much faster moving object.

obs1_f277w

Absolutely marvellous achievements proving everything is working as well as expected.
I am really looking forward to seeing a lot more over the next 20 years of the mission.

You can read more here:
https://blogs.nasa.gov/webb/2022/07/14/webb-images-of-jupiter-and-more-now-available-in-commissioning-data