Smart telescopes have been around for quite a while now.
Talking to Vespera and Uninstellar owners over the past year or more, they all said they enjoy the experience and are getting very good results.
But the cost of these can be somewhat prohibitive.
The Dwarf telescope came out some time ago, which was much more affordable, but reviews on these were quite mixed.
ZWO announced they were going to release their smart telescope, the SeeStar S50, and that would also be pitched at an affordable price.
Knowing just how fantastic their ASIAIR works, I was intrigued and looking forward to seeing how folks got on with it.
After quite a few frustrating delays, it was finally unleashed upon the world.
I managed to get one of the demo models from First Light Optics to try it out.
What is a Smart Telescope?
Using an app on a smartphone or tablet, you connect to the scope and send it to the object you want to image.
It then takes an image for however long you want… (But see below).
At the end of the exposure, the software processes the subs taken and the processed image is uploaded straight onto the smartphone or tablet being used.
All good stuff!
But be aware that there are a number of limitations, which I’ll discuss later.
Specifications of the SeeStar S50.
50mm aperture, triplet apochromatic optics should give relatively low chromatic aberration.
250mm focal length. Gives a field of view just over 1/2 a degree left to right. Enough to fit The Moon or Sun in.
Imaging chip IMX462.
Resolution 1920×1080.
Dew Heater built in.
Dual Band Nebula Filter.
Solar white light filter supplied.
Alt-Azimuth mount, with built in WiFi and Bluetooth.
Battery life, up to 6hs. Less with the dew heater on.
Weight 3kg.
What’s it like?
The SeeStar S50 is supplied in a very nice lightweight expanded polystyrene case, which ideal for travelling.
The case has a better feel than I expected, but not of the same quality as the Vespera’s and Unistellar’s, but hey, it is a lot cheaper.
It is very compact and the tripod screws onto the 3/8″ thread on the bottom.
This common thread will allow you to attach the SeeStar S50 onto many other, bigger and more stable tripods, if needed.
The App.
I downloaded the SeeStar App from the Andriod Play Store. It is also available for iPhones and iPads as well.
Watch out for the minimum specifications of phone and tablet that can be used with it.
All installed OK and I switched the SeeStar on and was ready to play.
I connected my phone to the WiFi on the SeeStar and opened the app.
After a setup routine, by pressing a button on the SeeStar and rotating it a few times, I was connected and ready.
As an aside, I was also able to turn on Station mode and connect it to my home WiFi.
This allowed me to connect to the SeeStar from anywhere inside the house.
No more standing out in the cold for me operating a telescope.
After all, I am getting to that age where I need to keep myself warm!
Clicking on the top part of this screen brings you into the SeeStar Settings.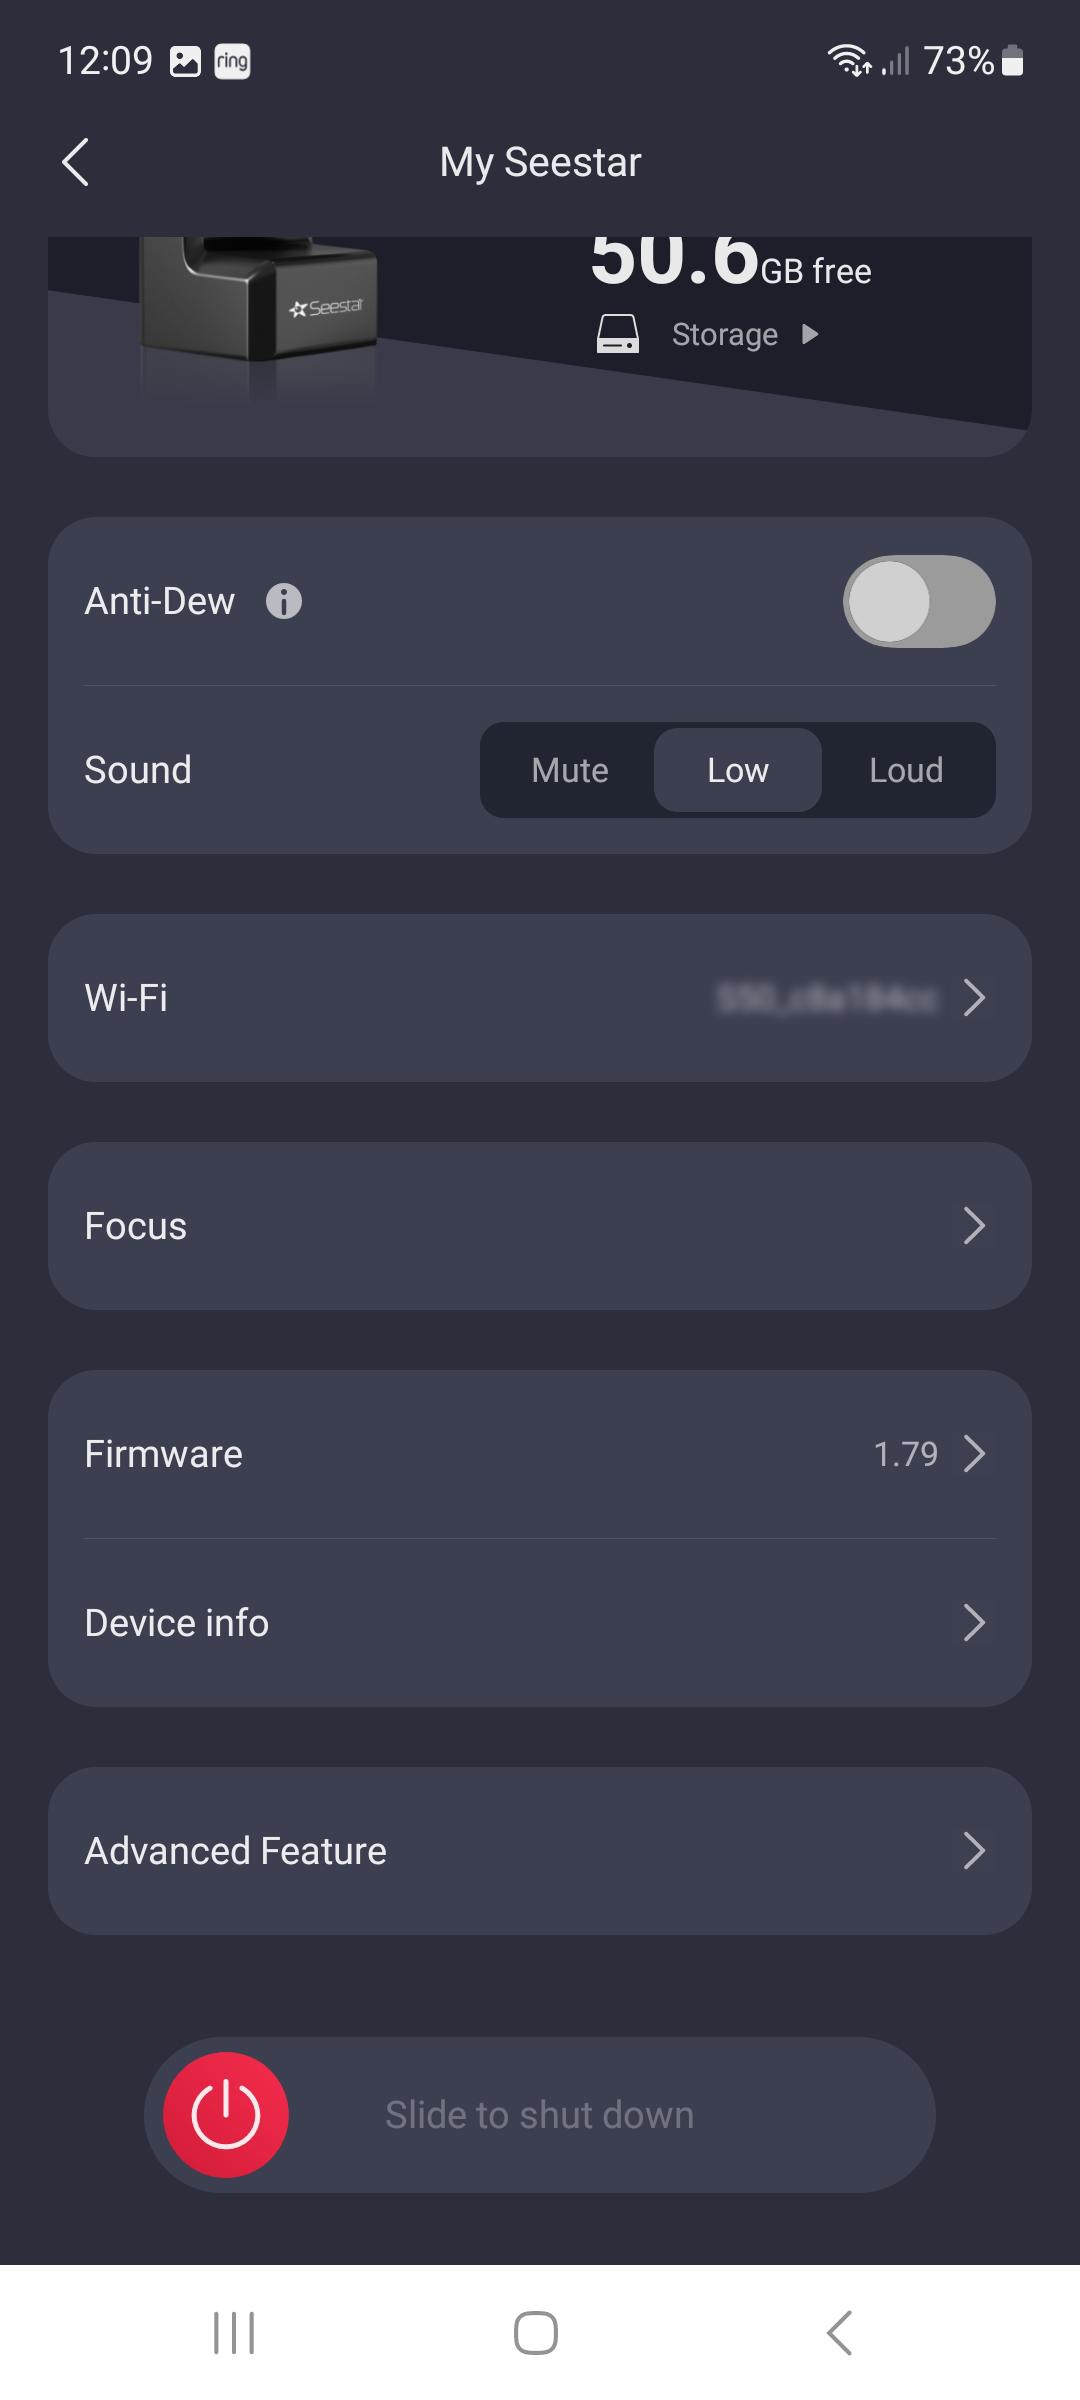
To turn off the SeeStar, you need to scroll down the bottom of this menu, as it is below the intial screen
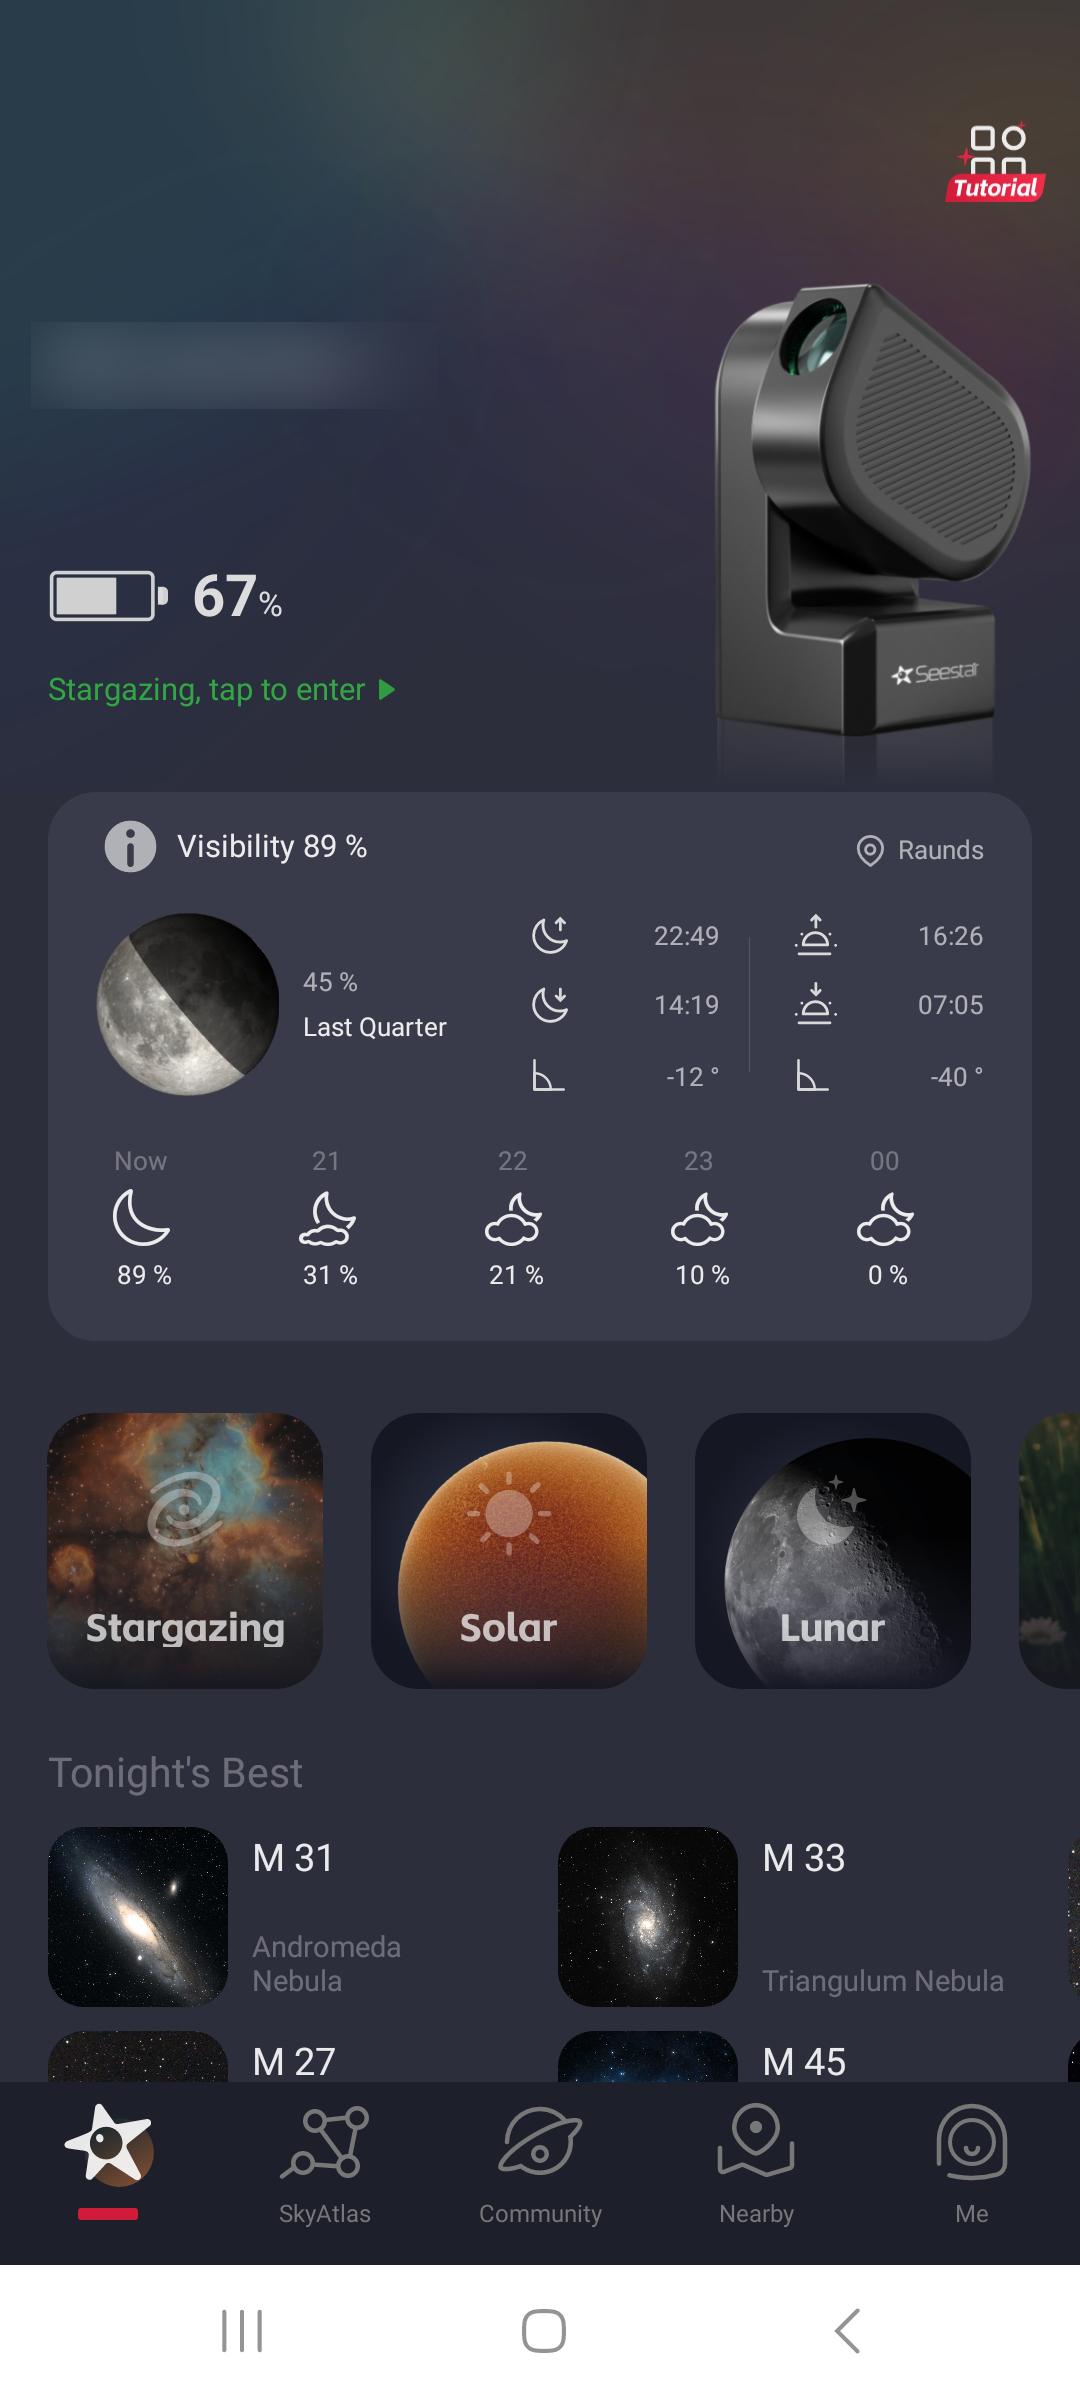
Once all connected, I clicked on the StarGazing button.
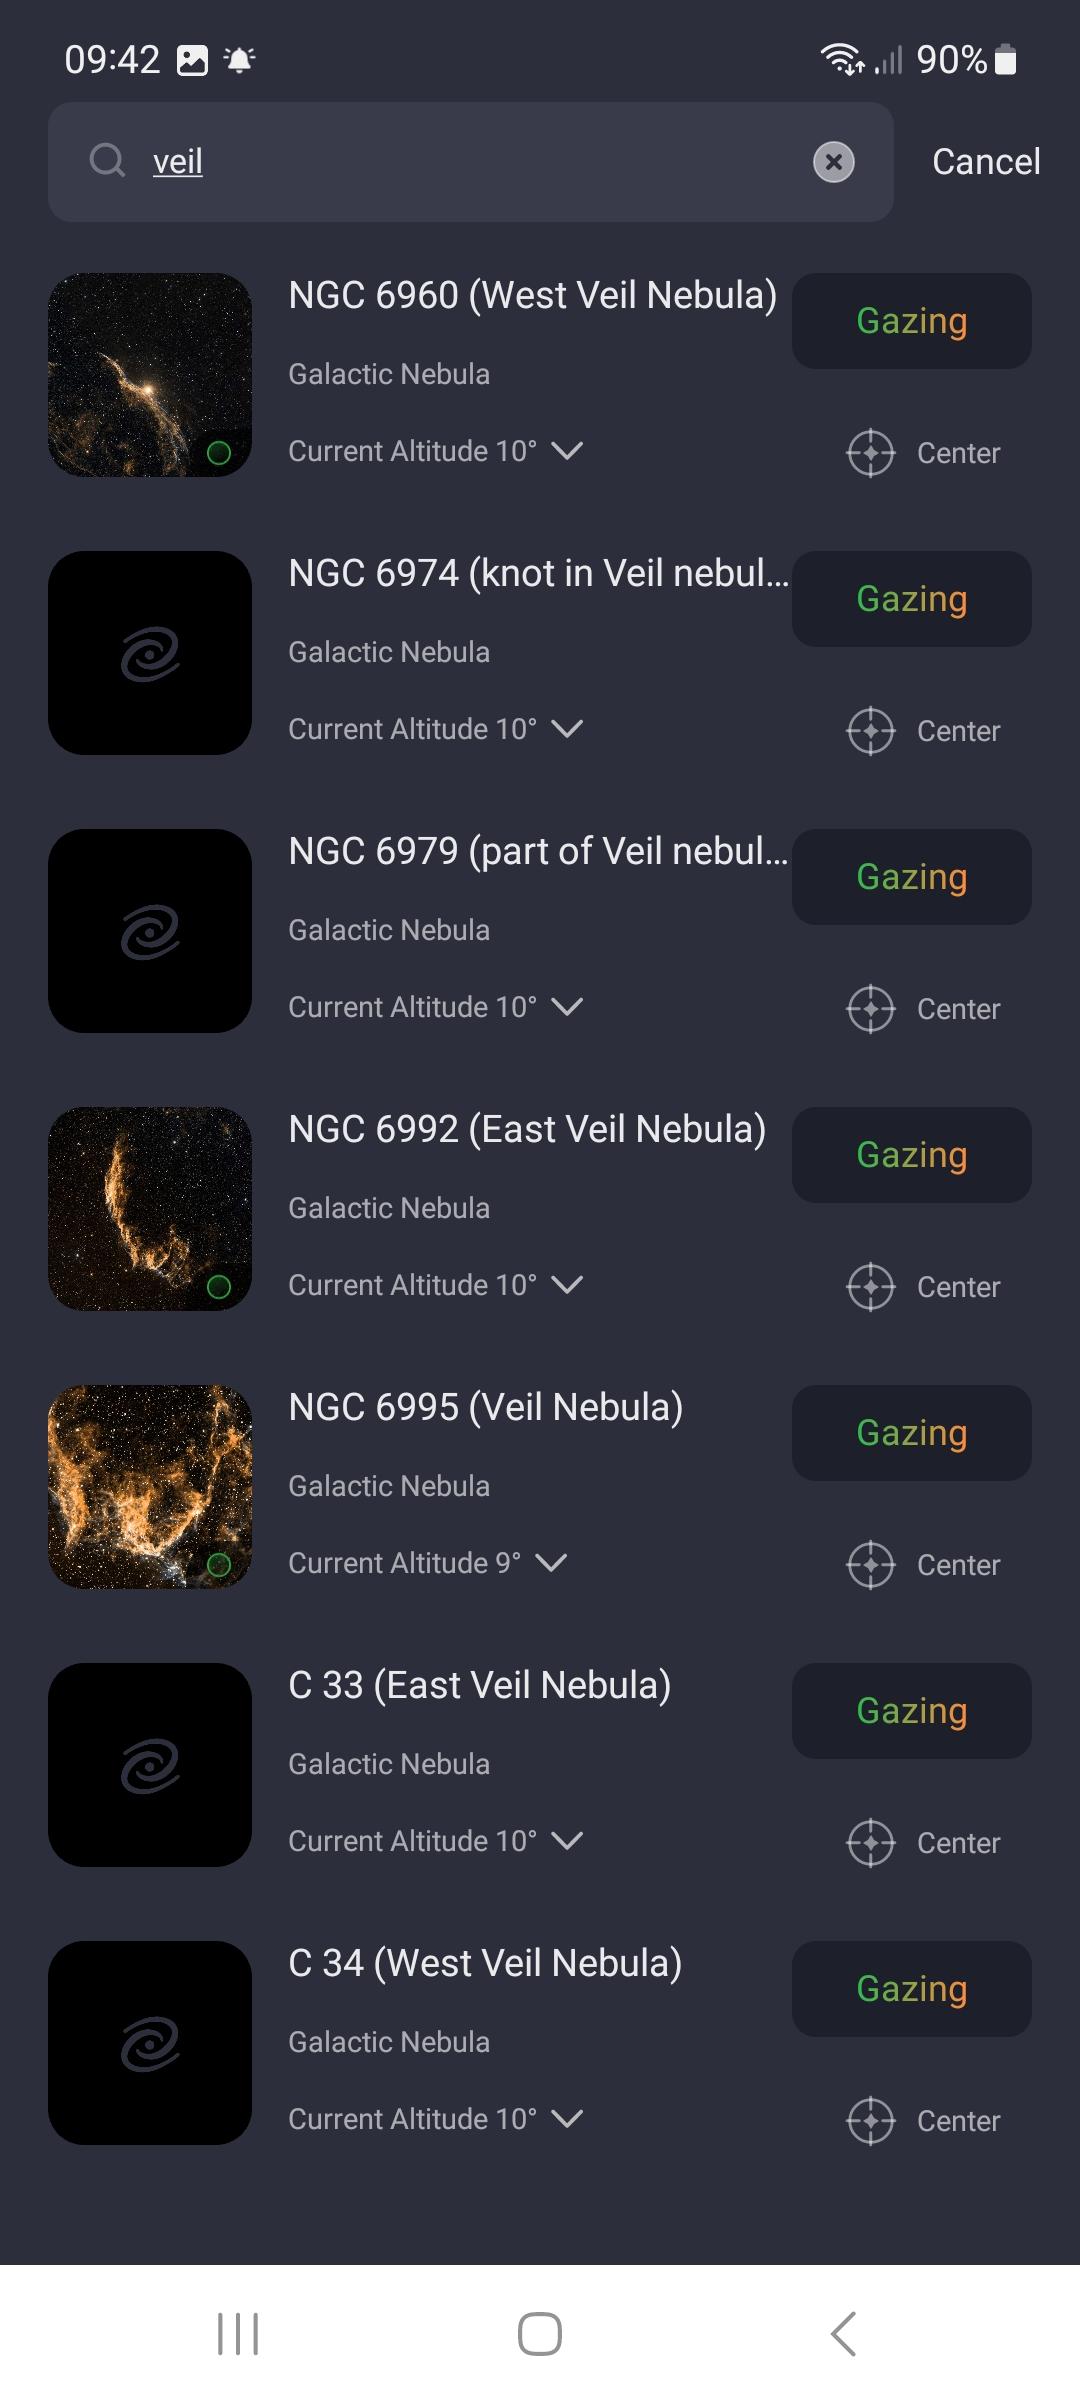
By clicking on the image of The Plough, I went into the map and searched for the Veil Nebula.
It found a number of entries for this, so clicked the Gazing button next to The Witches Broom and the SeeStar obediently went to it.
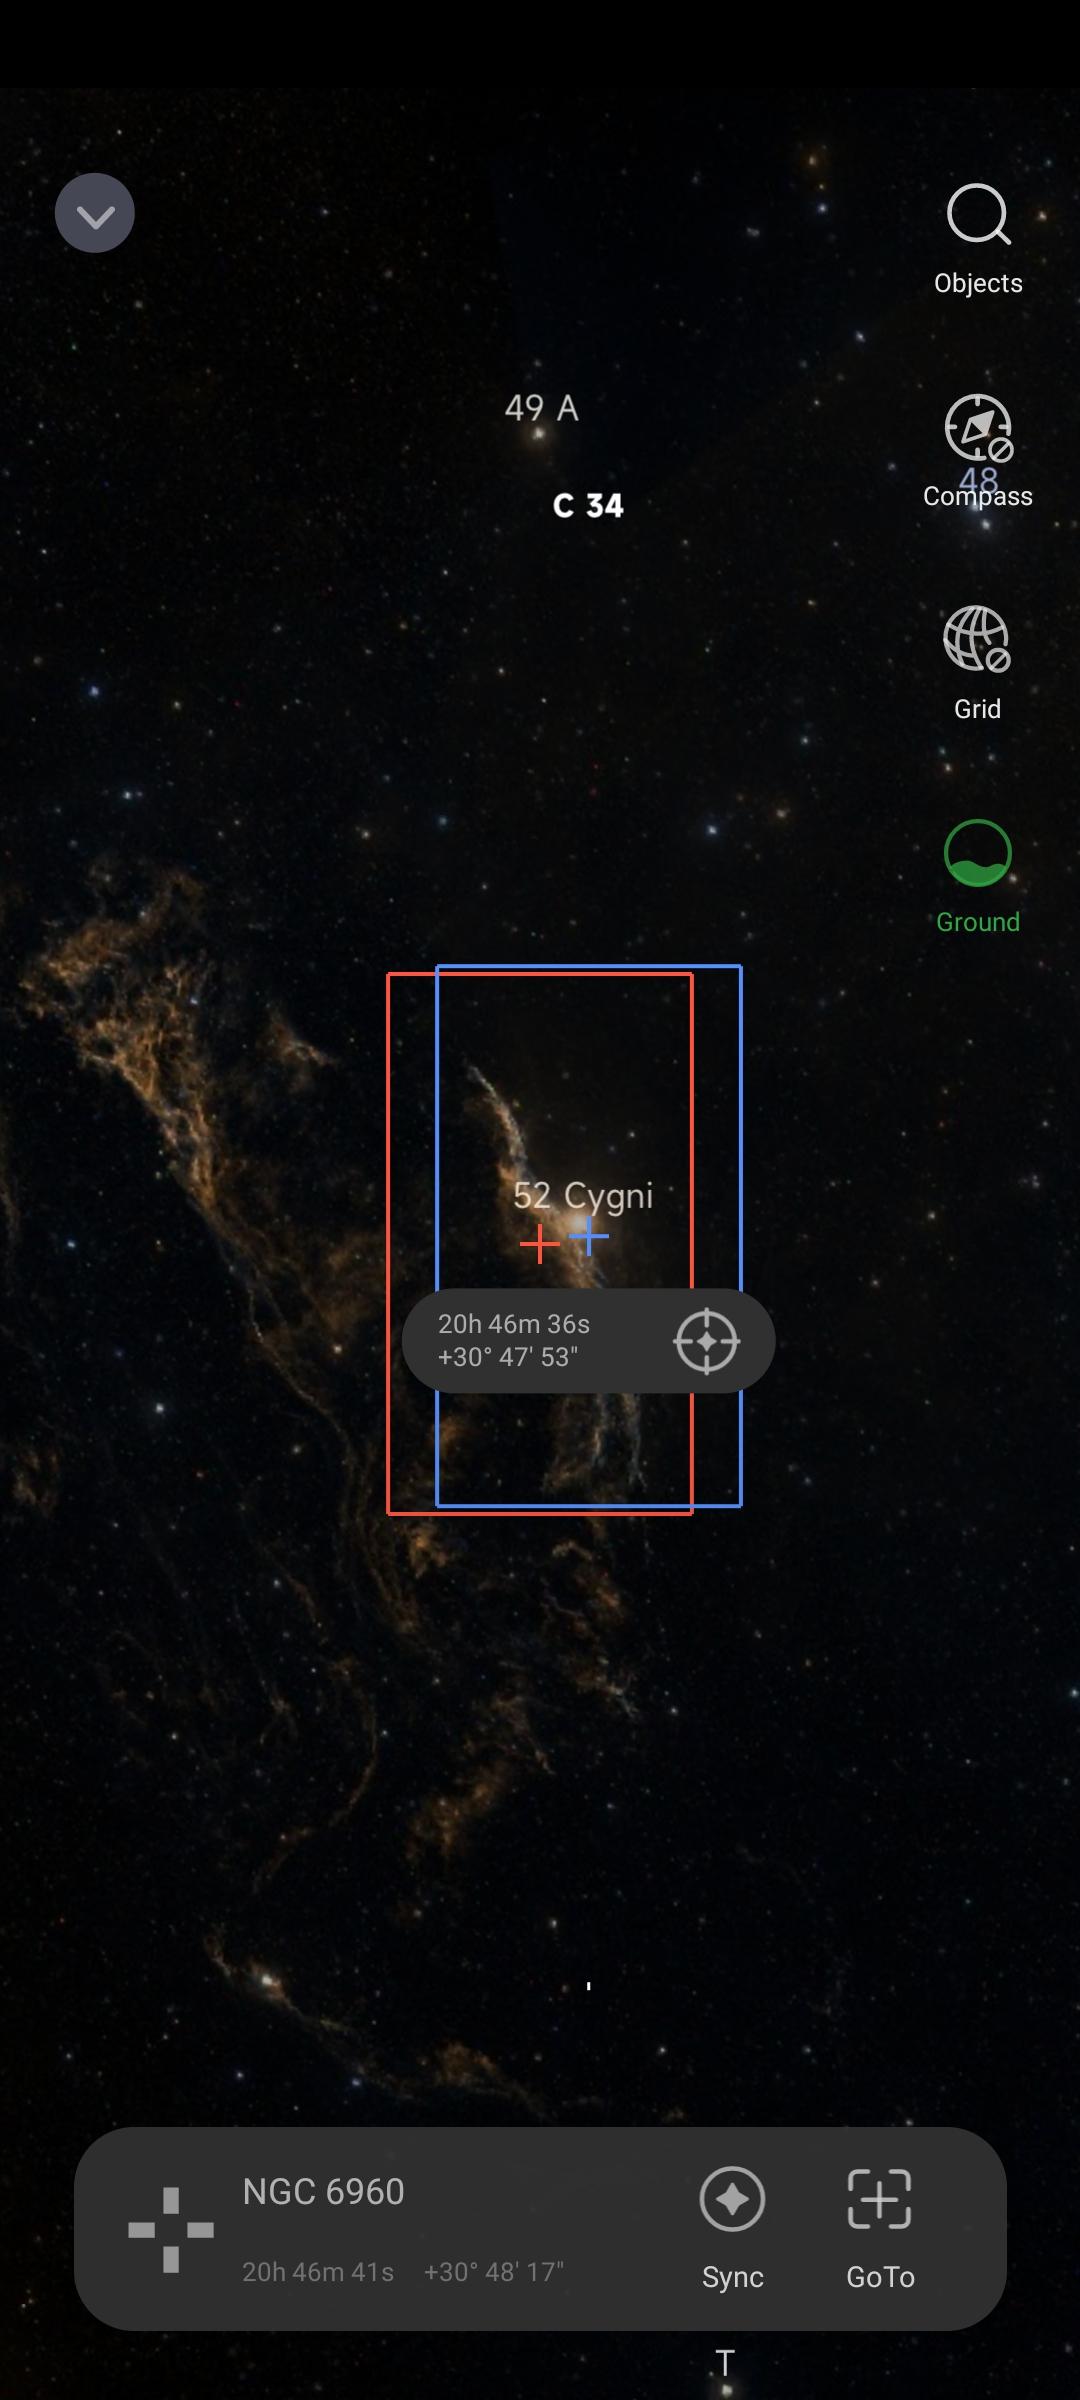
The SeeStar takes an image, looks at the position of the stars in the image and works out where it is pointing by plate solving, then corrects its position if required. No user intervention is required.
If the framing isn’t quite to your liking, you can move the background sky underneath the rectangle to reposition the camera.
Comet 2023 H2 (Lemmon) was in the database, and it went to it, and managed to image the comet, but I could not get a very good image, as the comet was moving too fast.
 The SeeStar has been set so that the camera chip is set to give a portrait image, rather than landscape. This cannot be changed. I guess ZWO did this so that the image format fits popular sharing apps, such as Instagram, so images can be shared easily.
Clicking the button top left, brings us out of the map back into the Stargazing window.
Once it has settled on the chosen object, it will be continually previewing.
Some stars or bright objects should be visible on the screen.
Depending on which object you have selected, you may want to use the dual band filter to get better contrast of the nebula.
Click on the Filter button and the filter moves across the camera and will be highlighted in green.
The image can be brightened or dimmed down by using the Adjust button, which changes the gain of the camera.
You are not able to adjust the exposure, I’ll mention more about that in a bit.
The AF button is the autofocus, which can be used if the autofocus hasn’t already worked.
The circle in the middle can be used to move the Seestar in any direction manually.
This control does take a bit of getting used to. I’d prefer up, down, left, right buttons and a speed control myself.
Taking an image.
To start the exposure, or as the SeeStar calls it, “Enhancing the image”, click the red button at the bottom of the screen
This takes a minute to start.
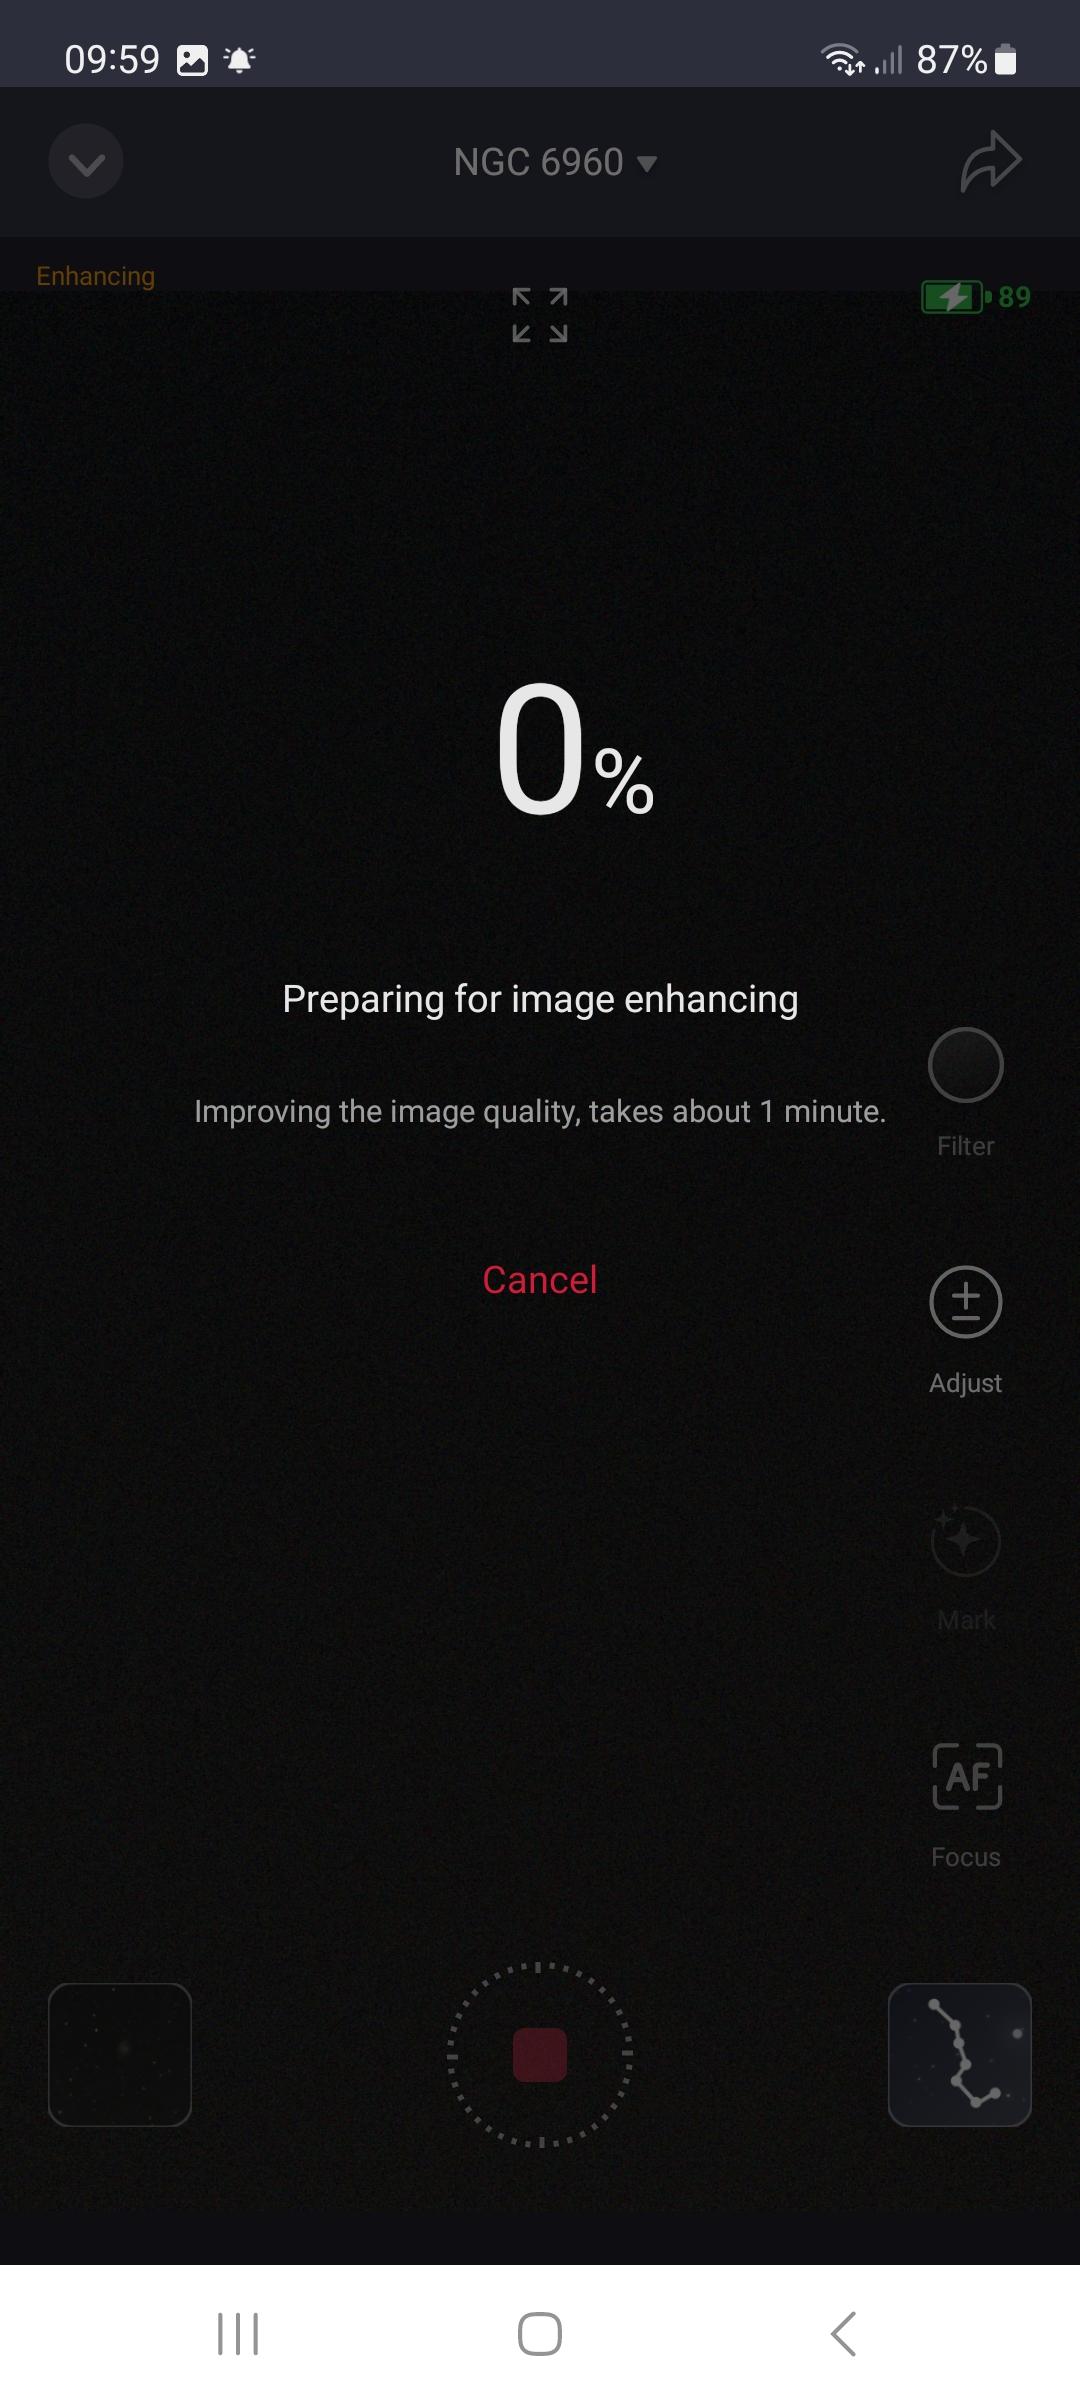
The SeeStar now takes a series of exposures, which it will add together at the end of the “exposure”. Here’s where some of those limitations I mentioned start to kick in.
The SeeStar is on an Alt-azimuth mount. As a result, as the sky rotates above (Oh, OK, as Earth rotates under the sky), the image will rotate in the field of view. This can be easily noticed in how the orientation of Orion rises and sets leaning in different directions.
As the imaging chip is set and cannot rotate to match this rotation, as the SeeStar tracks the sky, the image falling on the chip is rotating. This will produce trailing.
The rotation of the images does produce some artefacts around the edges of the images, which gets worse the longer the exposure. I went up to 15 minutes for some exposures with one object, which went really well.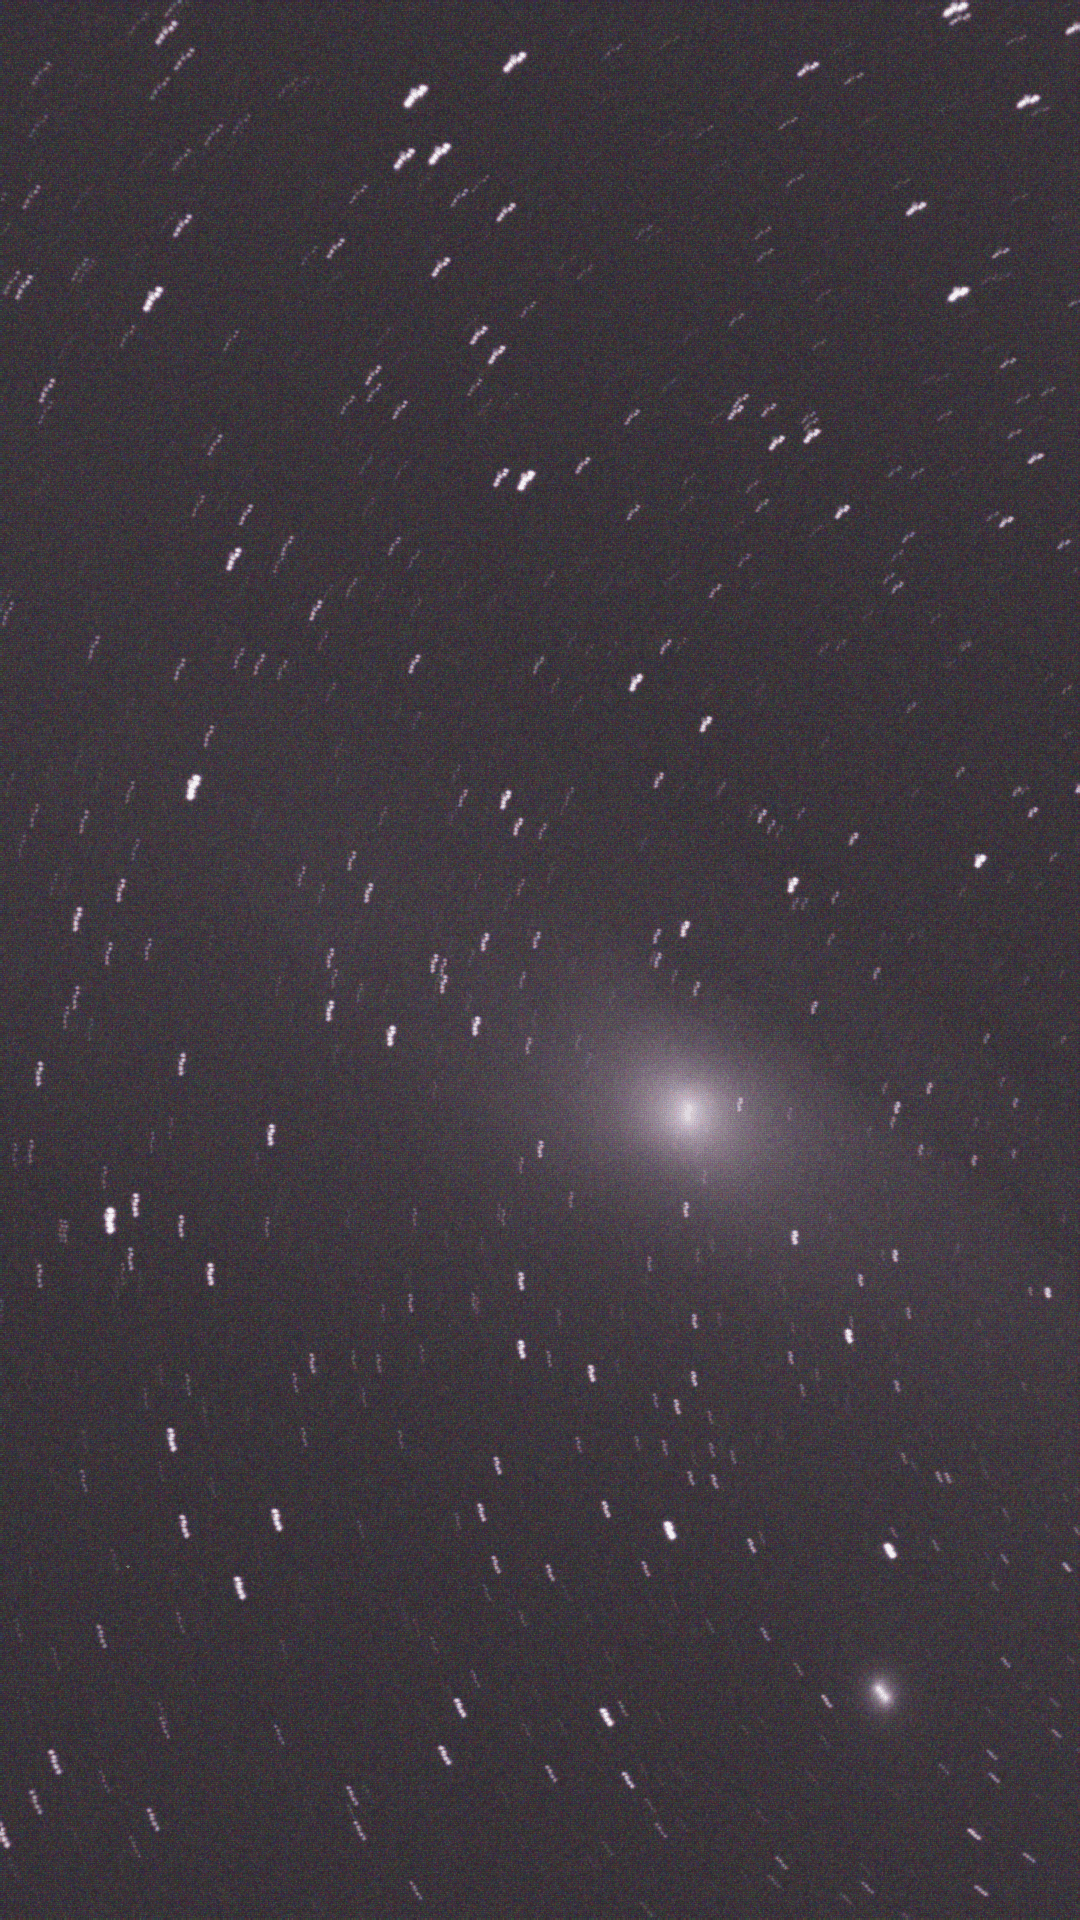
This is shown in this image on the right, which I stacked from a few SeeStar Subs to show the image rotation.
How does the SeeStar cope with all this to produce a nice image?
It takes very short exposures of 10 seconds, which minimise the amount of trailing visible in the image.
This is why you are unable to adjust the camera exposure. Longer exposures will start to show trailing.
Each sub image that the SeeStar takes is rotated and aligned on the star positions on the images to stack them together.
As the images stack up and are added together, fainter objects gradually brighten and more detail is revealed on the screen.
Added to this, another problem is that the SeeStar is not tracking the sky accurately. It can’t.
As an astrophotographer I am so used to equatorial mounts and autoguiding to get really good results, but these smart scopes work totally differently.
Between each image, the SeeStar takes an image to check whether the object is located on the imaging chip and adjusts the position of the scope, if necessary.
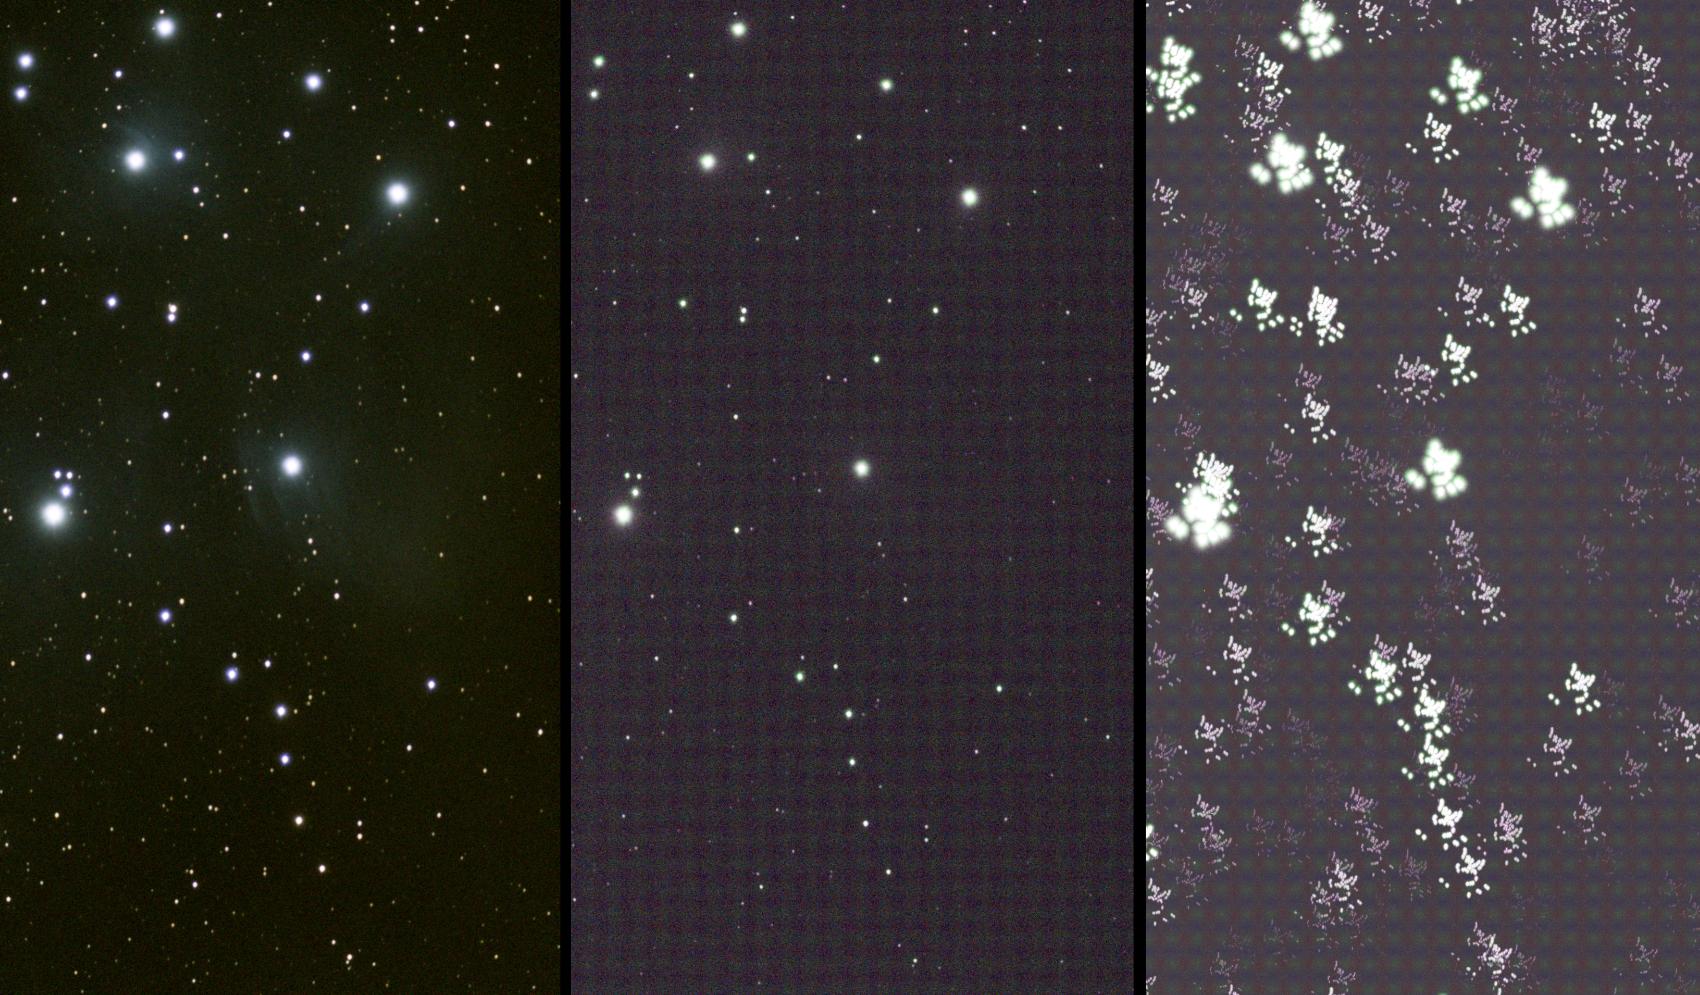
The image below is The Pleiades image created by SeeStars by stacking a number of 10 second subs together.
The centre image is one of the raw subs it took.
In the right-hand image I have taken a number of the subs it took and created a stack without aligning each image on the stars.
As you can see it’s a right mess. It reveals just how much the SeeStar moves between each sub.
The SeeStar has coped admirably with the rotation and this to produce the final image.
That’s enough about how it works, you really want to know what are the images like.
As well as some bright targets, I deliberately chose others that should challenge it a bit.
The first set of images below are as they were produced from within the app.
I’ll show later how the images can be further improved.
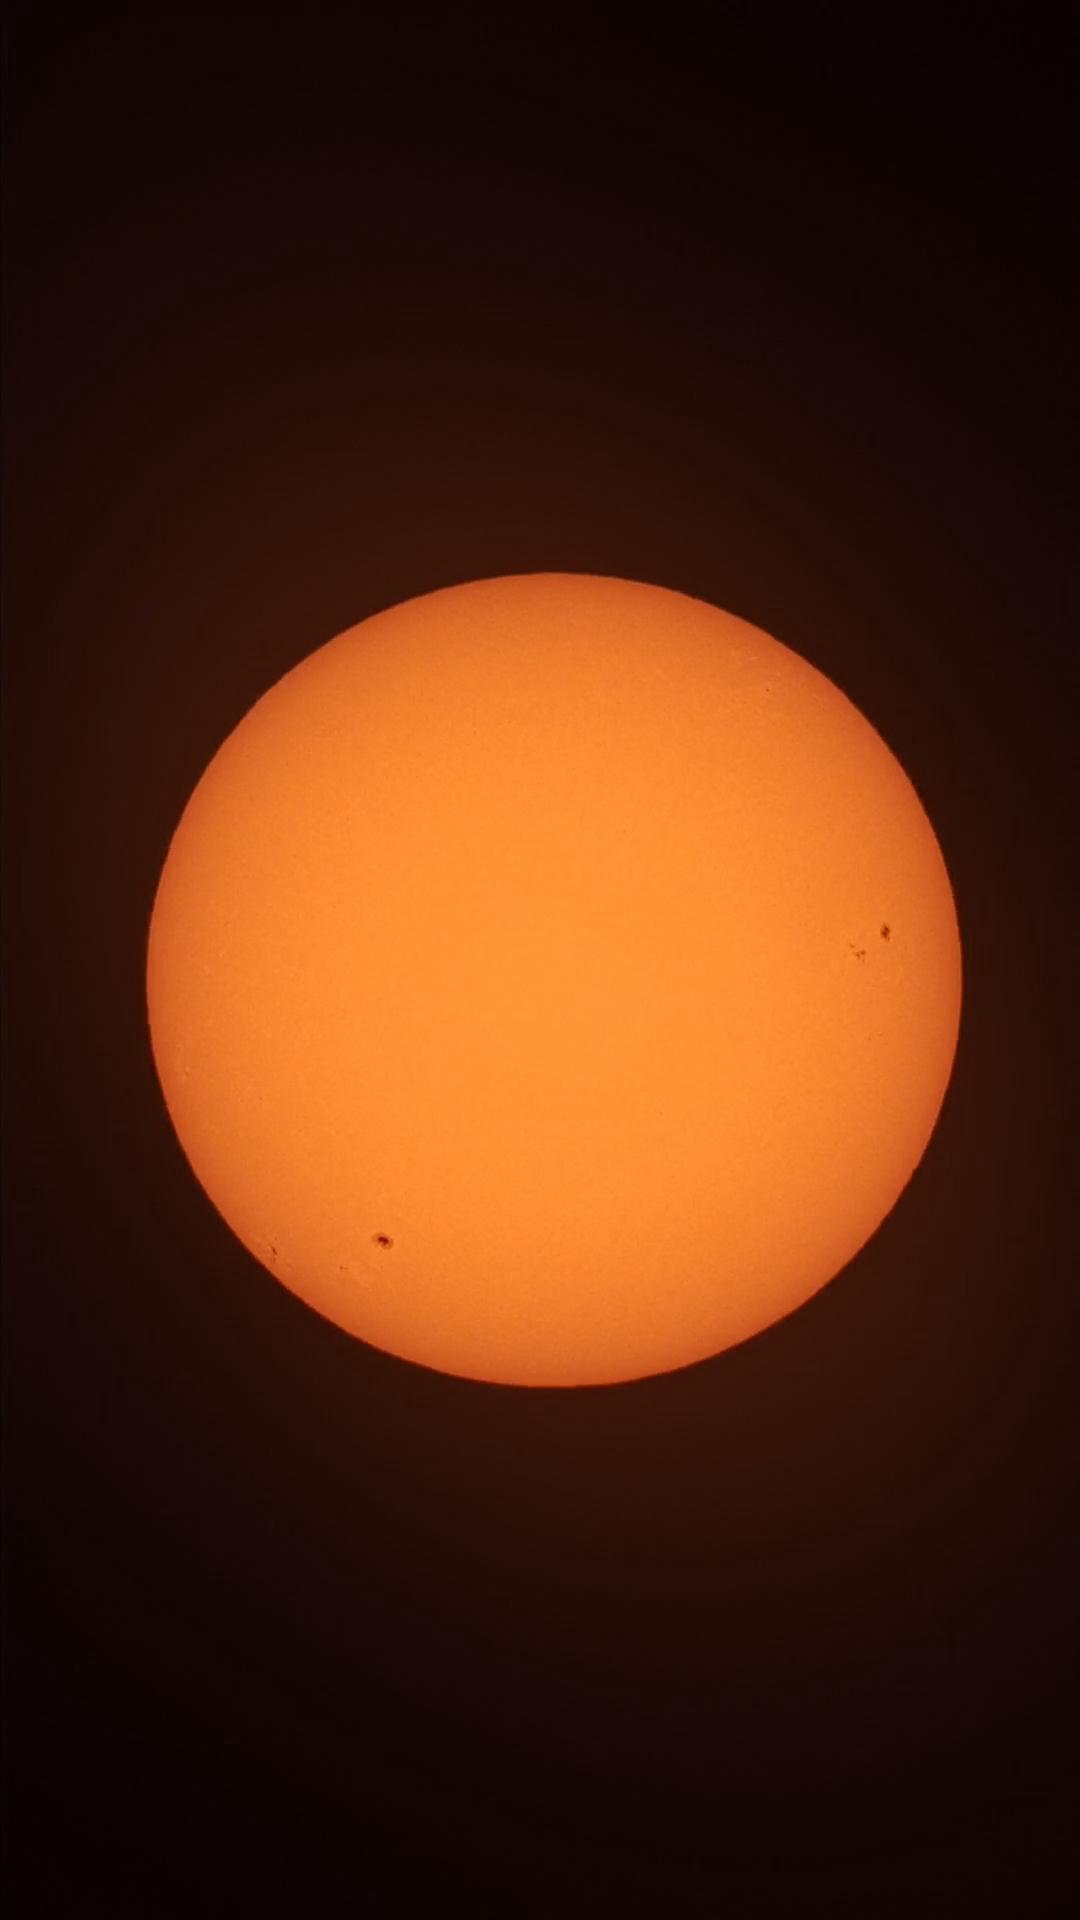
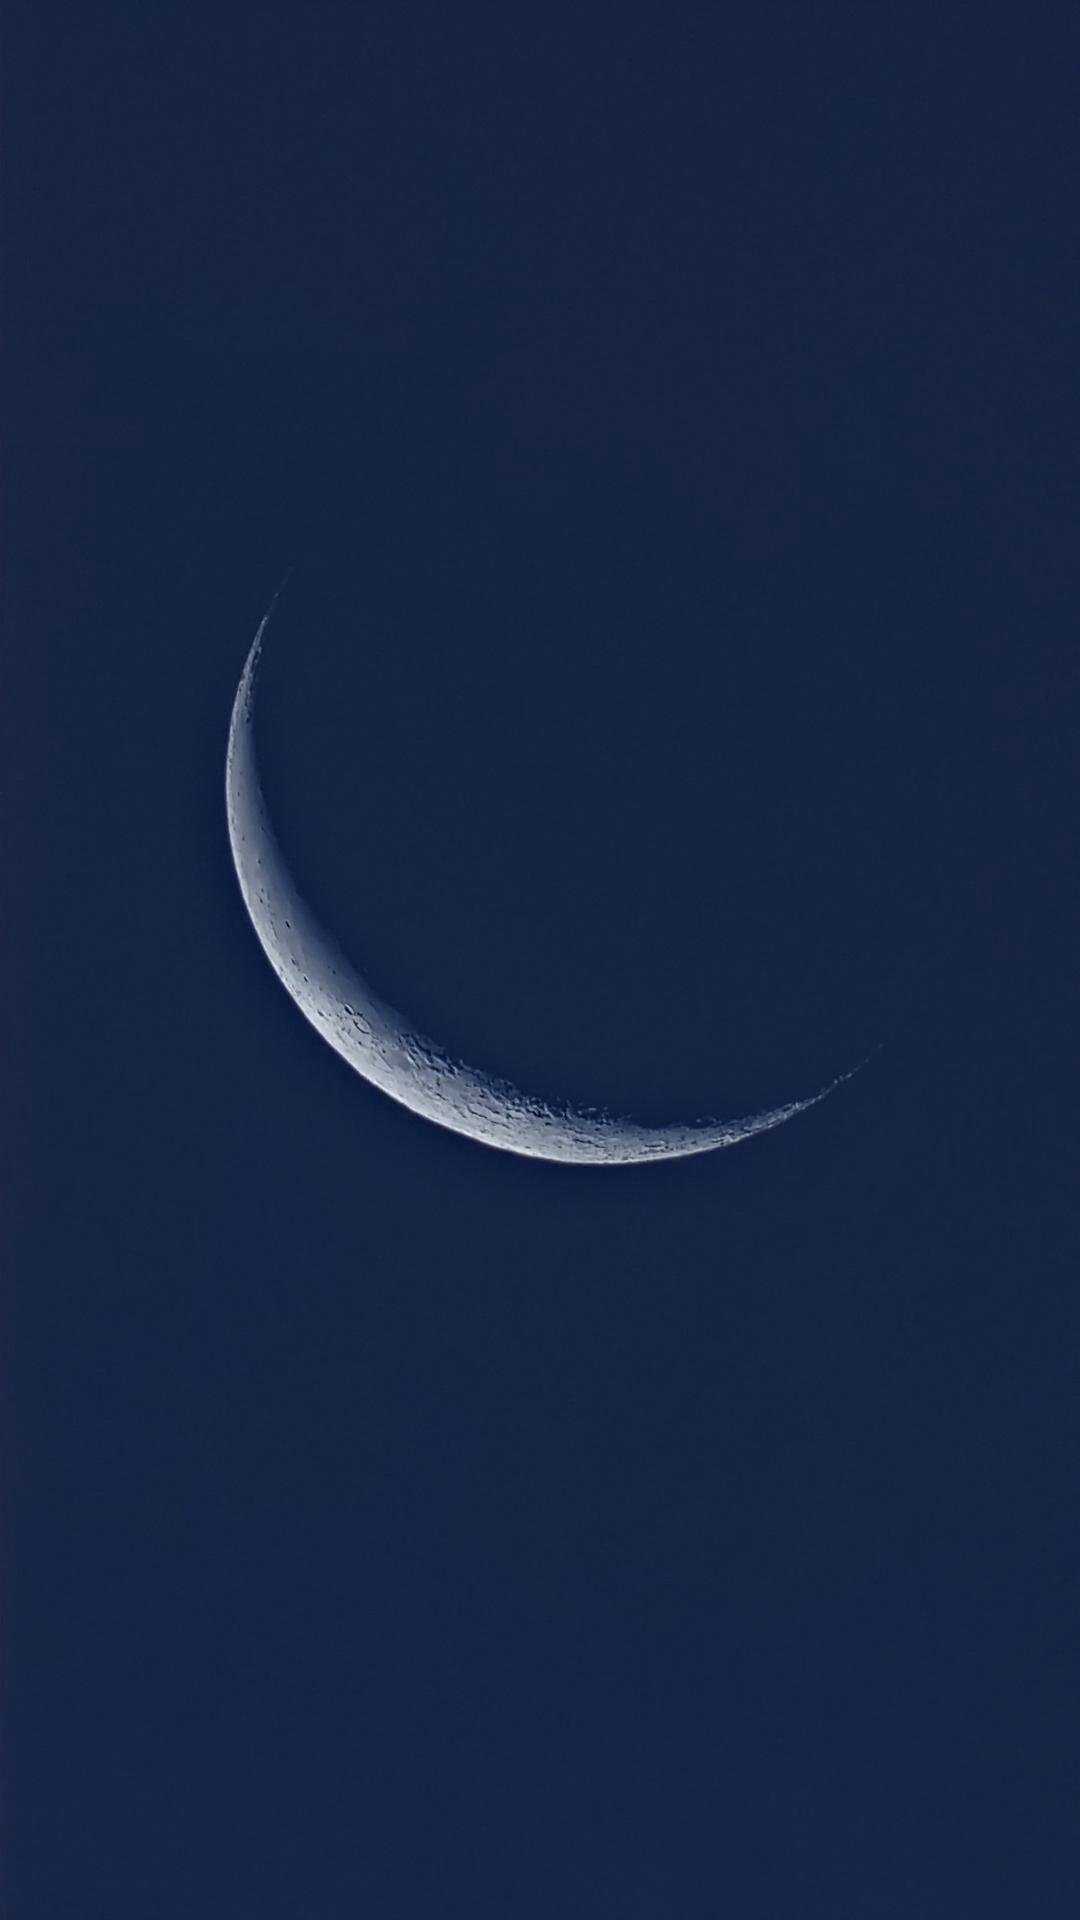
The Sun & crescent Moon in a bright morning sky.
SeeStar finds these itself, but make sure you put the solar filter on when pointing at the Sun.
The Moon could not be found in the bright twilight I tried, but I could use the on-screen controls to get it in the field of view and adjust the image brightness to match what I wanted to capture.
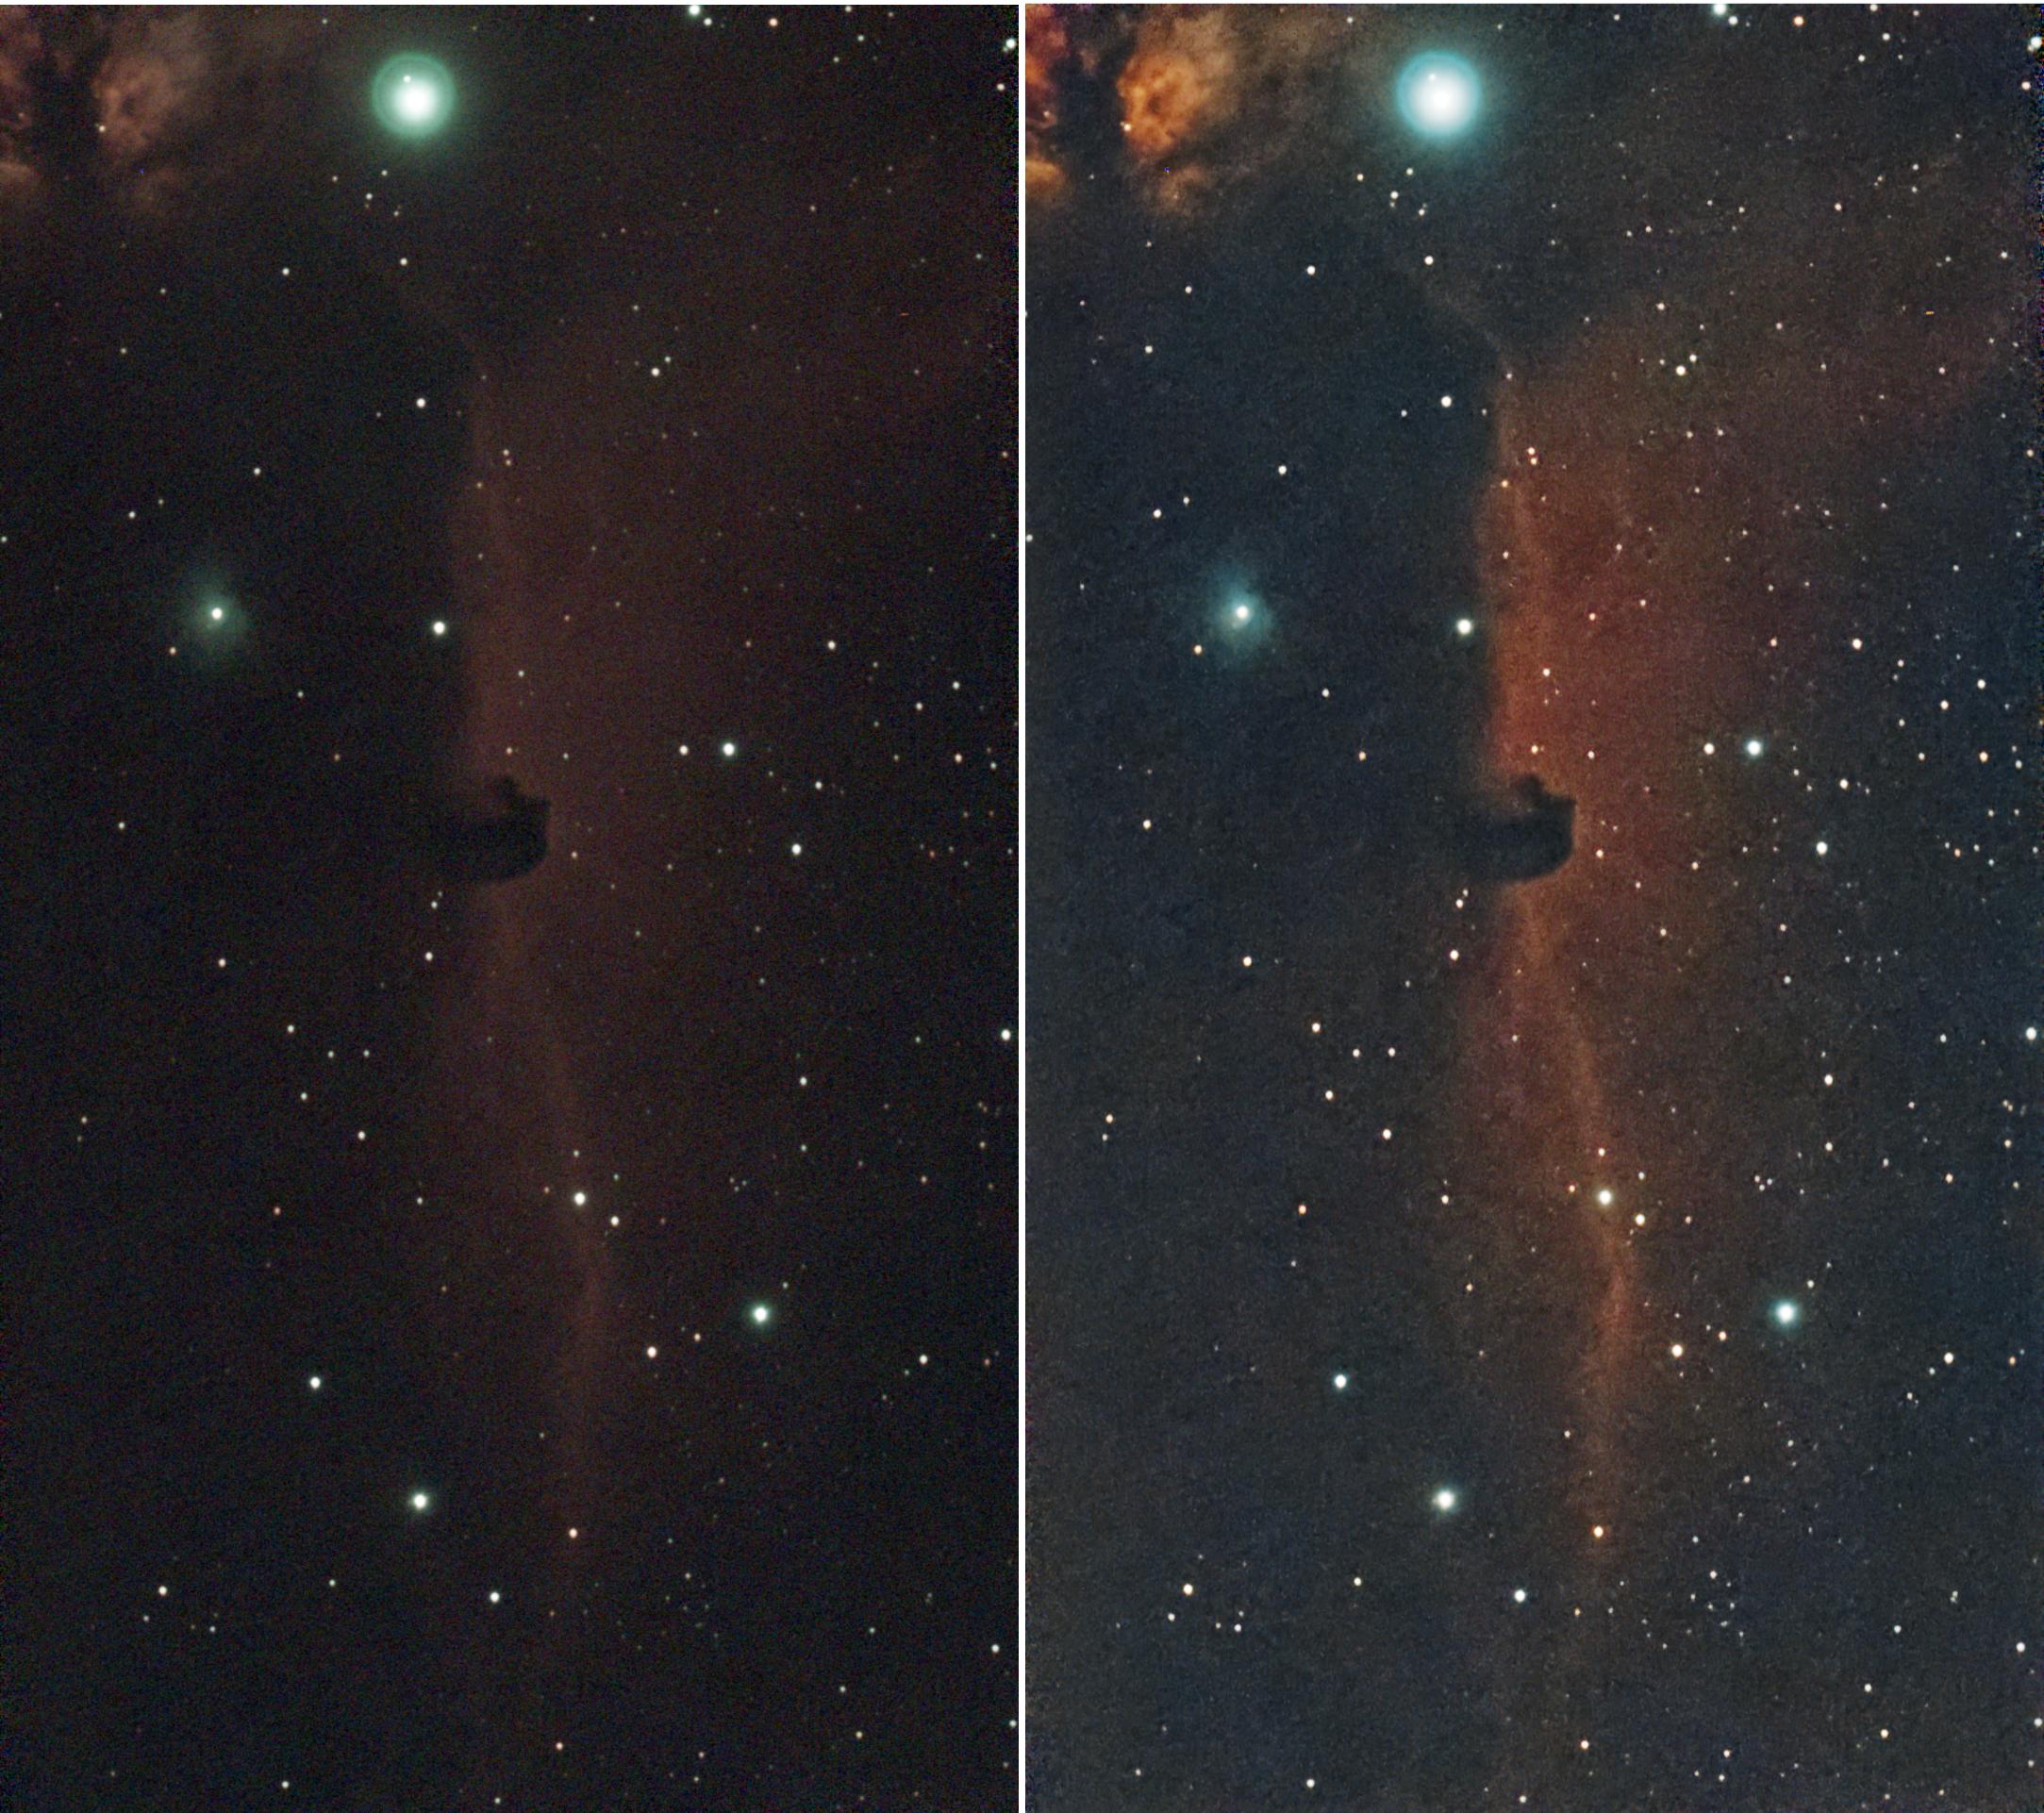
The Sword Handle in Perseus, The Cygnus Wall and The Crab Nebula.
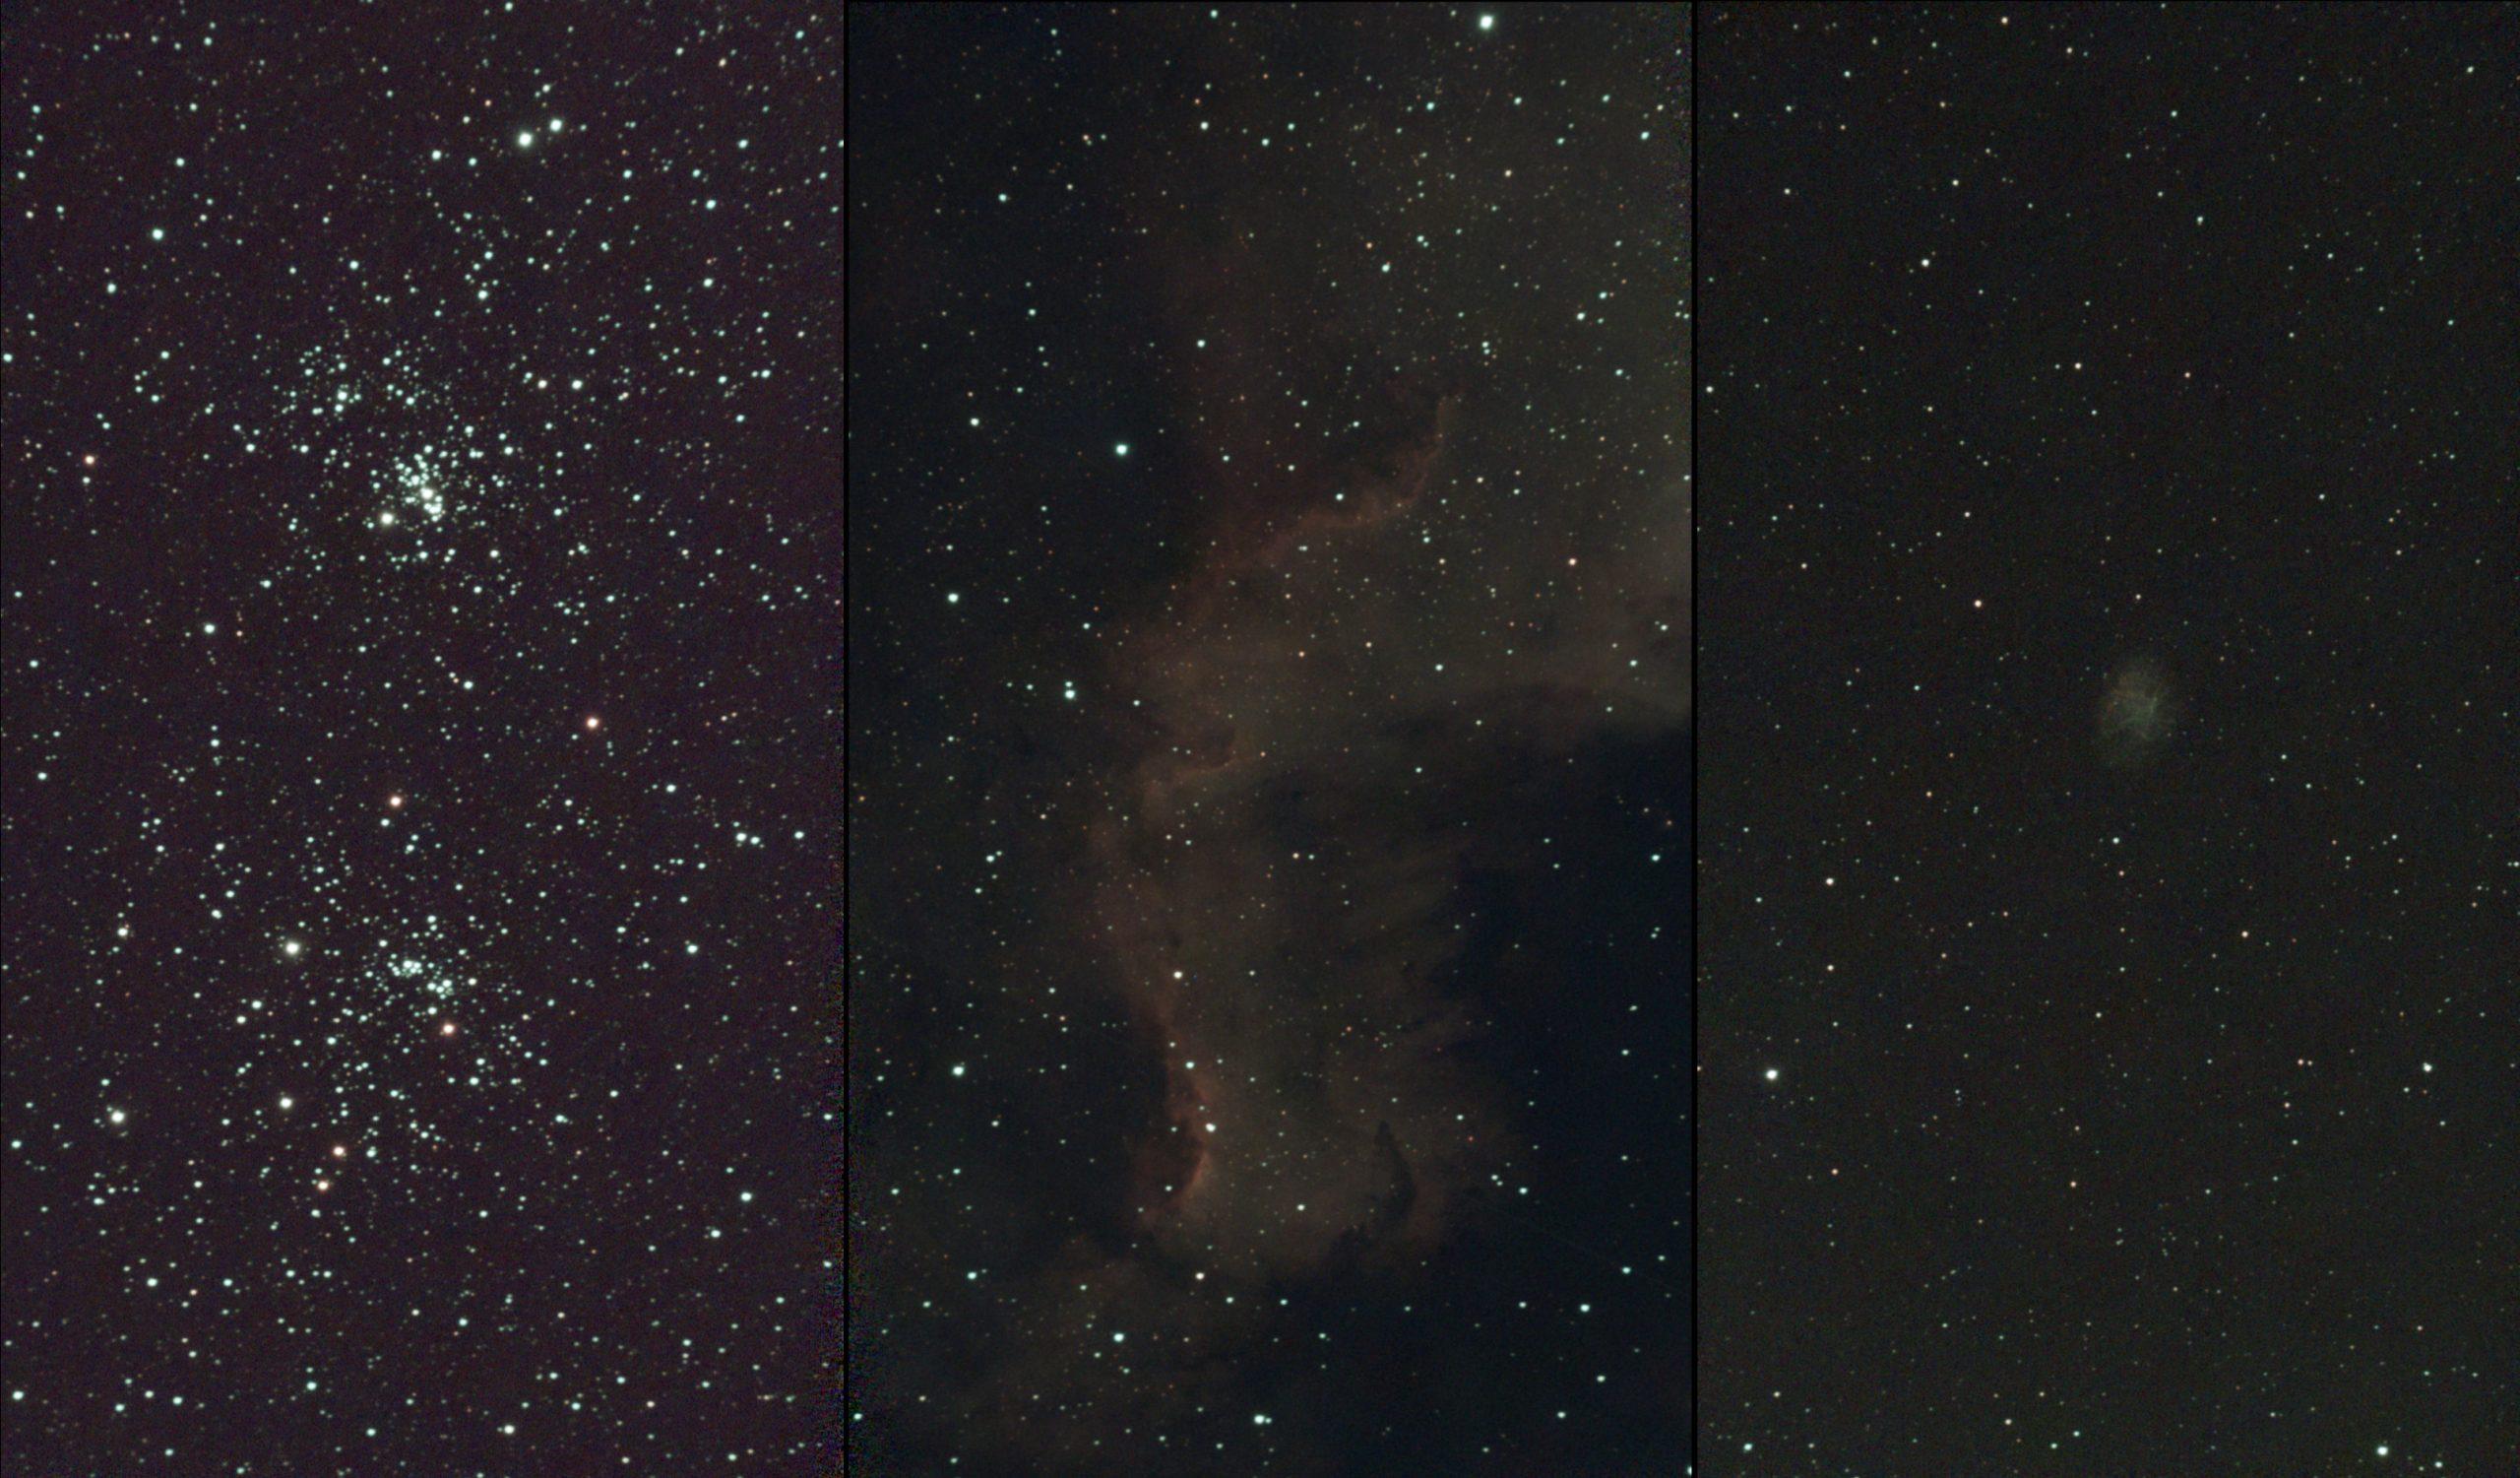
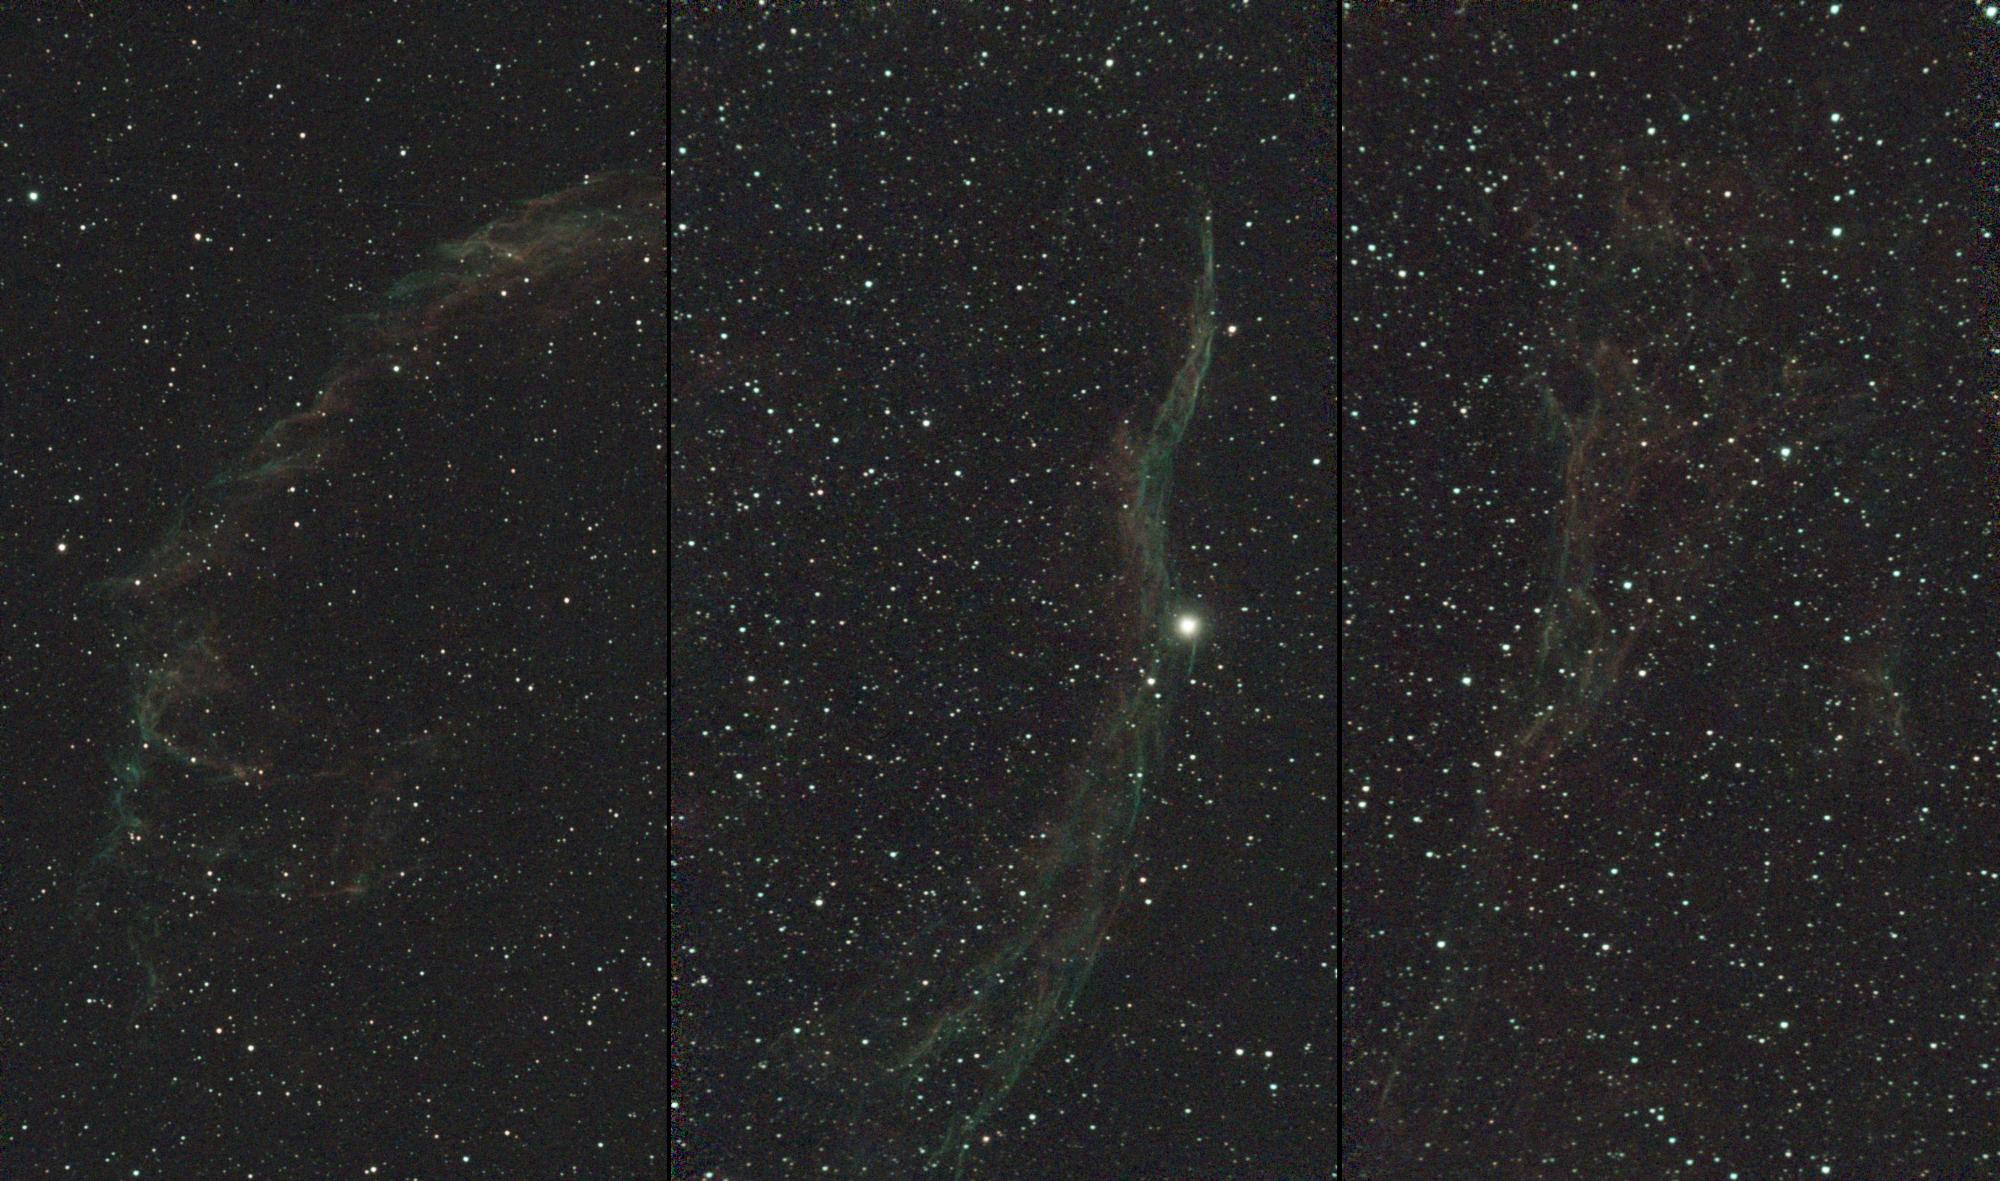
Three parts of the Veil Nebula in Cygnus.
Messier 33, Bubble Nebula and Messier 52, The Crescent Nebula.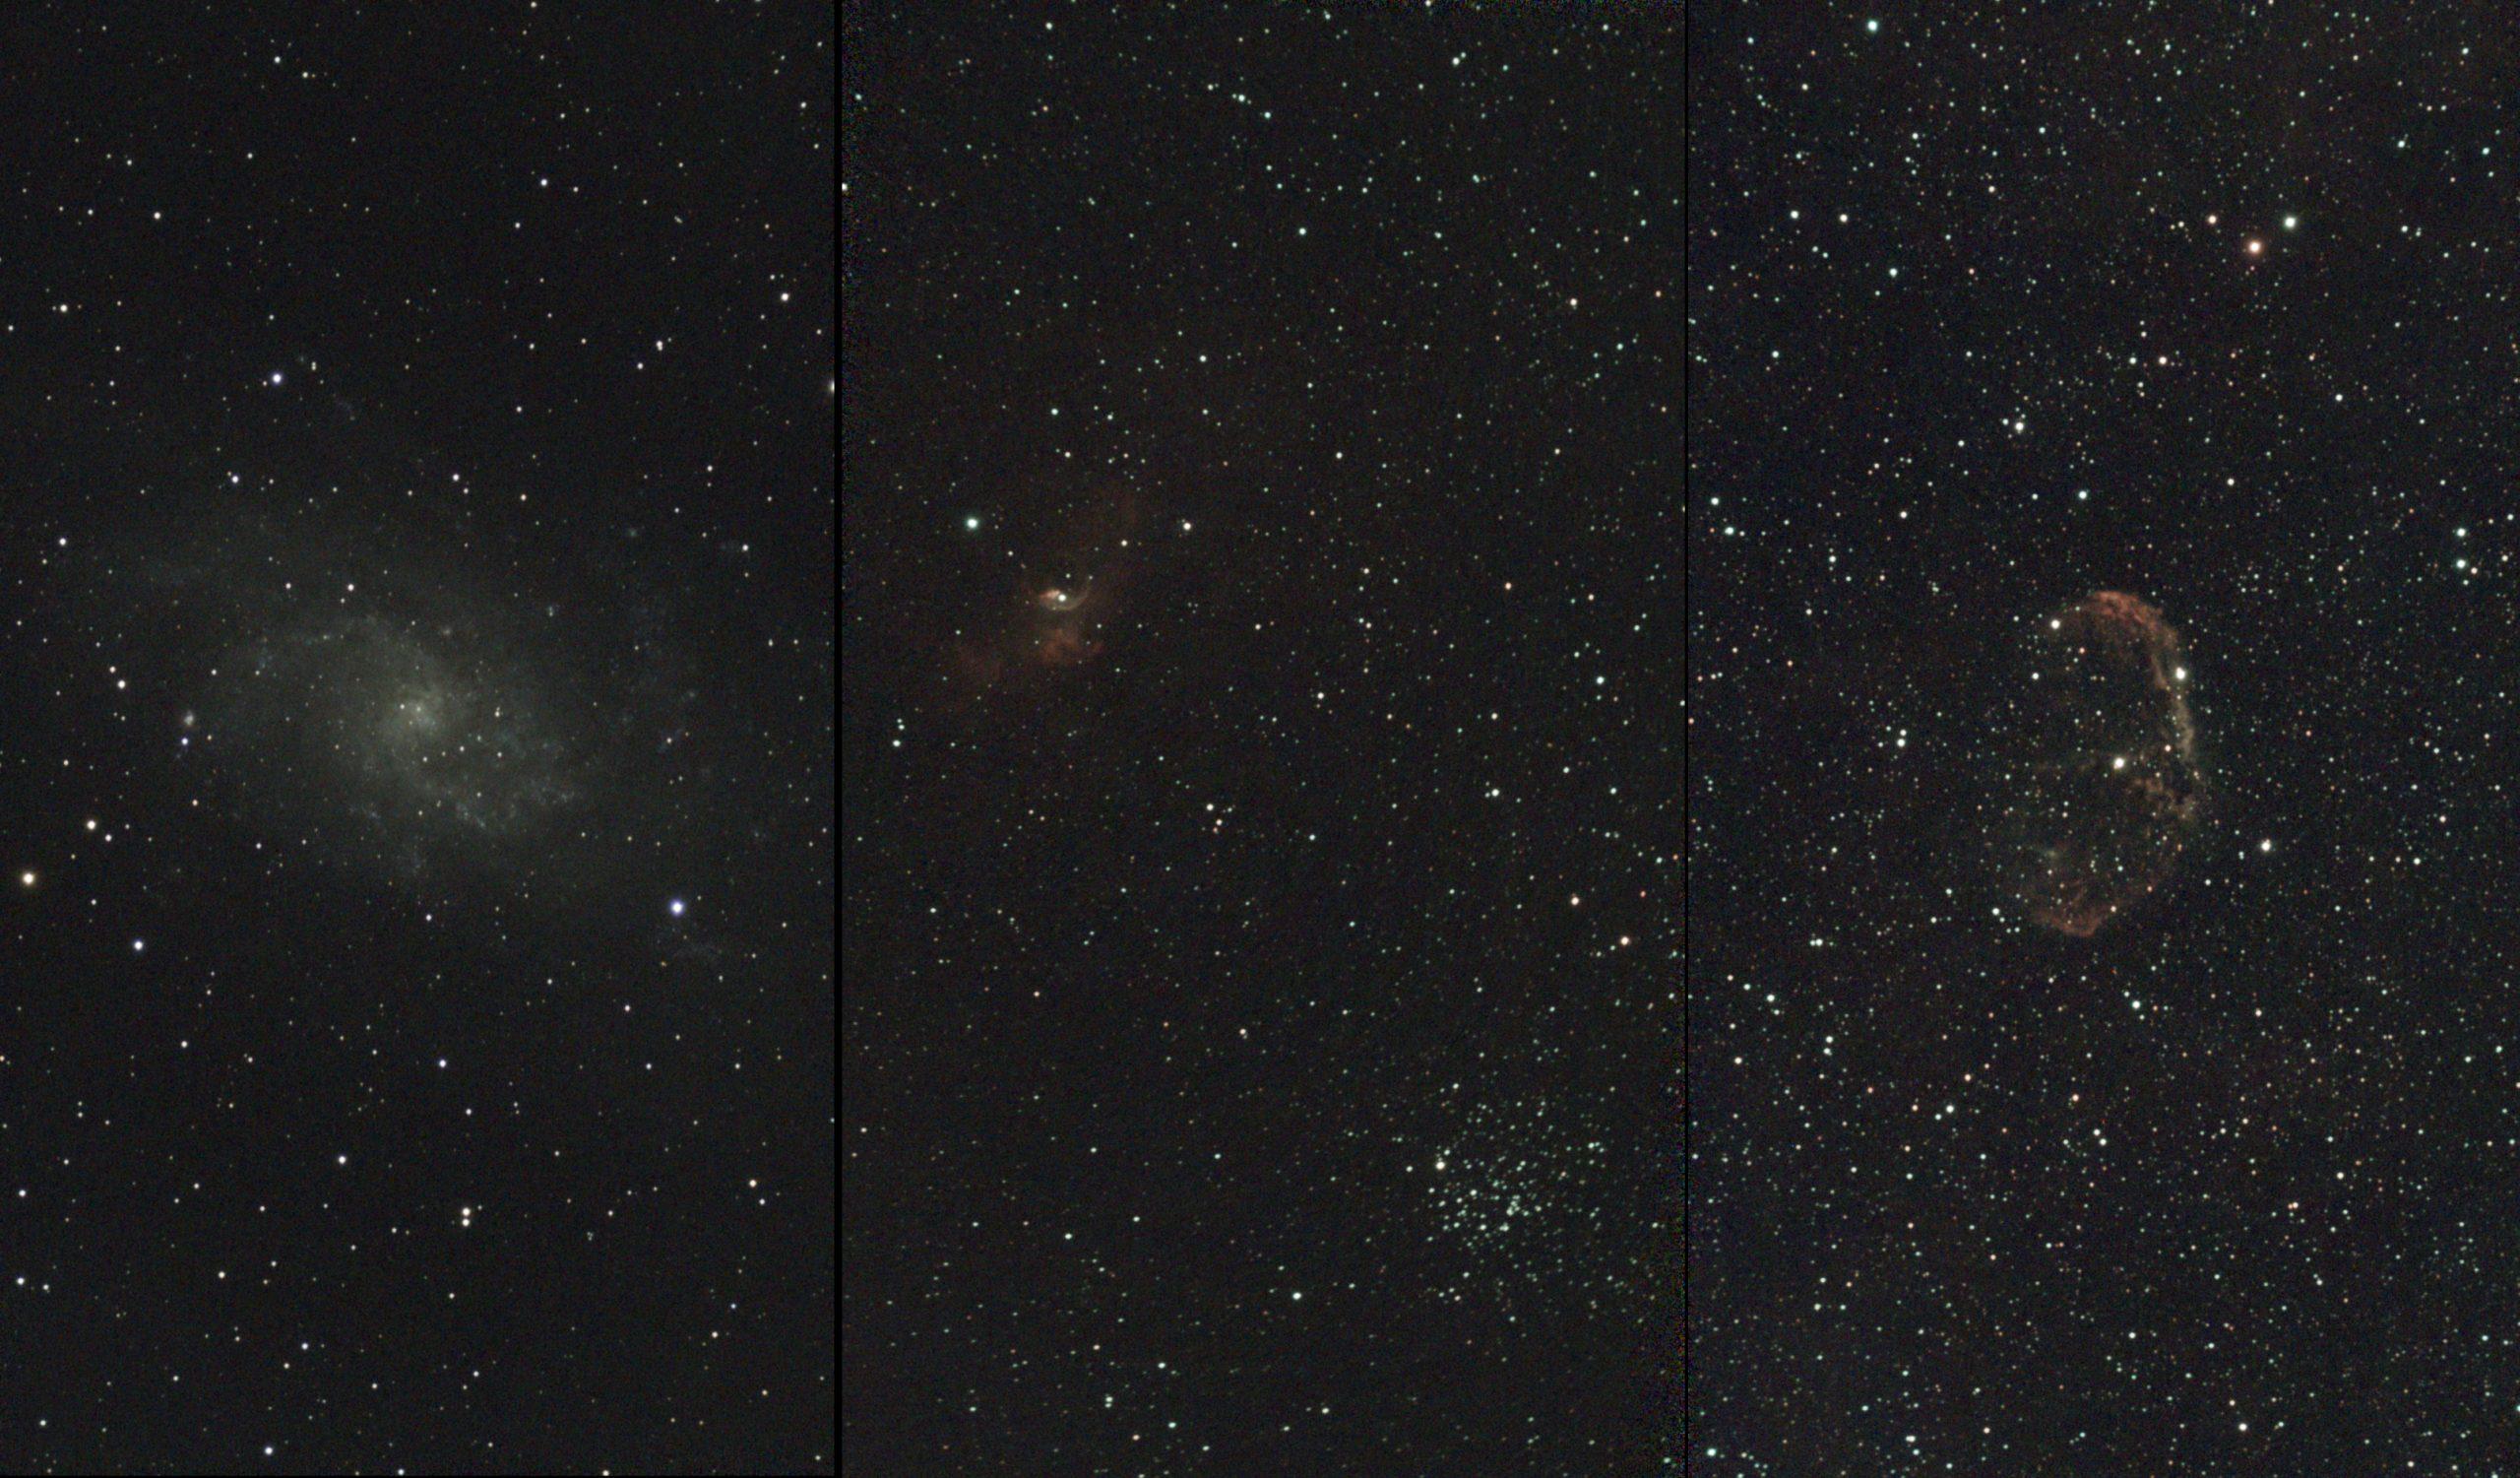
The Orion, Horsehead and Elephant trunk Nebulae. 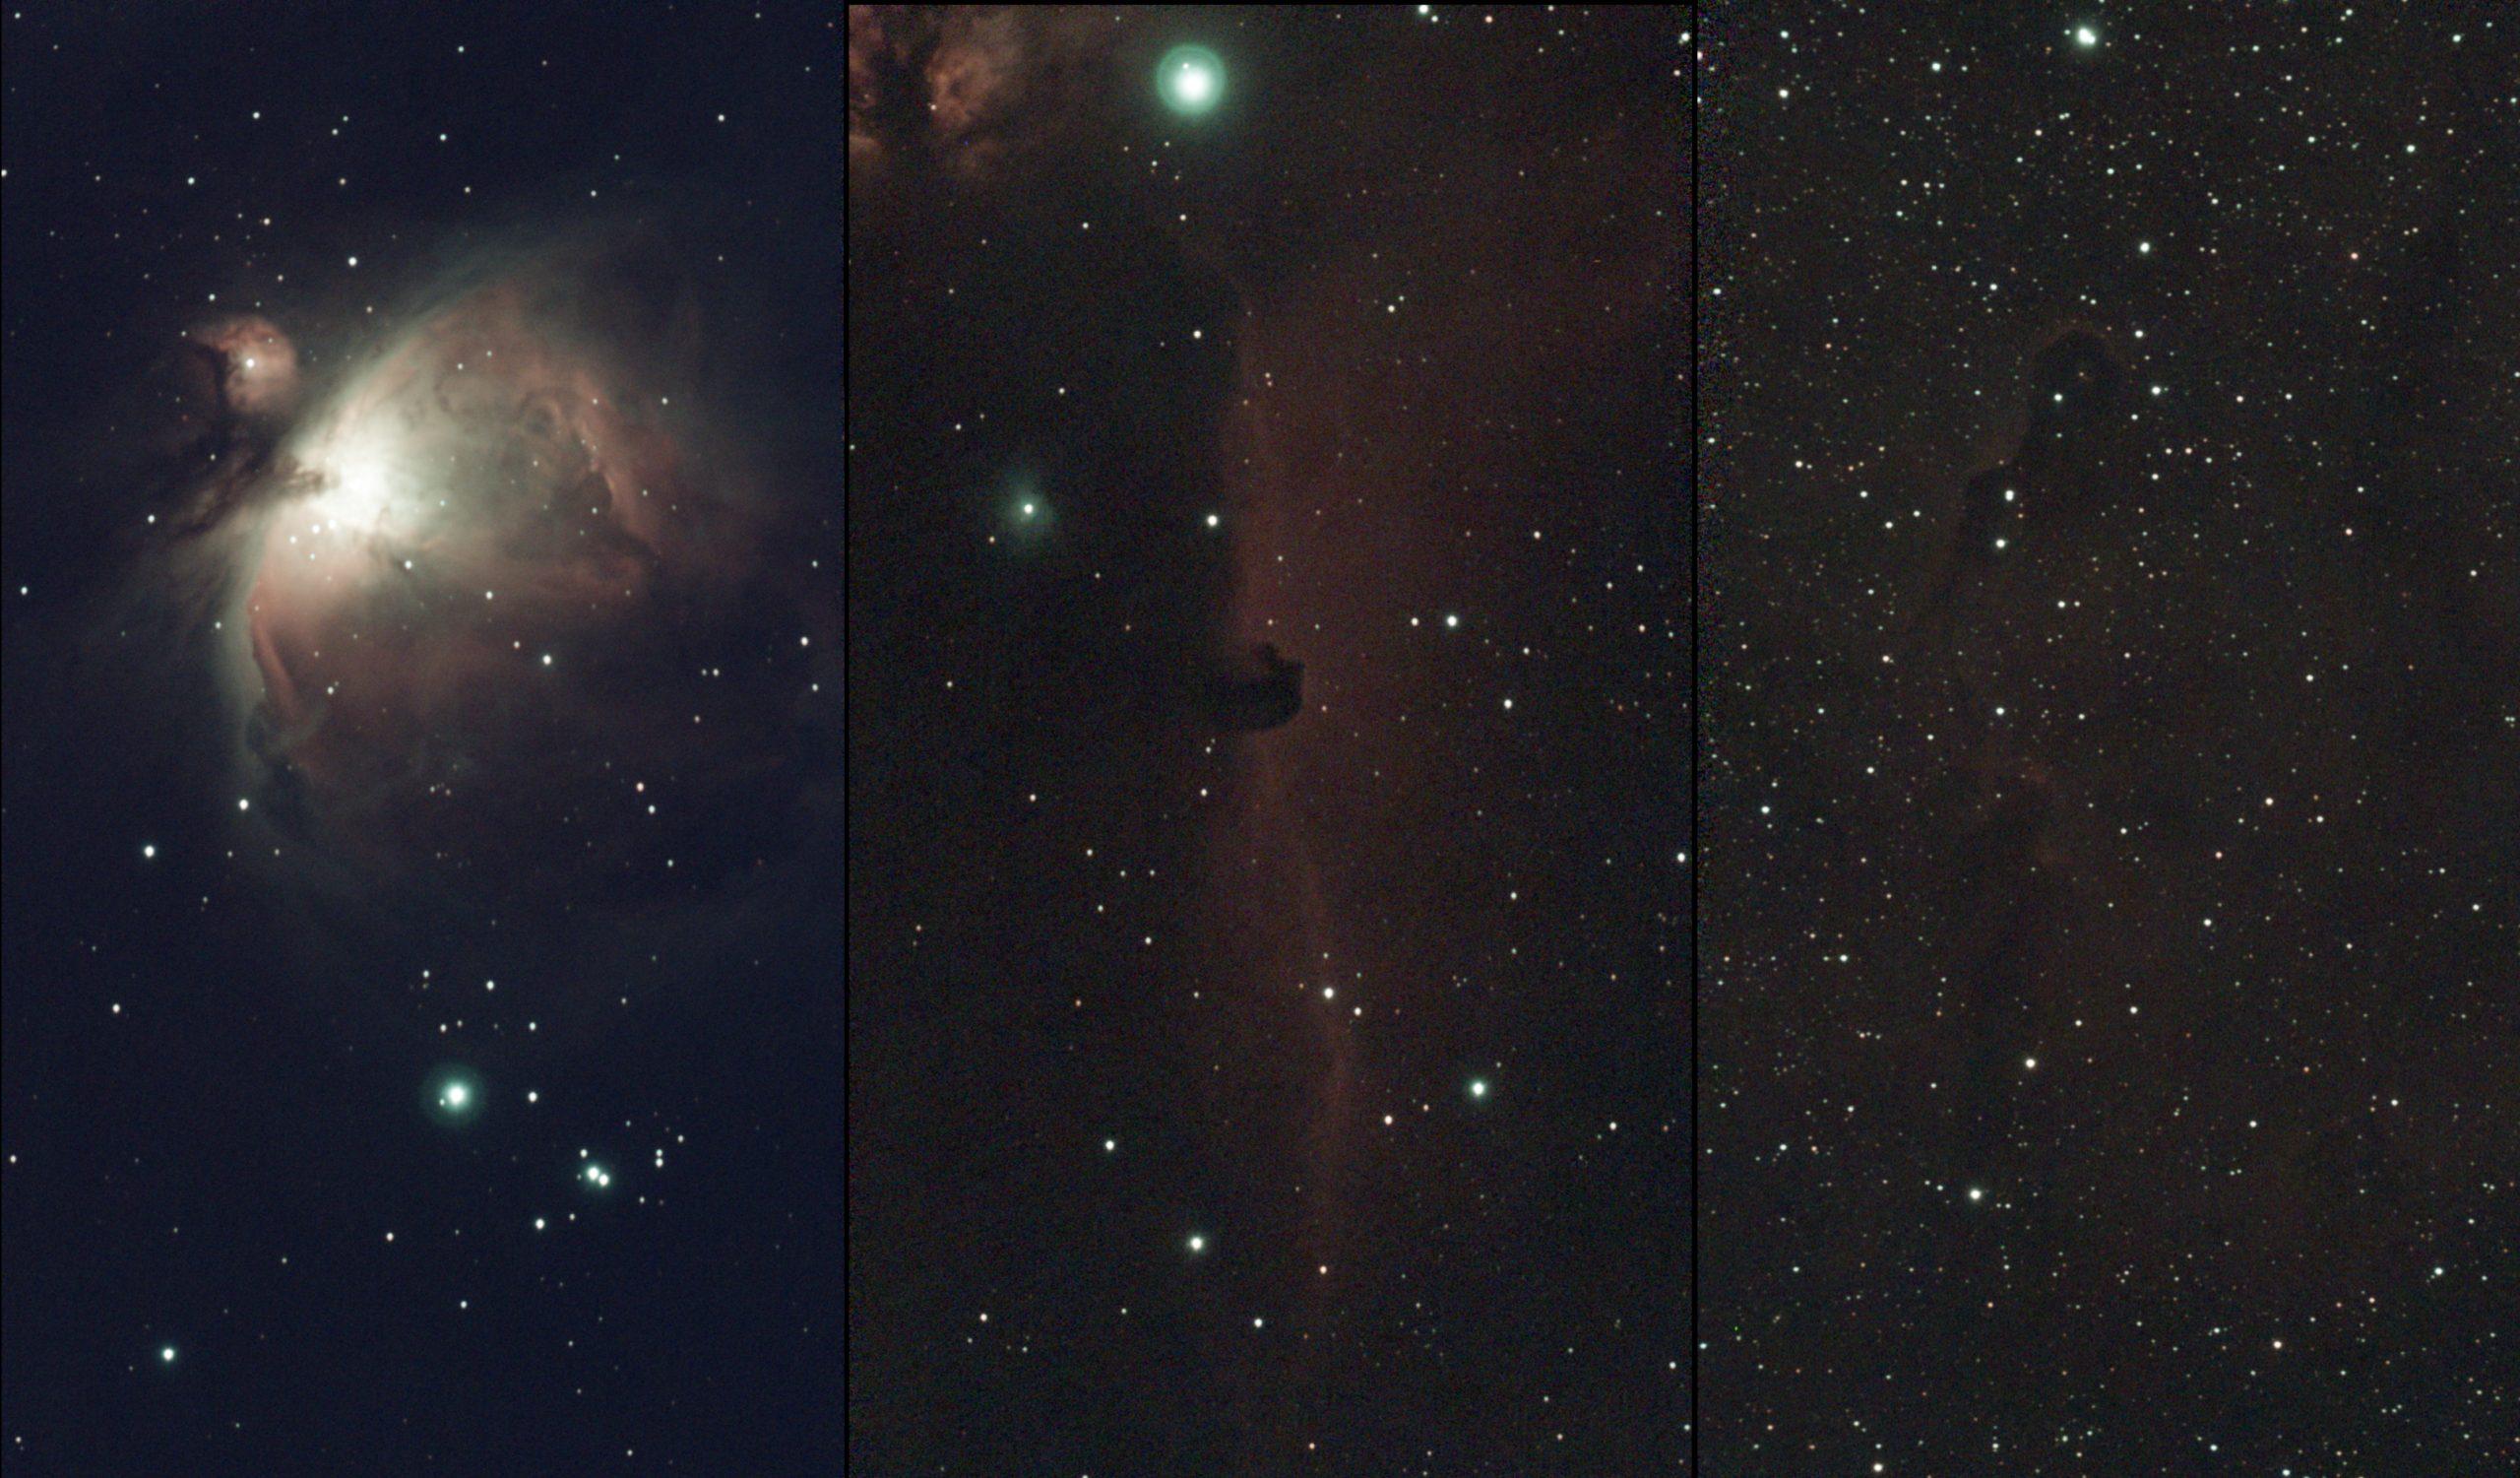
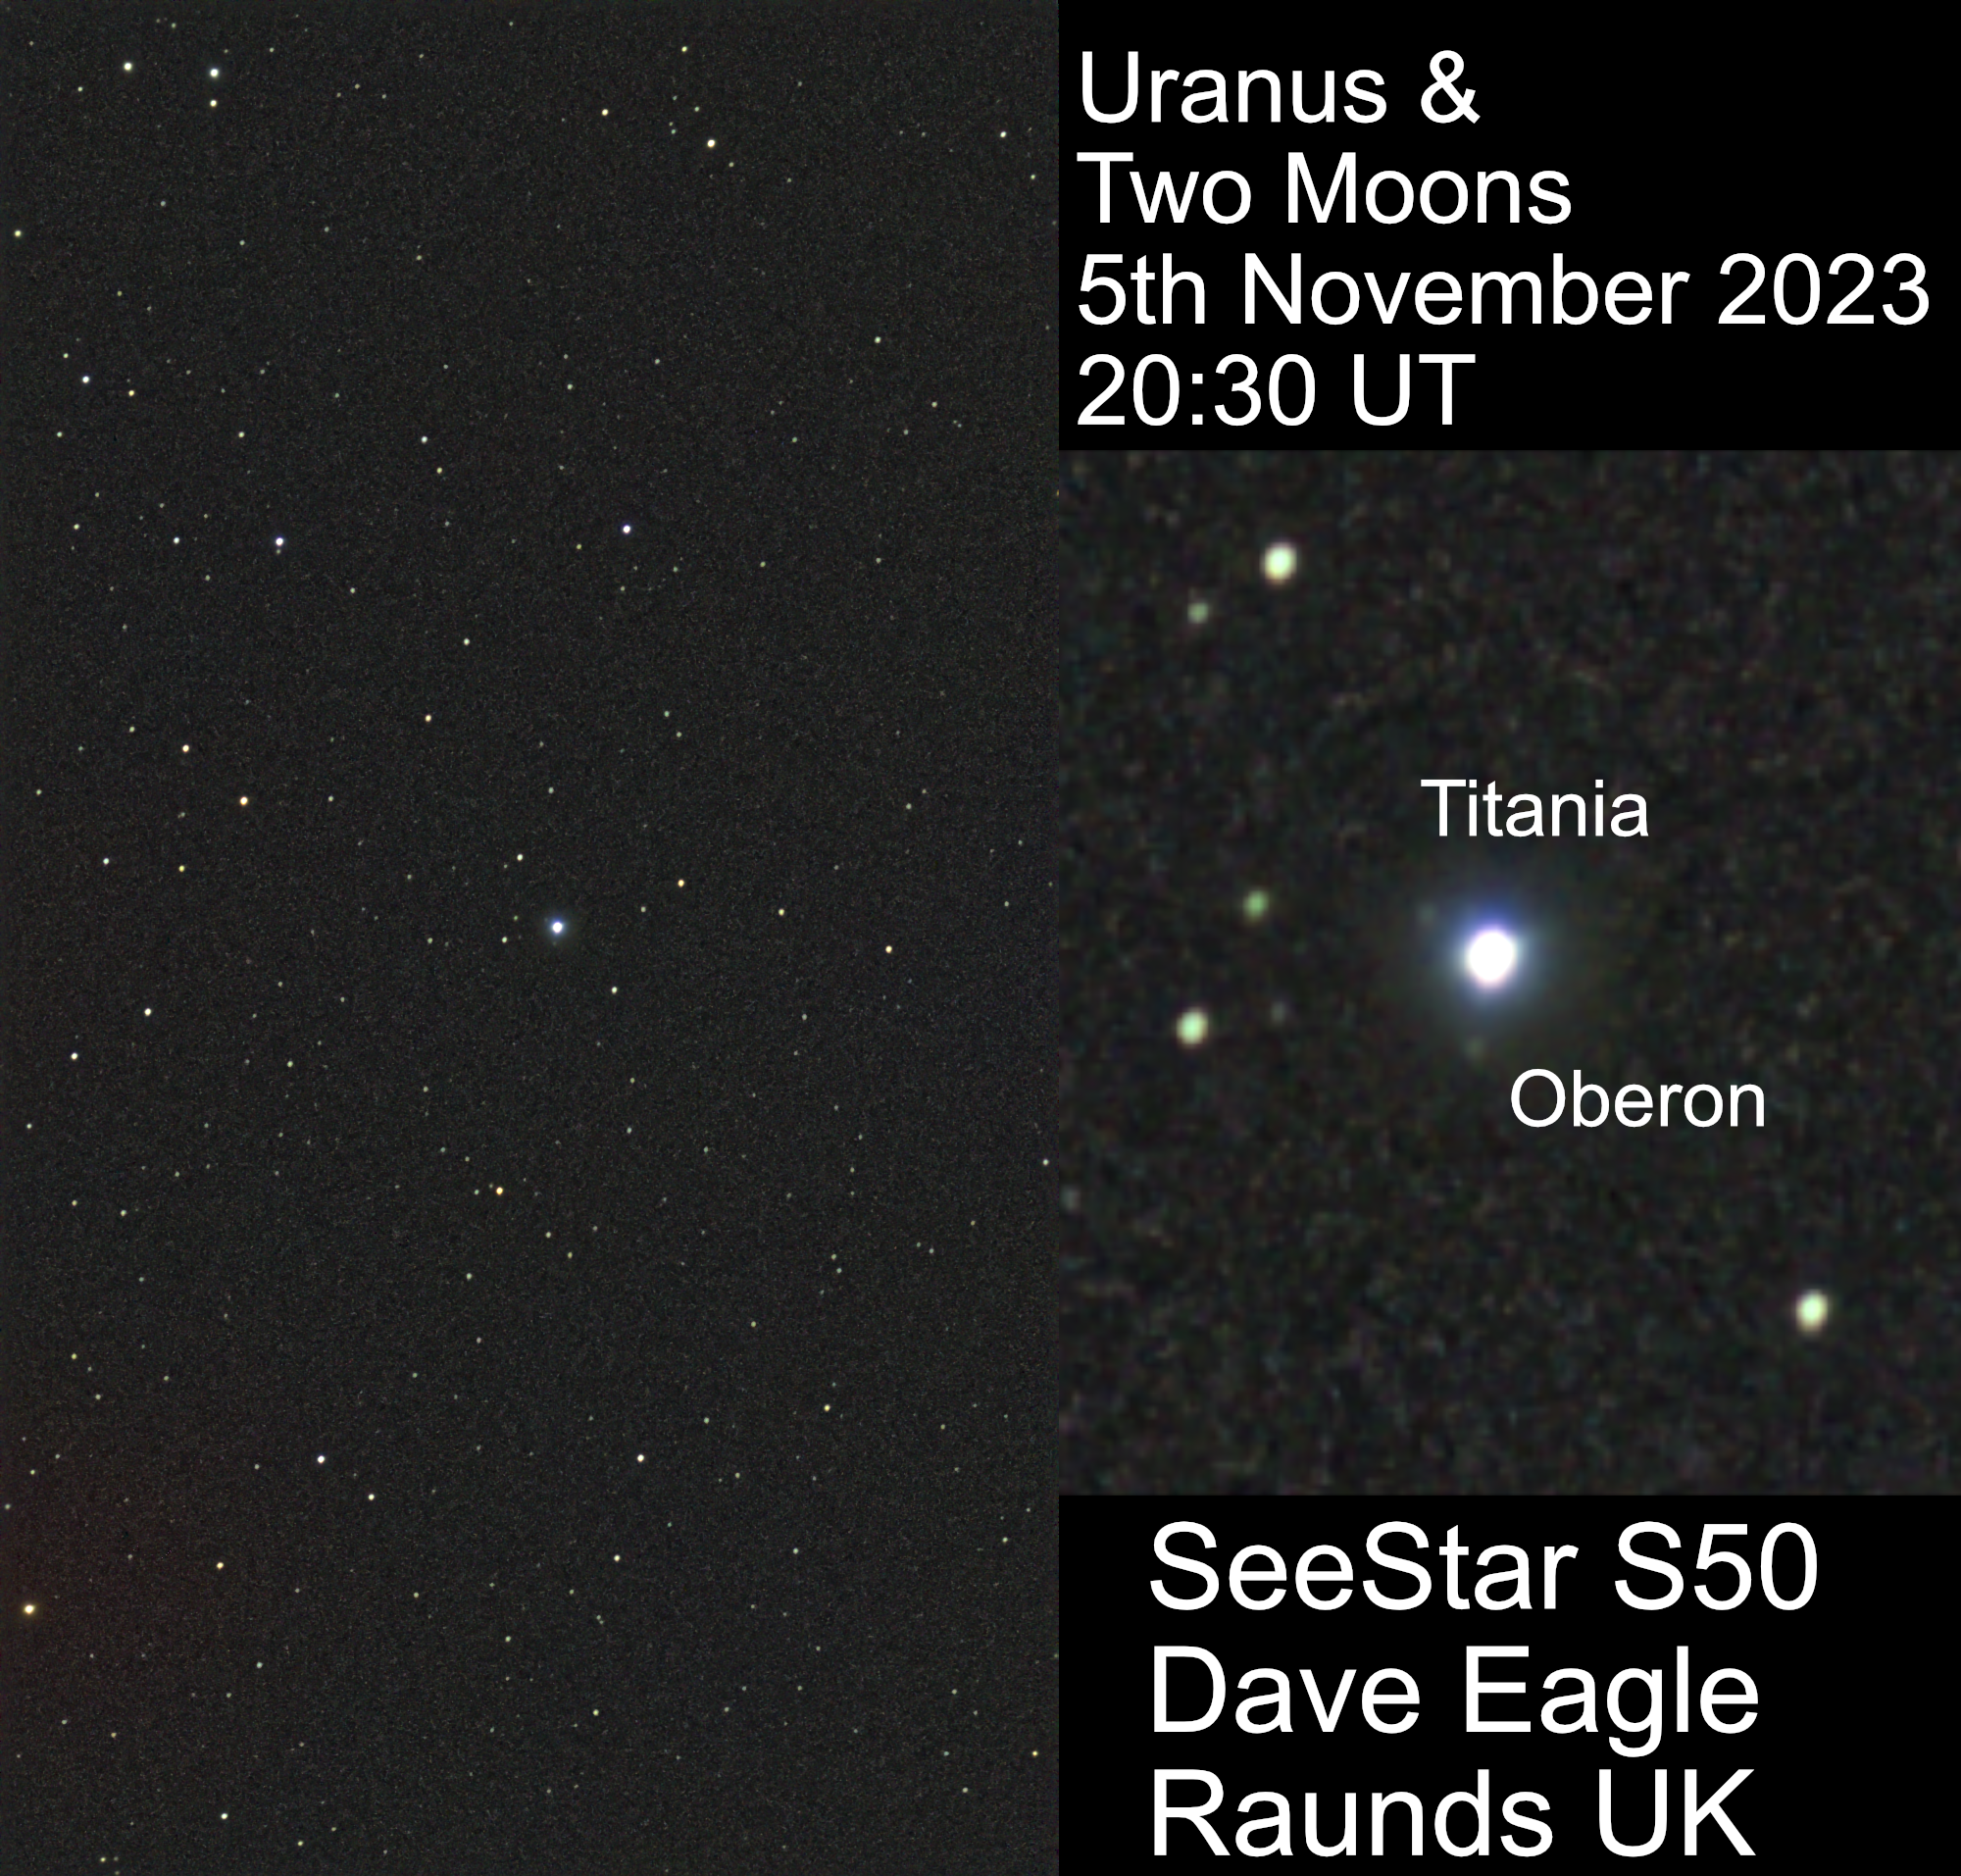
Something I really was not expecting was to point it at Uranus and be able to reveal two of its Moons, Titania and Oberon.
That shows it has really good optics.
My Conclusion.
I found the SeeStar S50 very easy to use and anyone wanting a highly transportable imaging system, it does produce very pleasing images.
I did encounter a couple of finding and tracking issues, but generally it did behave itself.
It could not image around Jupiter, as the flare from the planet swamped the image, so it could not pick out any guide stars.
Anyone would be loving the results it can give them just using their smartphone or tablet, even on their first night.
It’s so simple to set up and use, without all the faff normally associated with astrophotography and all its complications.
For a single cost, it’s ready to go and most importantly works most of the time.
More seasoned astrophotographers and pixel-peepers will poo-poo these devices, as they don’t produce the best quality images.
But for this cost and such convenience, it is after all aimed to appeal to the beginner who wants a convenient way to catch images of our universe.
It won’t appeal to everyone, but the SeeStar far surpassed all my expectations, and is an amazing bit of kit that really impressed me.
As long as it attracts more people into our amazing hobby, especially the younger generations that are used to doing everything on their phone, that has got to be a good thing.
Can the SeeStar S50 be improved?
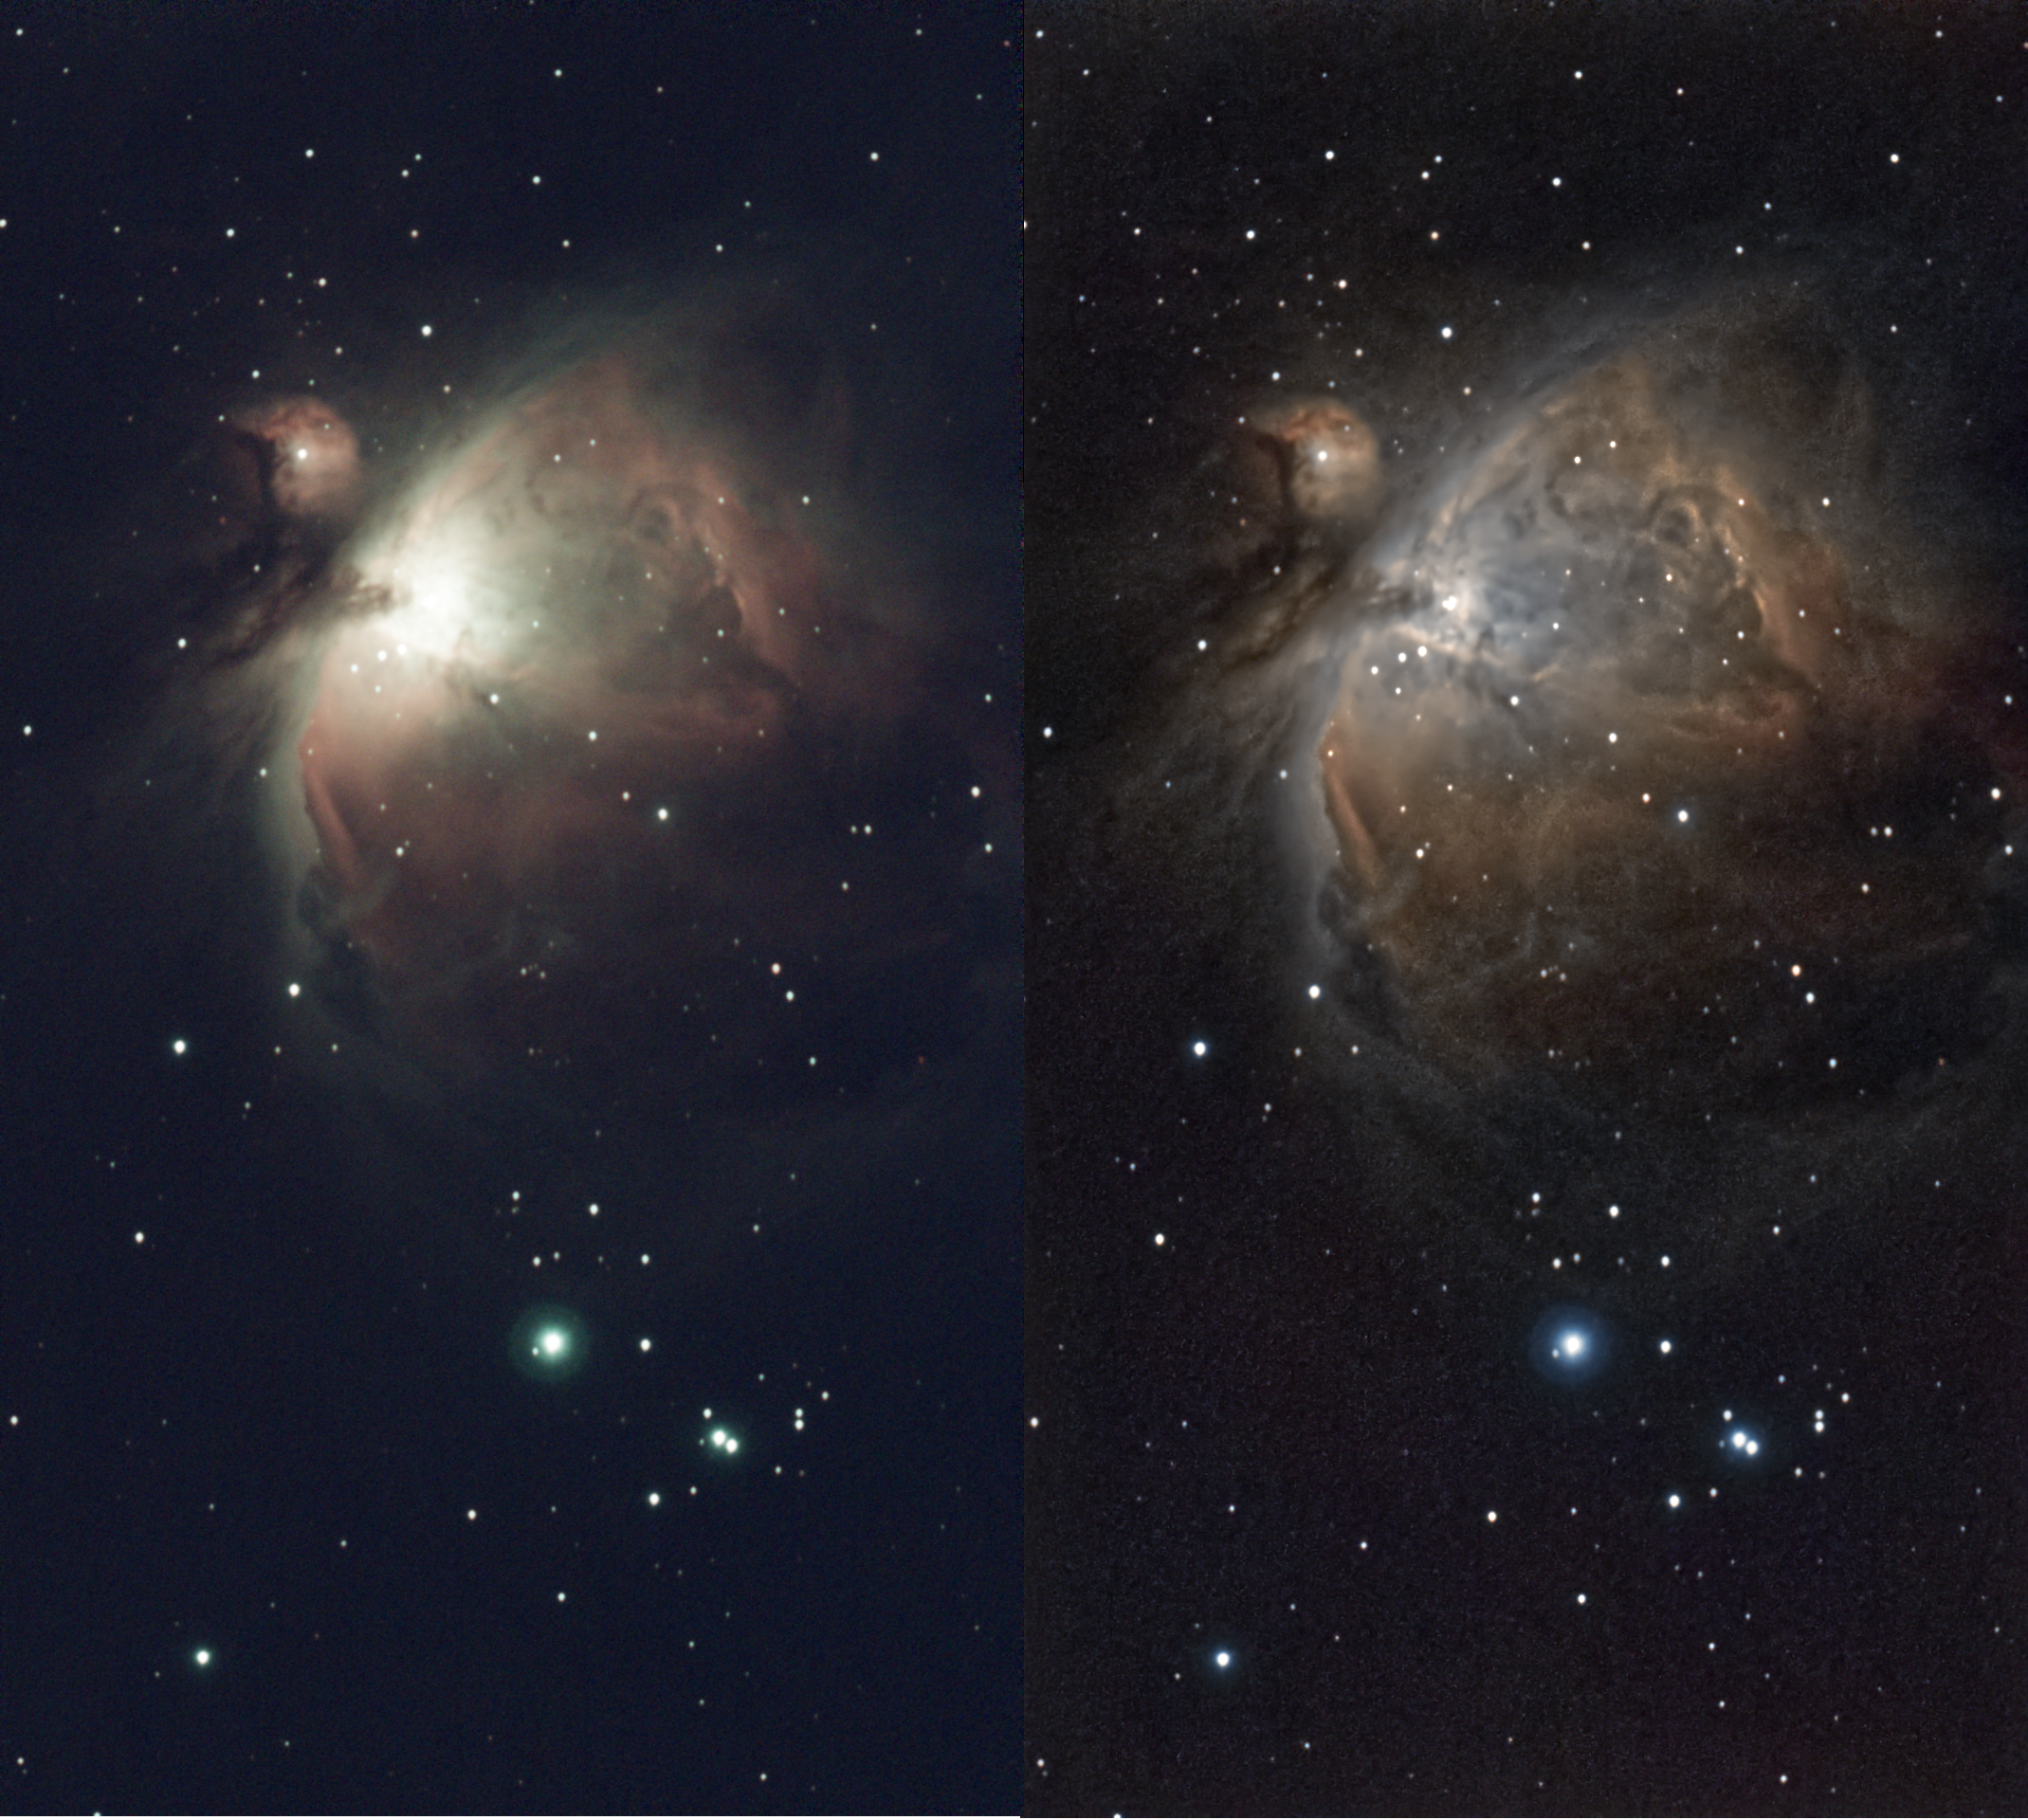
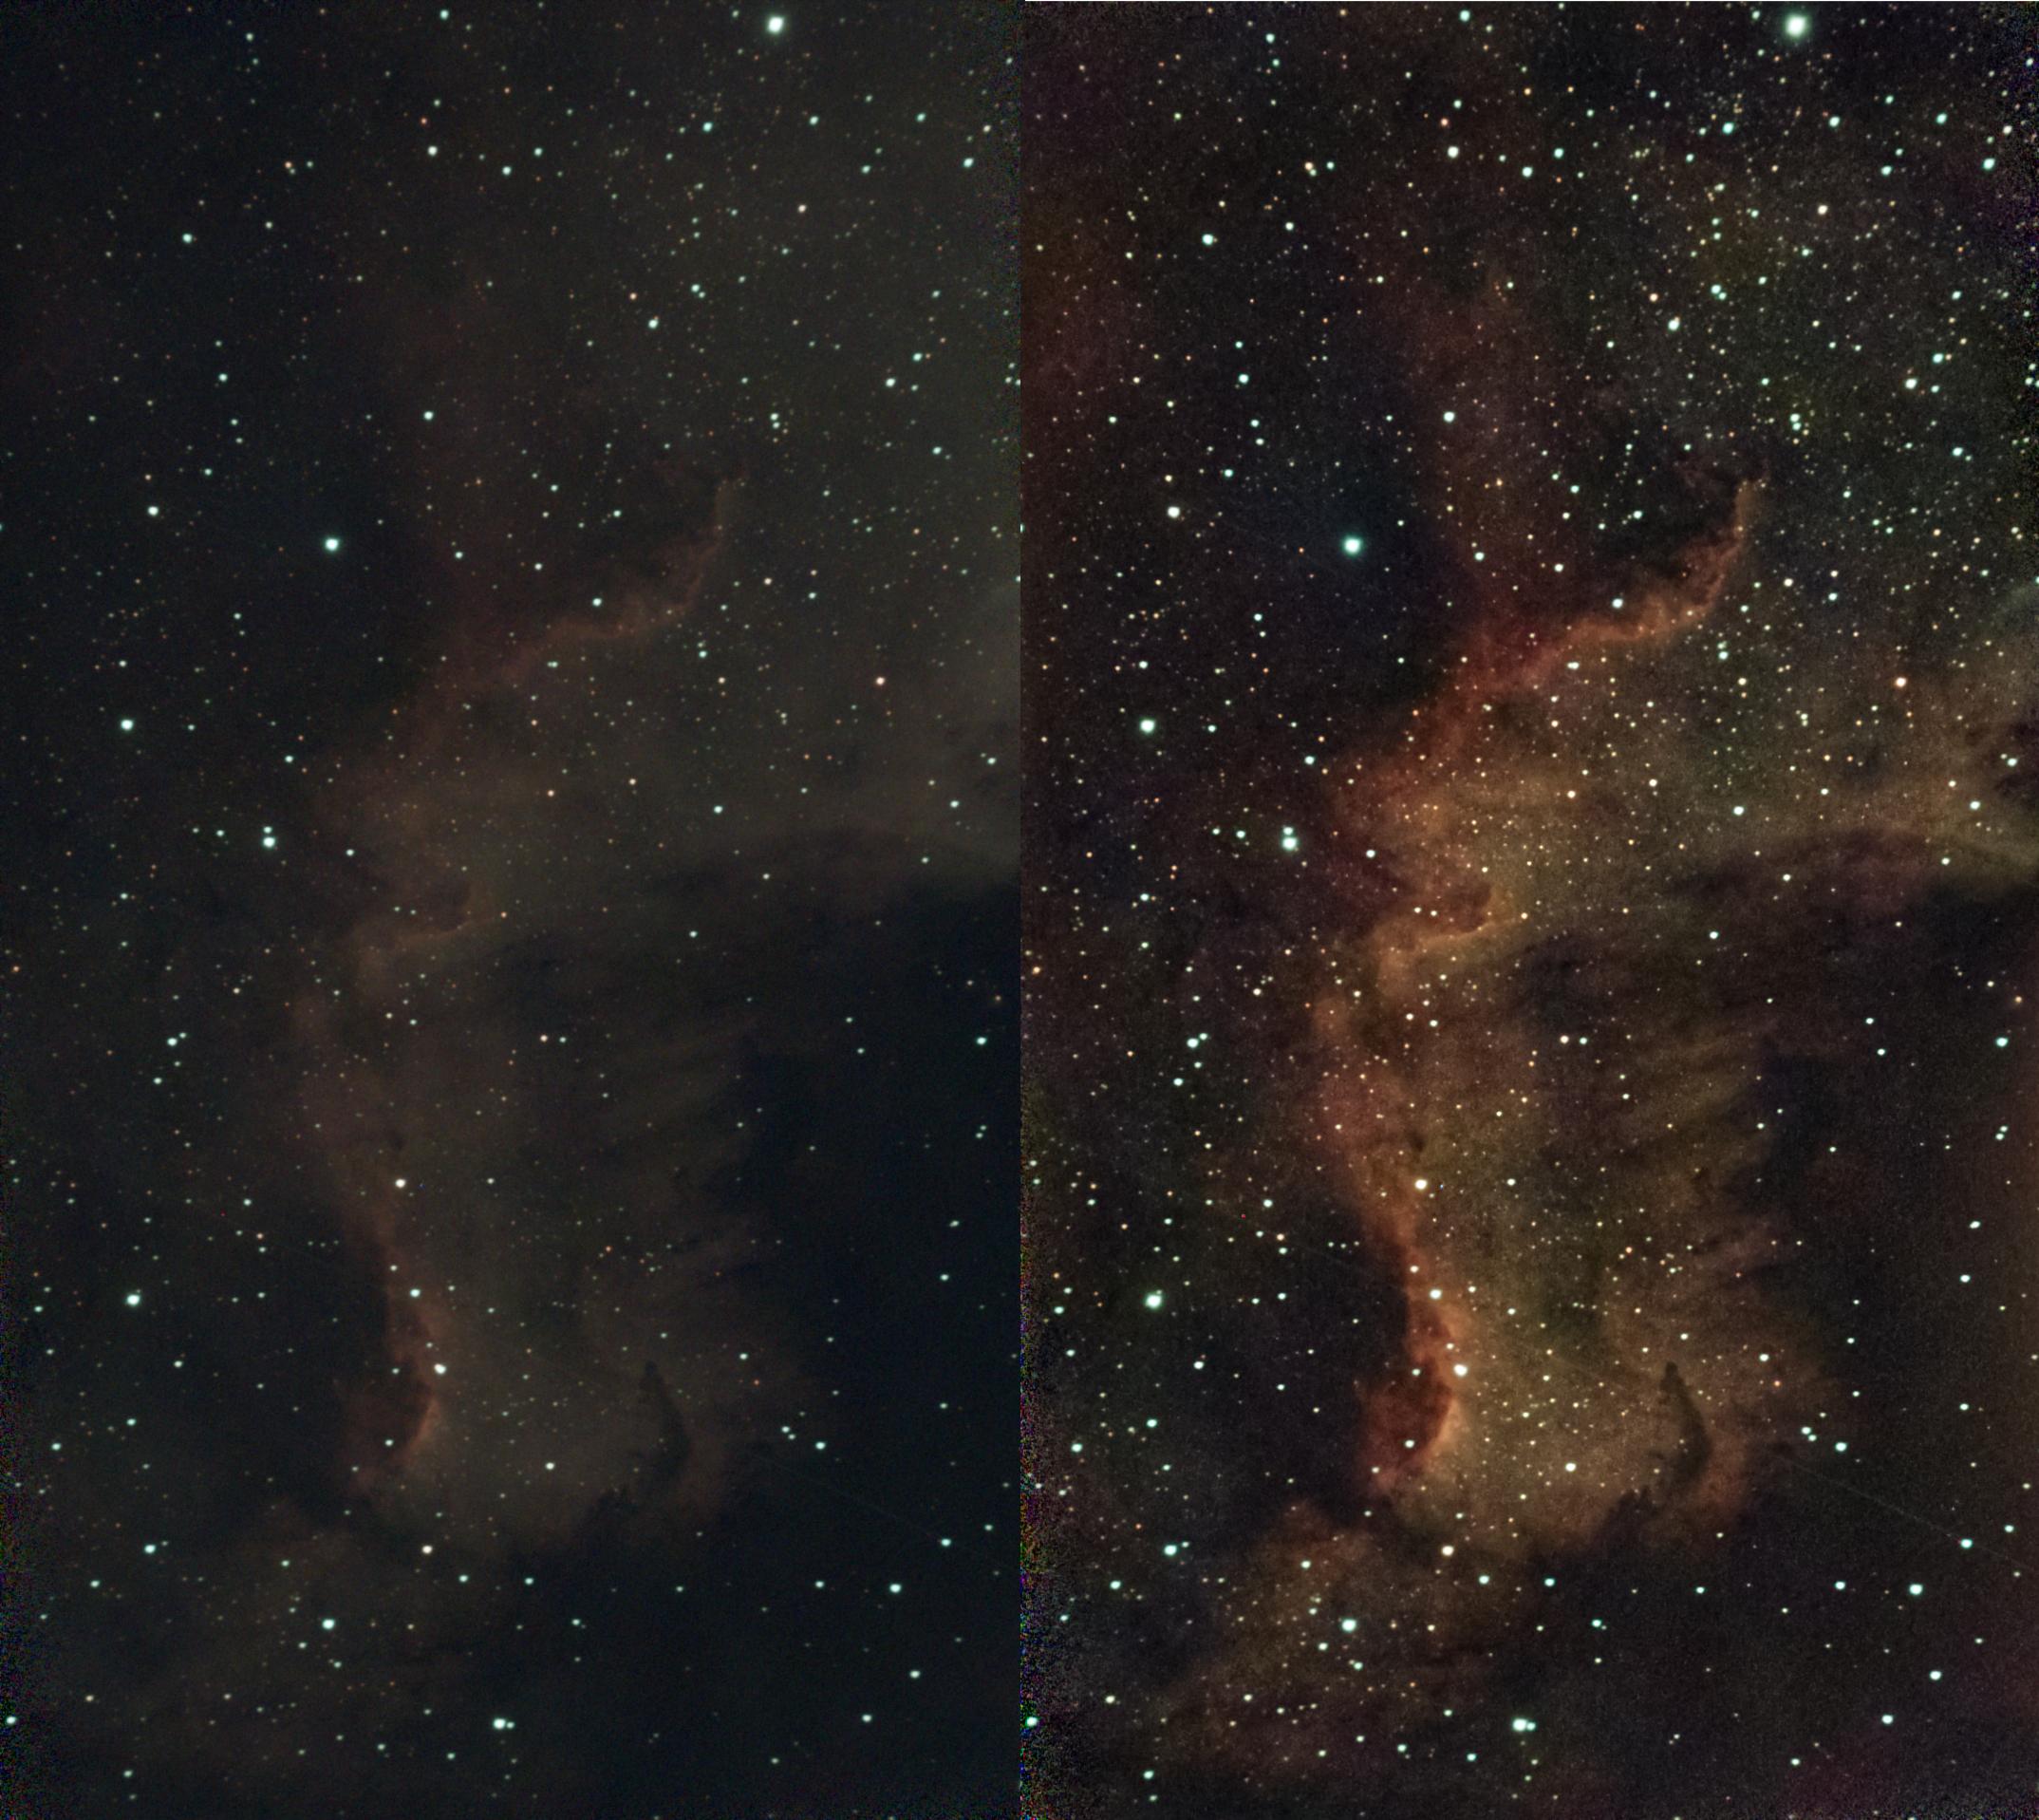
I’m sure as ZWO develop the software to manage the captured data, the images can only get better (See my processing results below).
If they had a way that the imaging chip could be rotated, this would allow you to rotate the imaging chip to get the framing you want.
In many cases you will find that the object you are trying to image will not lie in the correct orientation to make a nicely framed image.
A couple of hours can make a big difference in the orientation of the object, so that is something to consider when taking an image of a particular object.
A mosaic feature would also be quite nice to capture wider parts of the sky.
Some people have speculated if ZWO are working on producing a longer focal length version.
A longer focal length telescope will give a smaller field of view and a higher magnification.
This would show up the sky rotation a lot quicker than 10 seconds, limiting the exposure length even further.
Have an imaging chip that rotates as the exposure is taken or an equatorially mounted version would allow it to take much longer exposures without image rotation problems showing.
Either of these would be a real game-changer and if that does transpire, I reckon we are seeing a glimpse of the future of astrophotography.
Improving SeeStar Images.
The SeeStar has an option in the menu to save the raw data it takes in its memory. These are saved as fits files.
If you have the SeeStar networked, or connected to a computer with the supplied USB cable, you can browse to the folder called “EMMC Images/MyWorks” where these files are stored and transfer them to a computer to stack and/or process them yourself.
I found I was able to get quite a bit more out of the images using my normal image processing methods.
The SeeStar has two folders for each image subject it takes, such as M42 and M42-sub.
The finished stacked image (but not processed) is in the subject folder.
The Subject-sub folder contains the individual 10 second subs that were taken and used to create the stacked file in the other folder.
The following images were produced by processing the raw final stacked images using Affinity Photo.
The images as produced by the SeeStar S50 uploaded to the phone is on the left, my processed images are on the right.
With some of the subs, I was not able to stack these.
The stars on the images were too faint for the stacking software to detect enough for it to stack them.
Longer enhancement runs may get round this problem.
This is the first independent review I’ve read in relation to smart telescopes, it would be interesting to compare with all the other budget priced smart telescopes out there on the market.
I believe that these telescopes could be a real boon for getting people into Astronomy, as one of the frustrating things that I find is that people without knowing the capabilities of a telescope lose interest with looking through a telescope and see black-and-white images, and some of these images are literally just pinpricks of light, having the ability with little or no experience these types of telescopes can produce really good images.
Having the skill/ability to be able to further process these images in your own systems is obviously a benefit as your review shows. I would consider buying one of these telescopes because of its compactness and lightness to use when going away on holiday as at present the amount of equipment I currently use takes a strain on the luggage allowance, however, the use is much more flexible than just a holiday telescope and a real boon for people who would like to take that first step into Astronomy and feel happy with their results, can only bring them back another night…or day🔭
Cheers Colin.
I’ve got an outreach event in a school in a couple of weeks. I’m planning to take it with me that night and see what the children think.
Interesting reading read Dave, while I personally would not buy one I know several folk who are currently using the seestars in our astronomy society. Impressive results from such a small portable device, the feeling it gives appears to be instant gratification, for those who own one. I did joke that it must be downloading images off the internet at first! For a decent write up thought I would say well done!
Cheers Brendan. I will always give my own opinion on everything I try out.
A well written and interesting review, thanks Dave. I think it will be a great tool for outreach – showing newcomers what can be seen quickly and easily. For a newcomer to own the telescope though, I think there is a risk it hinder their wider knowledge of navigating the stars, astrophotography and processing (if that is the route they want to take). It’s a bit like learning to drive a car in automatic. It may be a bit easier at the start, but it can become very limiting if you can’t drive a manual. That said, people said similar things about Goto mounts in the early days…and they are an excellent tool.
Good review…I ordered mine in April and it arrived ready for Kelling. Minutes to set up and the results within the limitations of the FOV and orientation of the chip are IMO superb. I also have the ASIair and an AM5 mount. I still say that though this is aimed at astro-p newbies it is quite a serious piece of kit. My only real complaint is the useless guide they supply with it…really does not explain anything and you need to stab around on thephone or tablet to find a setting.
Thank you Frank. Good to hear other users experiences.
I was running an outreach event in Hunstanton for the County Council, talk then svopes outside. We had approaching 100 attendees and 2 guys outside with telescopes, one being a Seestar S50. When looking at Andromeda via the scope totally unimpressive but when seen on the tablet screen with dust lanes visible it was so great for visitors. In 10 minutes I had set my S50 up so we had 2 screens available. I will always use the S50 for outreach in future.
Thanks for this. I’d been looking at the Seestar50 and Dwarf2 (for a wider FoV) as I continue to have issues moving from Solar System/binary star imaging to Deep Sky. It’s comforting to see that the desires for future development mirror my own thoughts after reading the specs. – the Seestar FoV is an issue, especially given the absence of a mosaic feature (although the edge effects of this alt/az portrait-format system will be made worse). A larger chip, or a square version of the one in there would really help; so would an EQ mount system. I loved the Neptune result; I wonder if a Barlow-like addition will ever be possible … I’m saving my money for a while to see what emerges. Thanks again.
I have heard that there might be a mosaic feature to be added to the app at some point. But not sure how true that is.
It will be very interesting to see how the next upgraded models work and how the quality of the images might improve.