ASIAIR Pro Plus – First Nights Out

So, the big question is:
Does the External aerial on the ASIAIR Pro Plus (AAP+) make the WiFi Signal Stronger?
From what I have seen on the two clear nights I’ve had, that is a resounding YES!

I connected to the AAP+’s WiFi and using the ASIAIR App managed to get it Activated with no issues.
It told me to connect to the Home WiFI and download the activation to the device from the Internet.
I then re-connected to the now activated devices WiFi.
I then used the AAP App to connect the AAP+ to my home WiFi, and set it into Station Mode.

Once I did this, it picked up an IP address on my home network. So far, so good!

I then tried using the Android Emulator LDPlayer on my PC to connect using the ASIAIR app.
It could not connect directly, but as I had made a note of the IP address in my home router, I added this manually and everything was connected.
After doing this, it connected first time, every time.

This was also true for any of the mobile Android devices I used which were connected to my home network.

I put in all the details of the accessories attached. All went really smoothly.
Now just got to get it all attached to my setup, ready for action.

It was clear the night I received it, so although it was a bit murky, I thought I’d have a go anyway and put it thorough its paces:
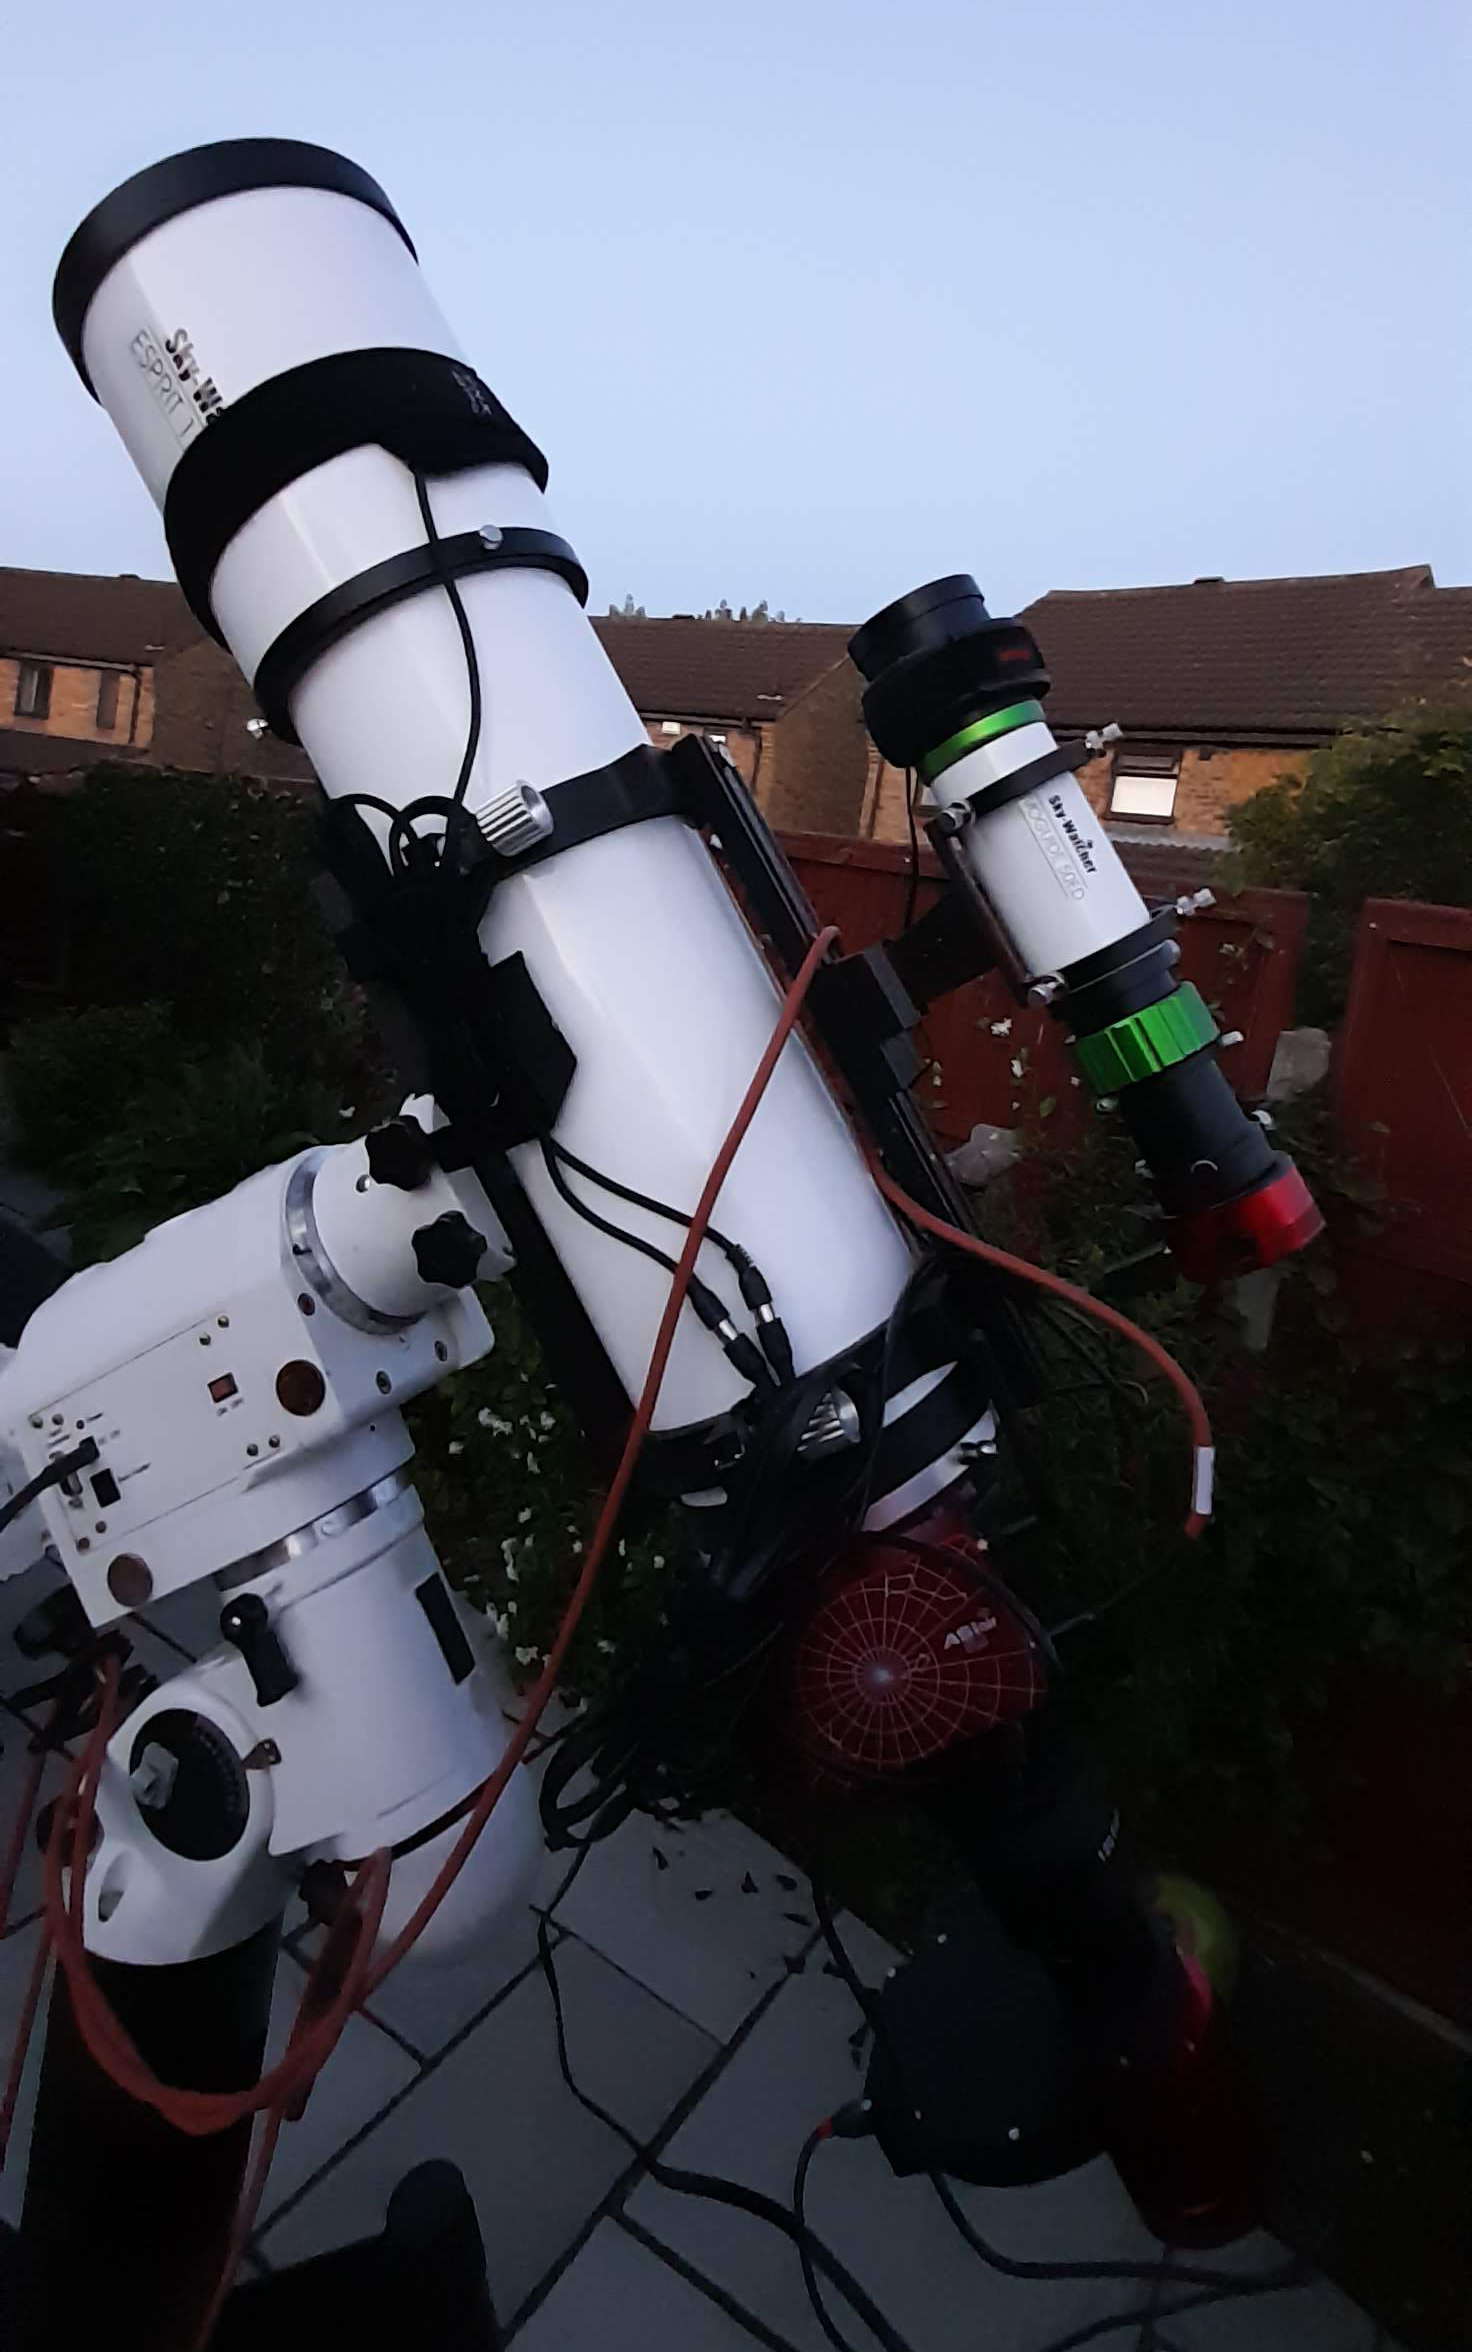
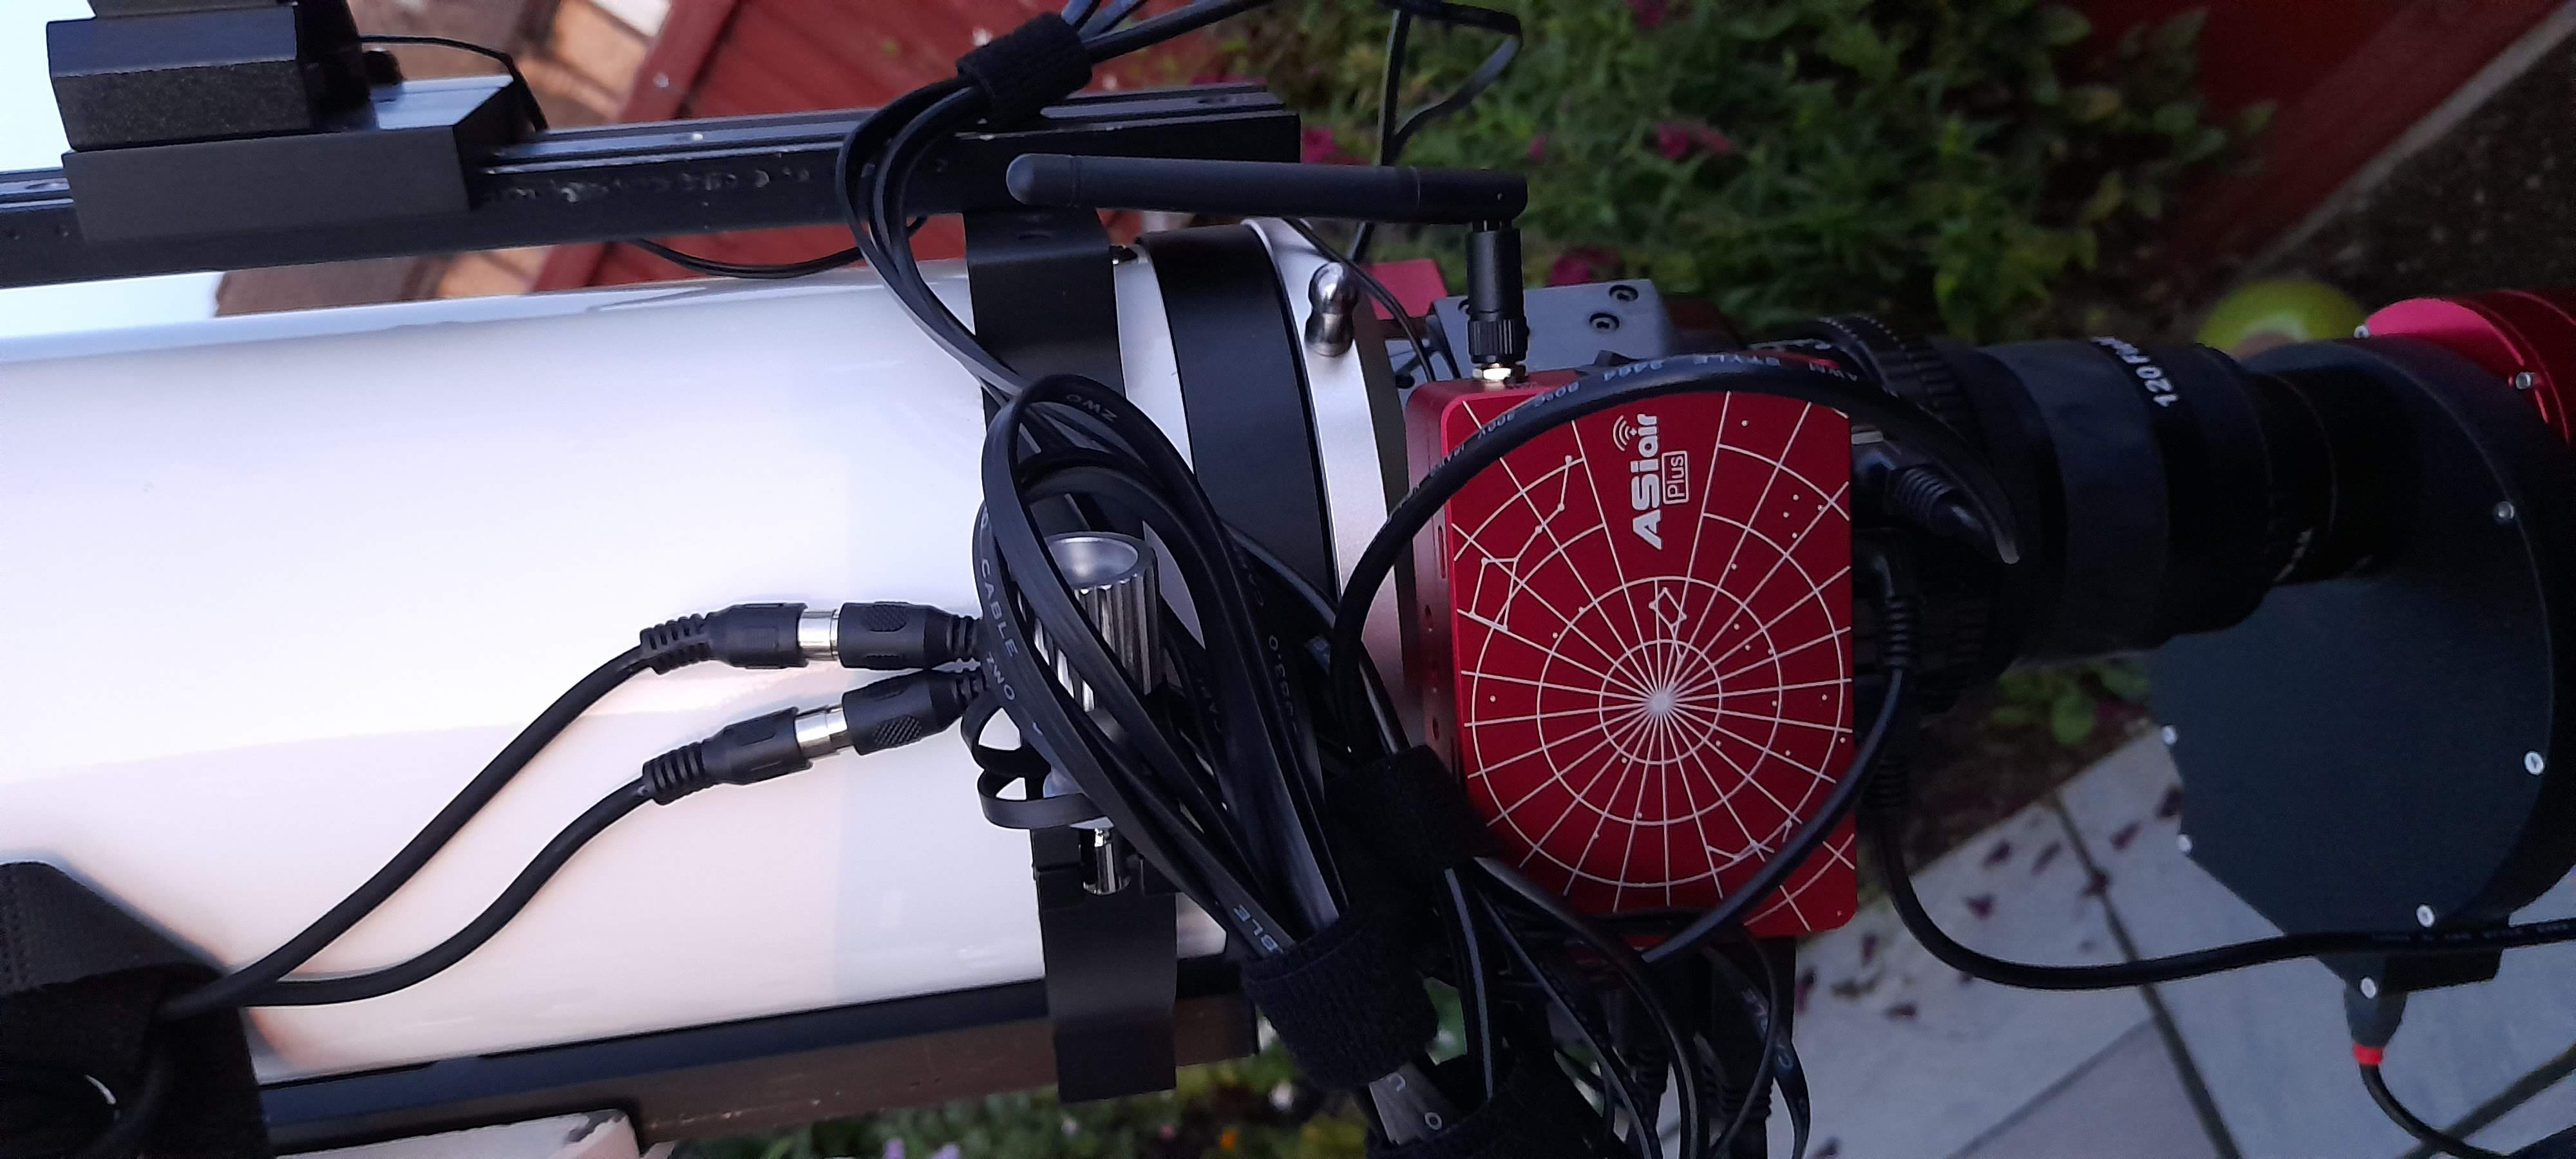
Once problem I had is that the slightly different configuration of the AAP+ made it a little bit more awkward where it was mounted on the finder shoe. So I have now ordered the clamp so I can mount it in a better position and orientation. Plus it’ll be more secure, behind the guidescope on the top dovetail.

Once set up, all the accessories were connected and with no hitches it was very quickly up and running.

The EQDIR cable connected to my EQ6 and I was also able to connect to the mount using EQMOD with SkySafari. This software often has more up-to-date comets in the database than the ASIAIR App, so is an extremely useful addition to the weaponry when tracking down your prey.

All I had to do now was wait for it to get dark.

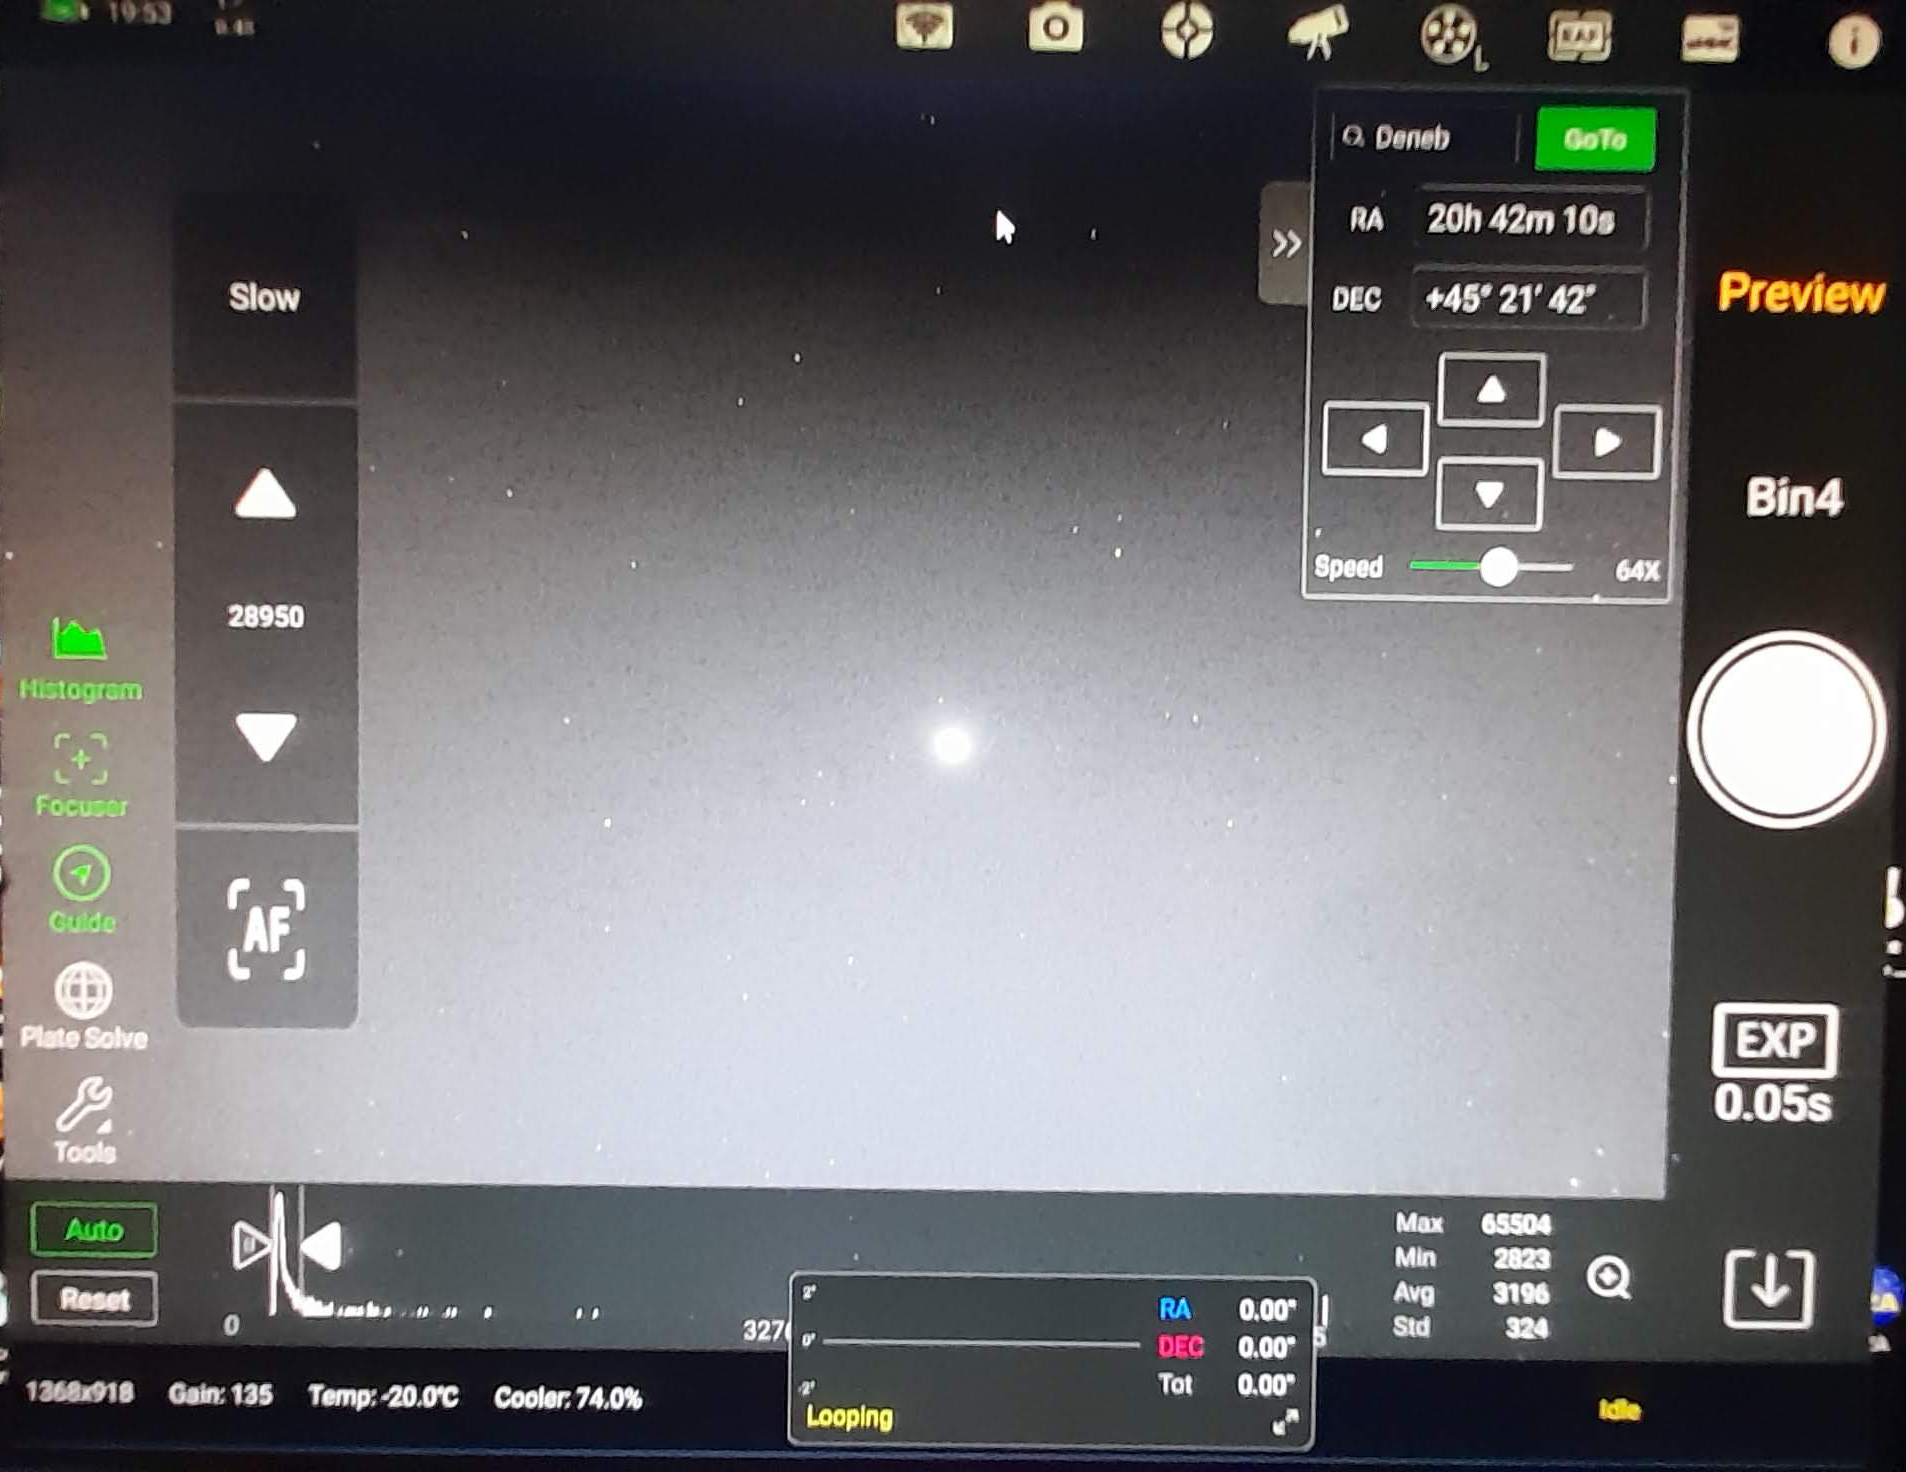
I could just about see Deneb in the bright twilight, so I sent the scope to it.

As I had come to expect from my old AAP, it dutifully pointed the scope near to the star, where I stopped the slew and was able to manually move the scope onto the star, so I could start to get the main camera and guide camera focused.
Once done, I took another image, got the AAP+ to plate solve, then GOTO Deneb again.
It slightly adjusted its position and then displayed an image of Deneb, right slap-bang in the centre of the screen.

So far, so good.
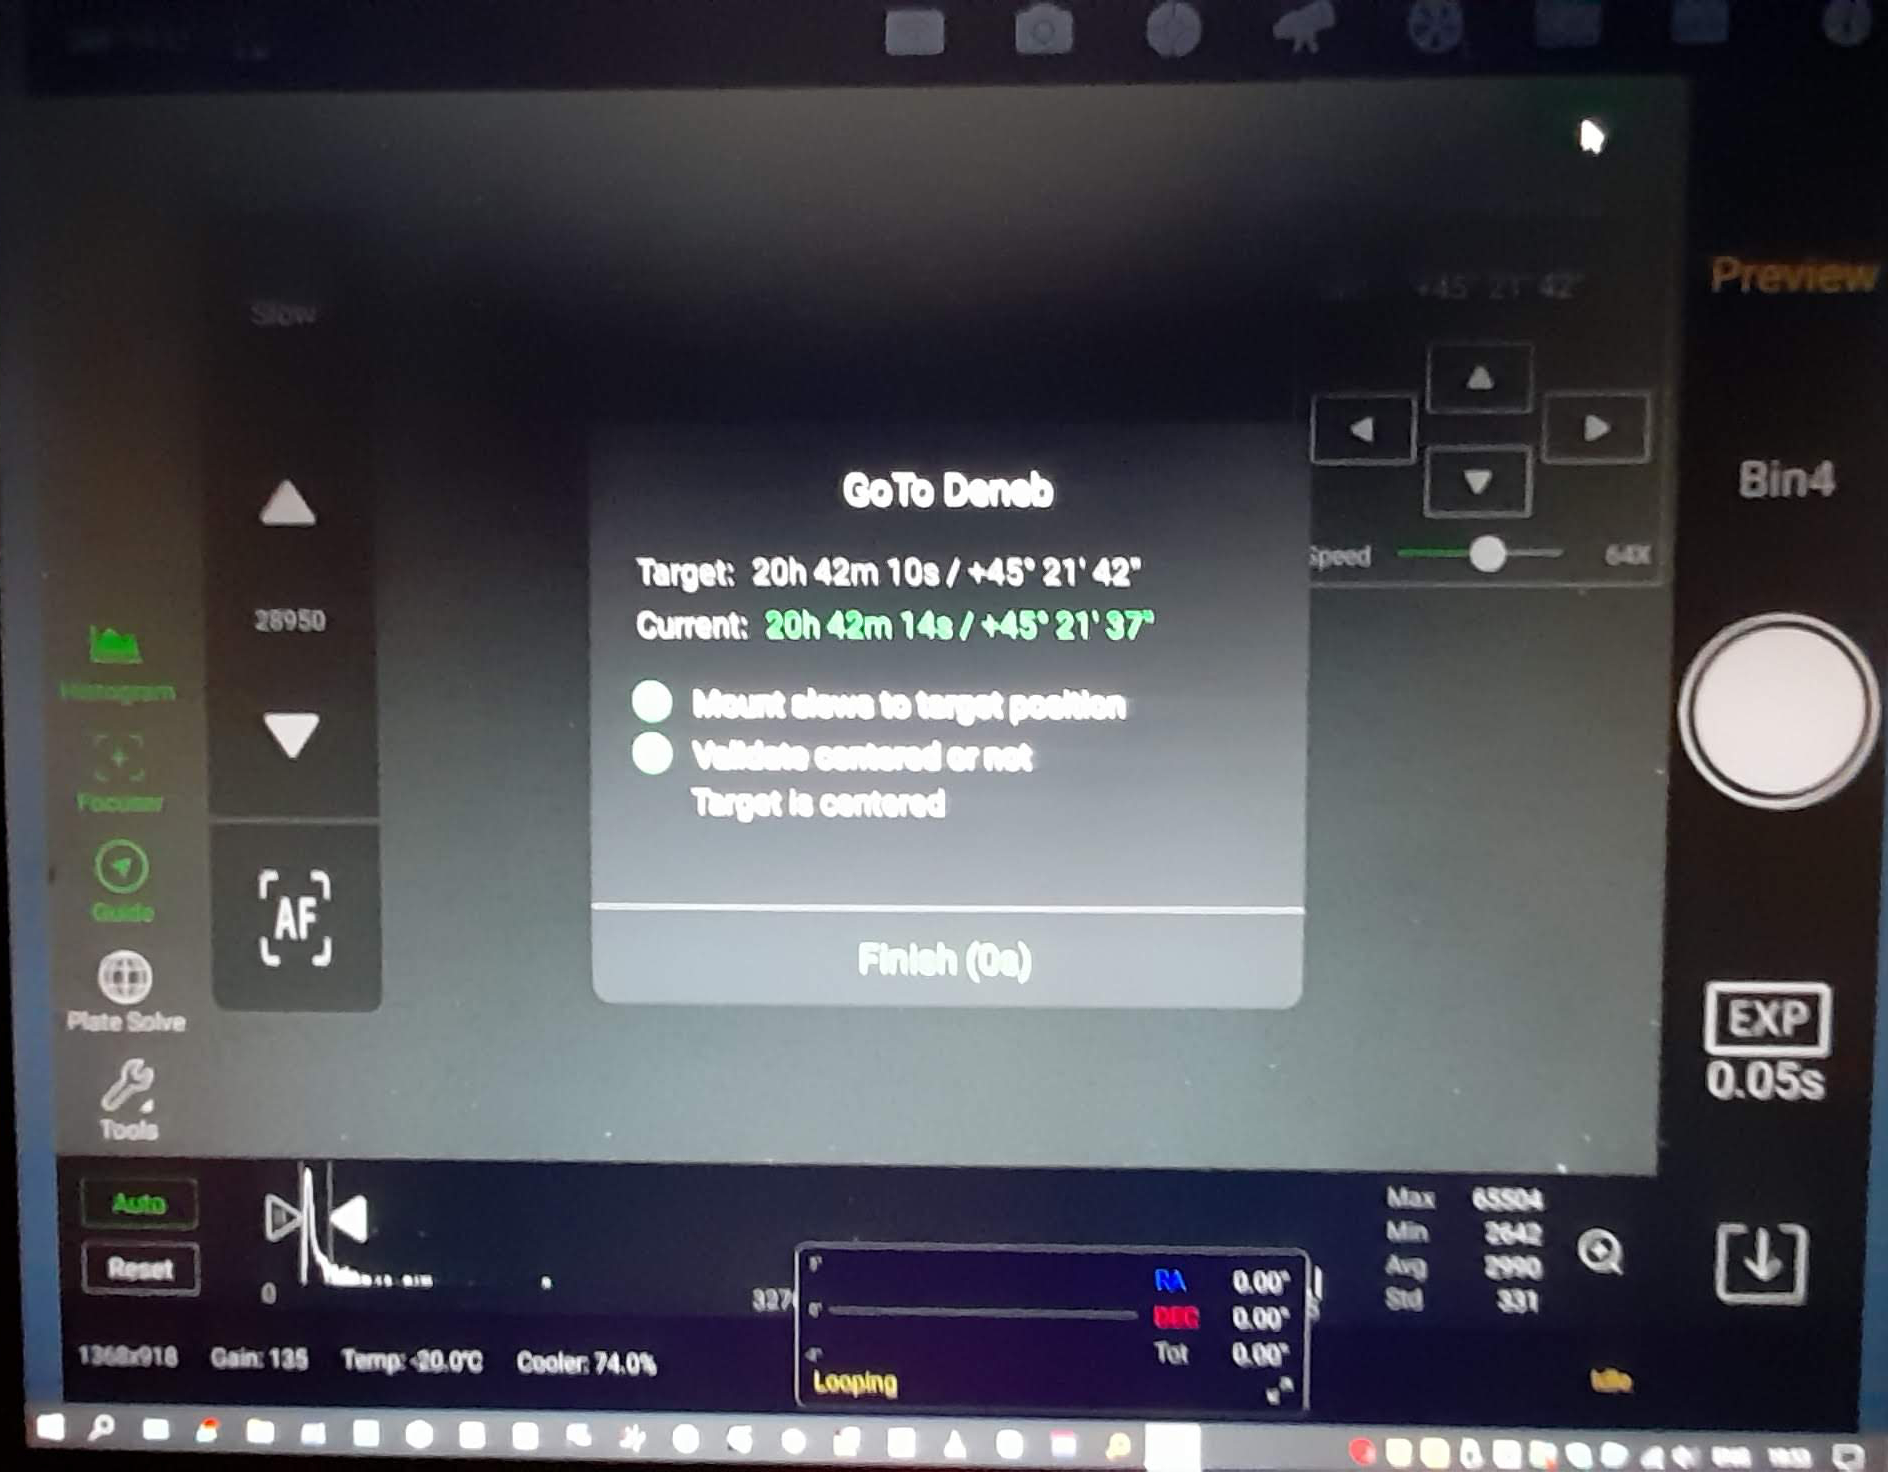
Once it was dark enough, I took the scope on a quick tour of a few objects that night, to test the GOTO capabilities.
All the searches were performed flawlessly. Each object was perfectly positioned each and every time after a quick plate solve.

Holding down the mouse or finger on the screen bought up the GOTO circle.
This allowed me to easily reposition the object on the cameras field of view when required.

The auto-focuser worked really well, so I refocused using the Hydrogen Alpha filter.

I set it up to tell the camera to chug out some quick Ha images.

Preview, Plan and Autorun Modes worked extremely well.

The multi-star auto-guiding was an absolute dream.

Cassiopeia Ghost:

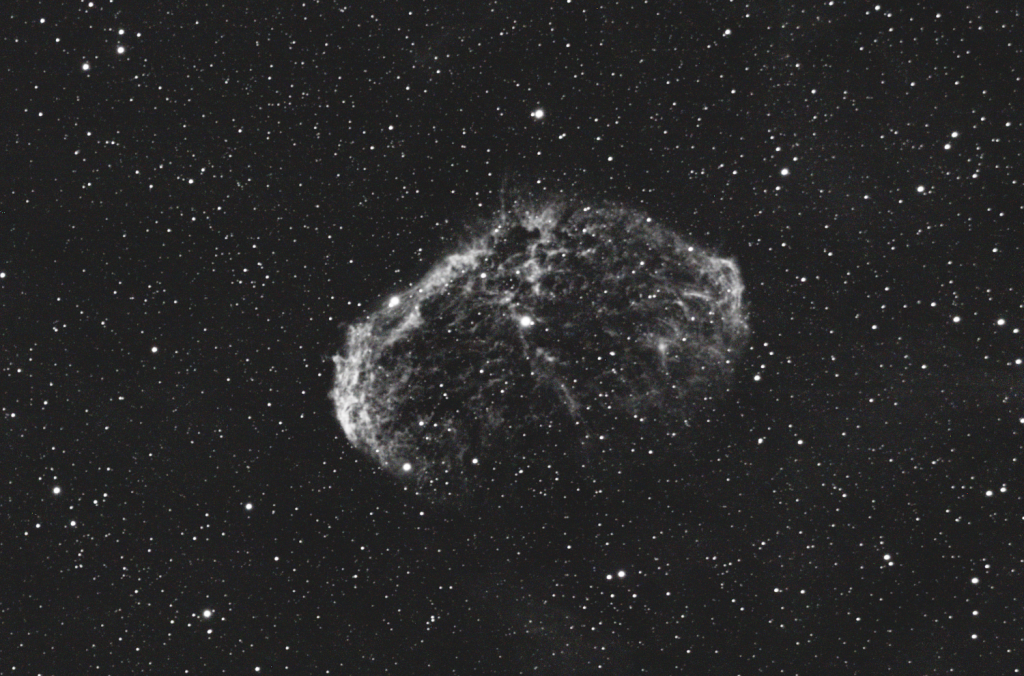
Crescent Nebula:
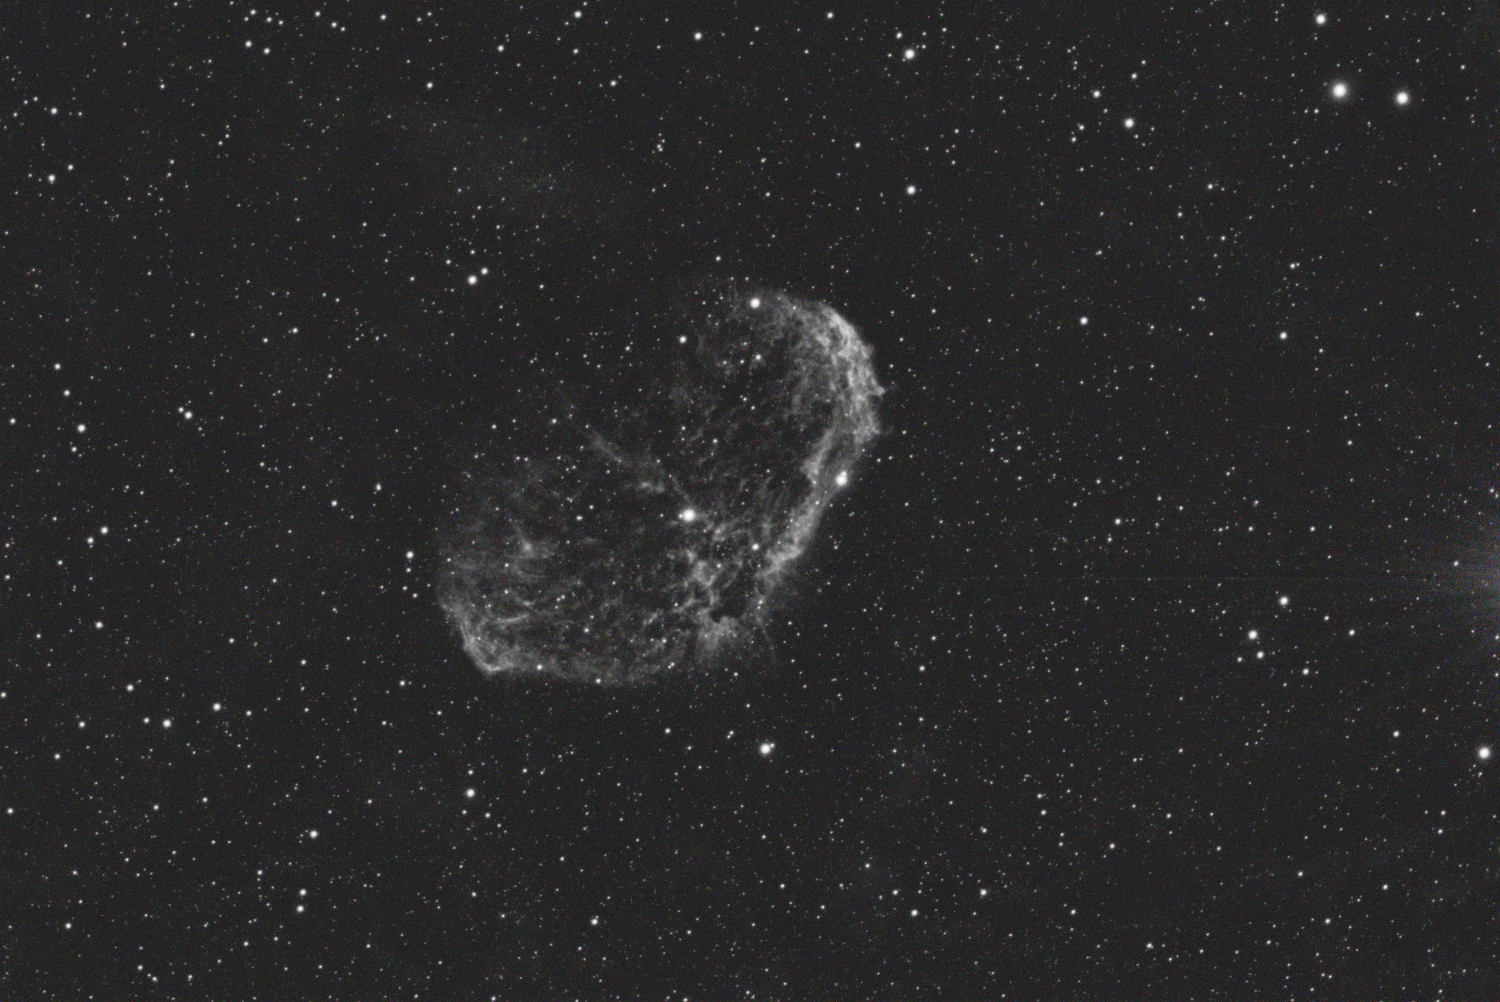
Afterwards, I noticed a few problems that caused by the user (ID10T error) that I needed to fix.
(As you might be able to tell from the Crescent Nebula image above).

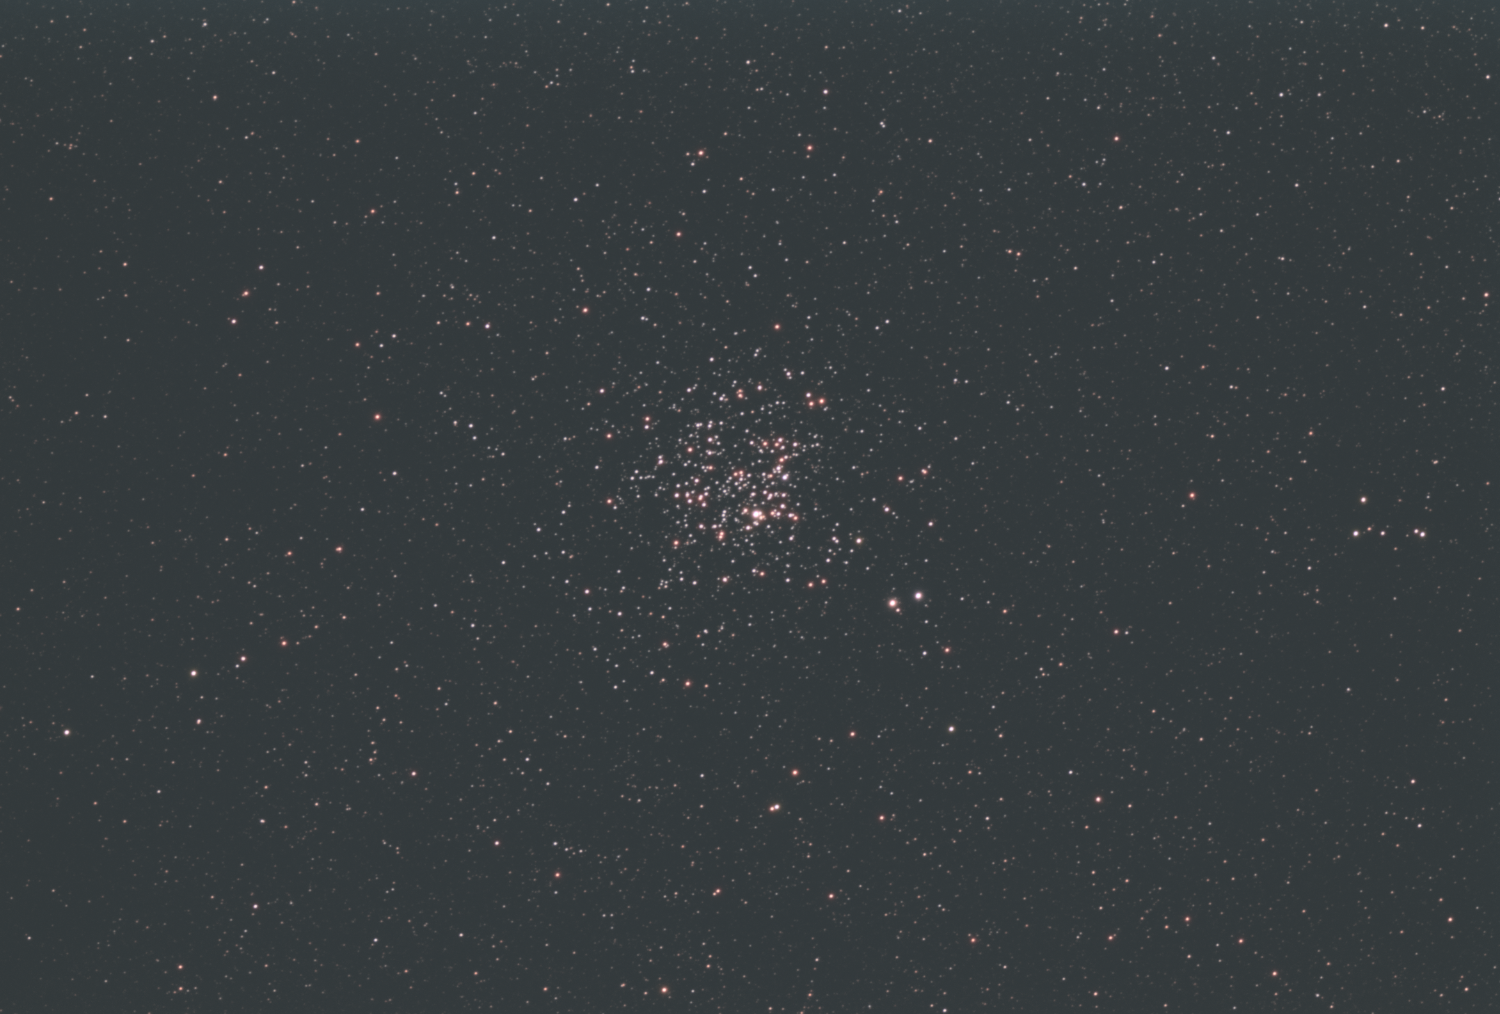
So a few nights later on the next clear night, with a bright gibbous Moon, and another murky night, I decided to concentrate on a single bright cluster.

This was Messier 11, the Wild Duck Cluster in Scutum.
I took LRGB images of the cluster and the results, considering the conditions, it all came out quite well.
I’d never seen the V-shaped flight of ducks in this cluster until now.
So what do I think about the AAP+?

The AAP Pro completely transformed my imaging.
I have absolutely loved it since I was first given it to have a play with this time last year.
I loved the functionality that it has so much, I just had to buy it.

The AAP+ can only build on that as ZWO start to add new functions.

This will be the way I will be taking my images and tracking down comets from now on.

Like the AAP Pro, It Just Works!

I didn’t experience any signal drop-outs on both evenings.
The external aerial definitely makes the signal a lot stronger and gives a much more stable connection on my home network.

The AAP+ was accessible and controllable from all my mobile devices and LDPLayer on the PC across my home network, wherever I was in the house or garden.
This will makes it invaluable for me for live-streaming images of objects across the Internet.
Just to note, my home WiFi has boosters to reach to the bottom of our fairly small garden.

One problem I did encounter was when I was using an older Power supply.
When all my devices, camera, focuser etc, were connected, the AAP+ would not start properly and its WiFi light did not come on.
Once these were removed, the AAP+ started OK and the devices could be reconnected and looked like they were working.
But this was down to the power supply being used not supplying enough power, not the AAP+ itself.
Make sure you use a recommended power supply, not one from well known general stores online shops or flea markets.
These frequently cause the device to run erratically, despite being labelled as the correct voltage / rating etc.

Talking of Power, There seems to be some confusion as to whether or not you can power a mount through one of the power ports.
Some people haven’t reported experiencing any problems when they have done this.
I originally did this, but have since have moved to powering my AAP+ and mount separately, just in case it causes any problems or damages the AAP+ or Mount.

Features I haven’t tried with the AAP+
Polar alignment. But it worked extremely well with the AAP Pro.
Video Mode.
Live Mode. (I much prefer to stack my subs after the event anyway, but this may change…).

Is it worth getting one?
If you haven’t got one and have ZWO Cameras, or you have the original AAP, then it is definitely worthwhile getting one, or upgrading.
If you already have the AAP Pro and not experiencing any connectivity problems, I do not think that the AAP+ offers that much in additional features from an upgrade as yet. BUT! The device has had some significant changes under the bonnet.
This should allow ZWO to make additional improvements and add lots of new features as it develops the product further.
It does look like they are extremely keen to do this going forward, so it will only be a matter of time before some new functions are added.

All versions of the AAP only work with ZWO cameras and many DSLR’s.
If your CCD or CMOS cameras are of another make, they will not work.
Is it really worth getting one and having to change your cameras to achieve this sort of functionality?
In this case a different solution will probably work best for you.
A list of tested DSLR’s is shown here:

So, if you want one, when are they expected to be available?
ZWO are reporting that pre-sales placed with them will be sent out sometime during November.
https://astronomy-imaging-camera.com/product/asiair-plus

It is not likely to become available to astronomy stockists such as First Light Optics until later in the year.
So if you are interested in getting your hands on one, keep a look out for when these do start to become available.

If you have any questions that you think I might be able to help with, please do give me a shout, as I’m happy to help others if I can.
dave@star-gazing.co.uk

Fun in The Sun – 18th September 2021

I always get excited when an active sunspot approaches the solar limb.

You just never know what delights it will give you using a Hydrogen Alpha setup.

On the morning of the 18th of September it was very clear, so I set up my scope and plugged in the Quark.

Even before the Quark was anywhere near set at the correct temperature, it was quite clear that there was an extremely bright prominence visible on the limb.
You cannot usually see prominences in this setup, until the Quark is close to reaching its tuned temperature.
So I quickly realised that this might give some really great results.

All came to temperature and the view was incredible.
Undoubtedly, these were the best views I have ever had with my own equipment.

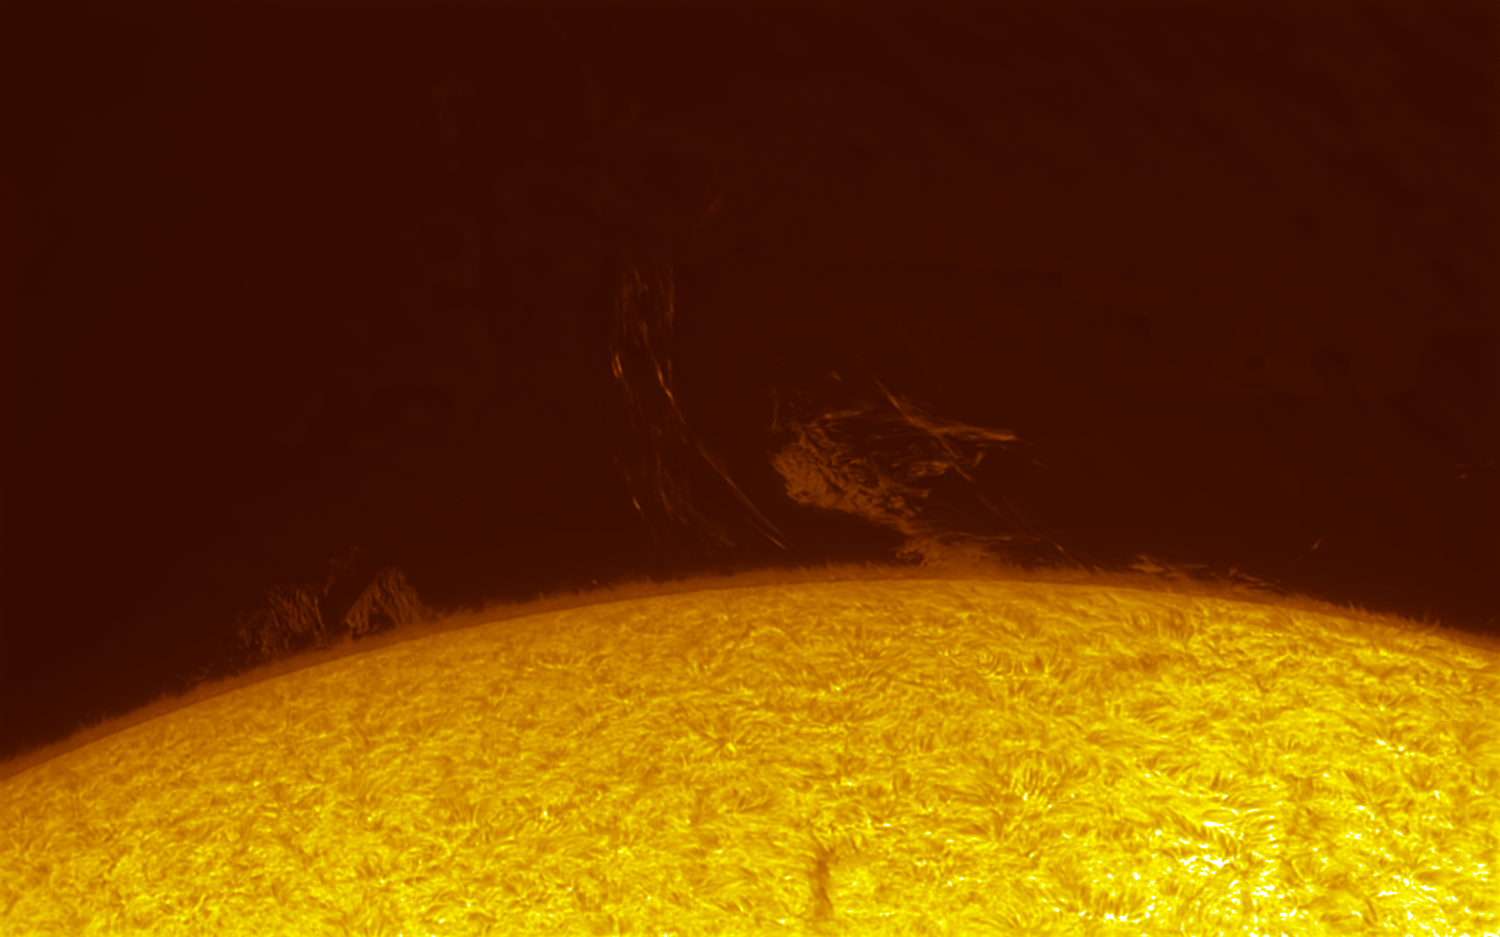
This was Active 2871 before it rounded the solar limb to move into view from Earth.

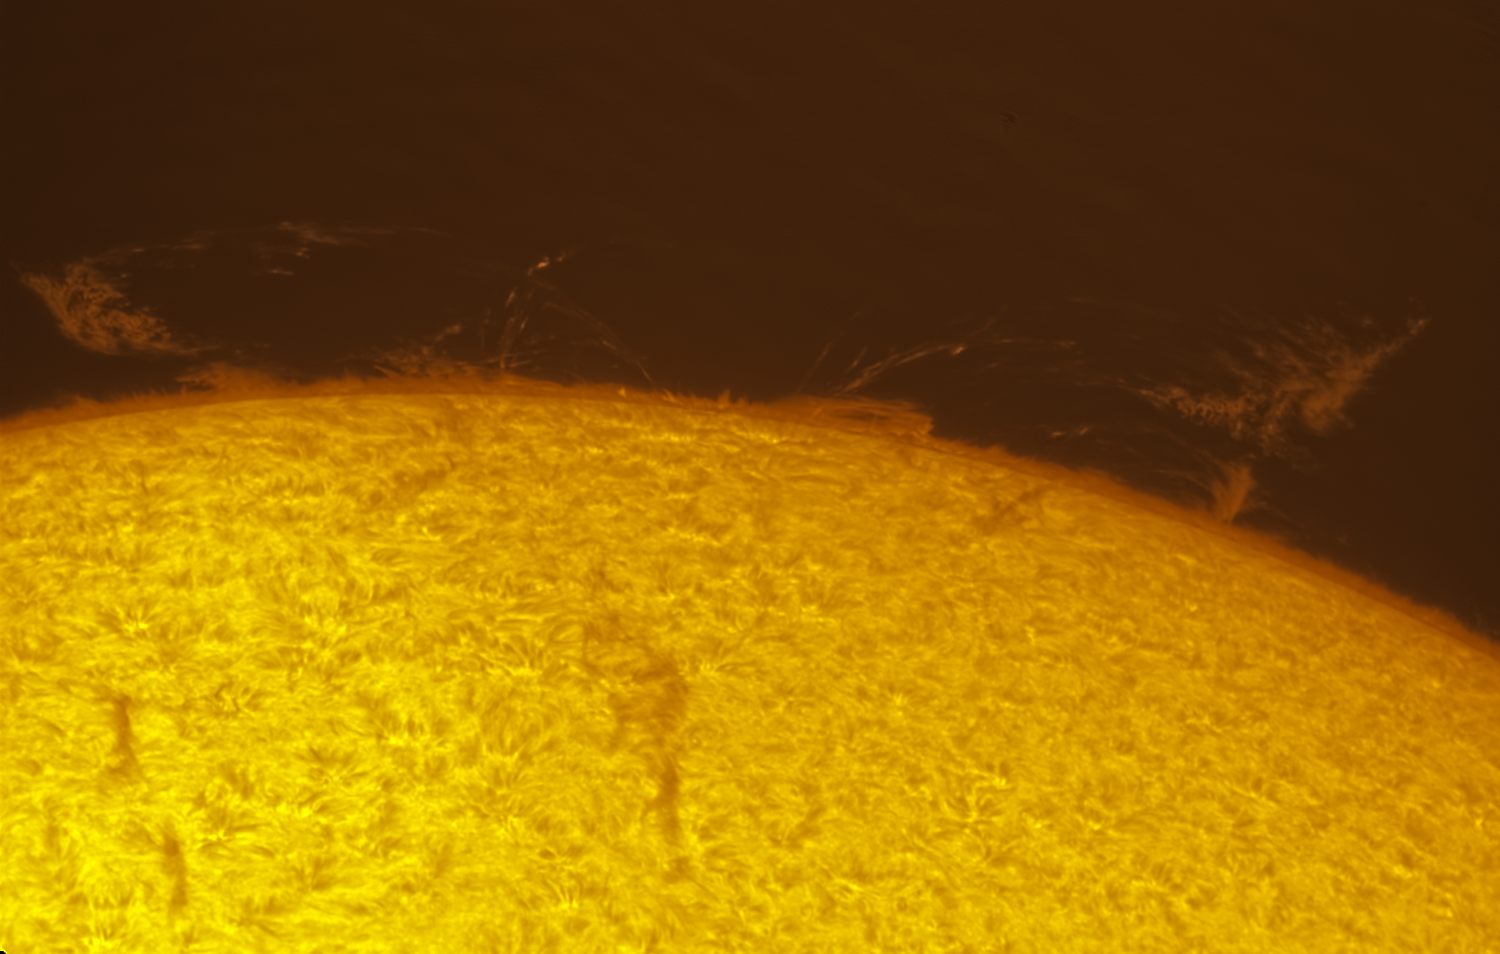
I took a few images,  a couple of which I have posted below.

Just look at that plasma following the lines of the magnetic field around them.

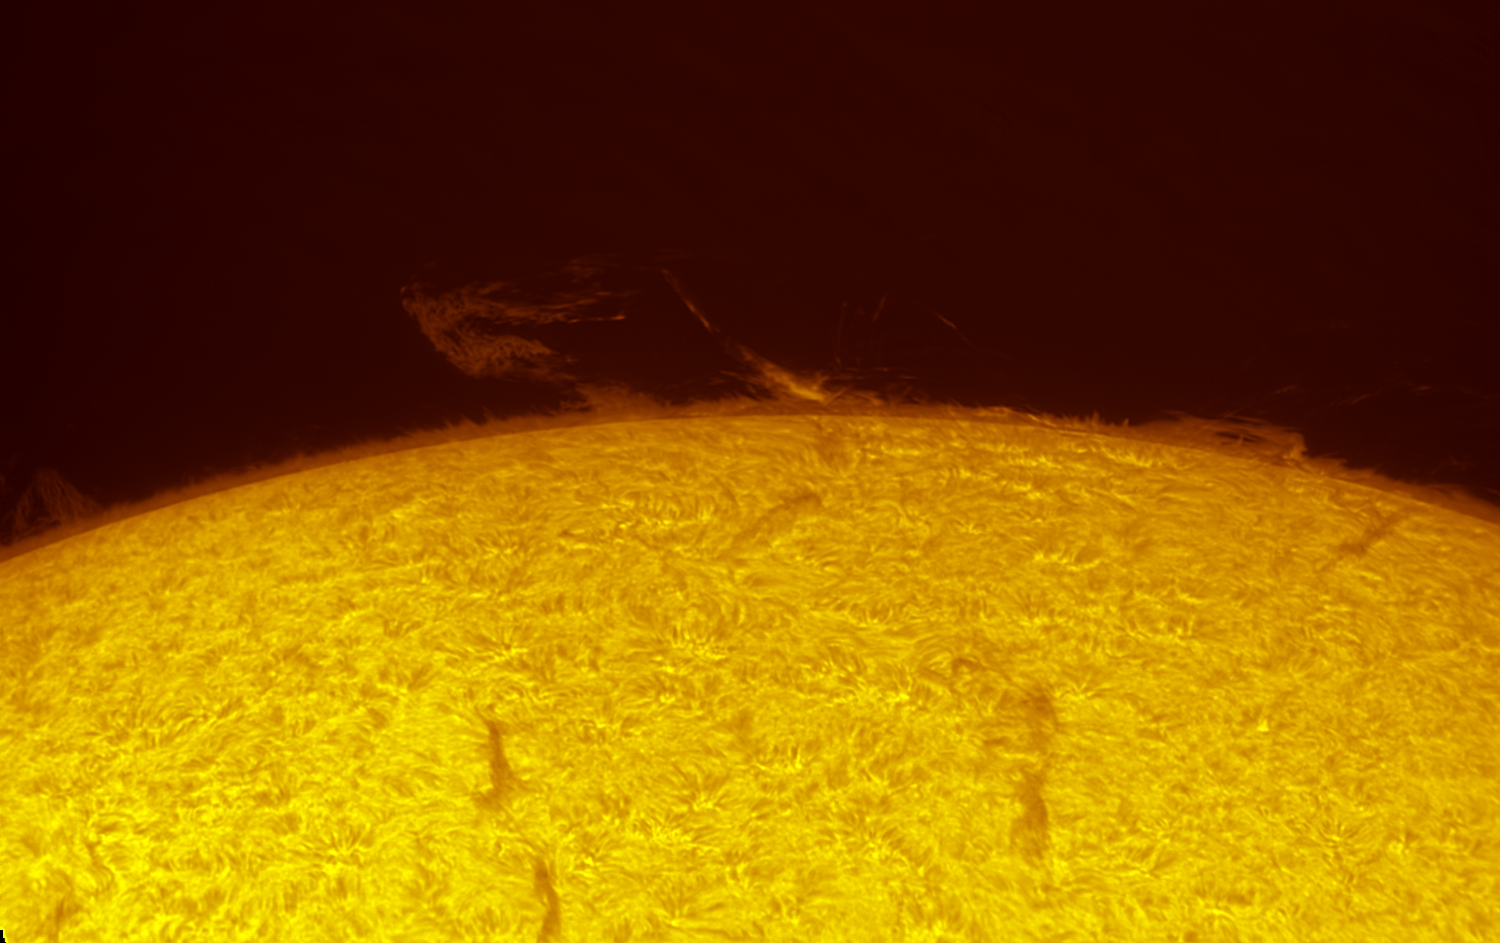
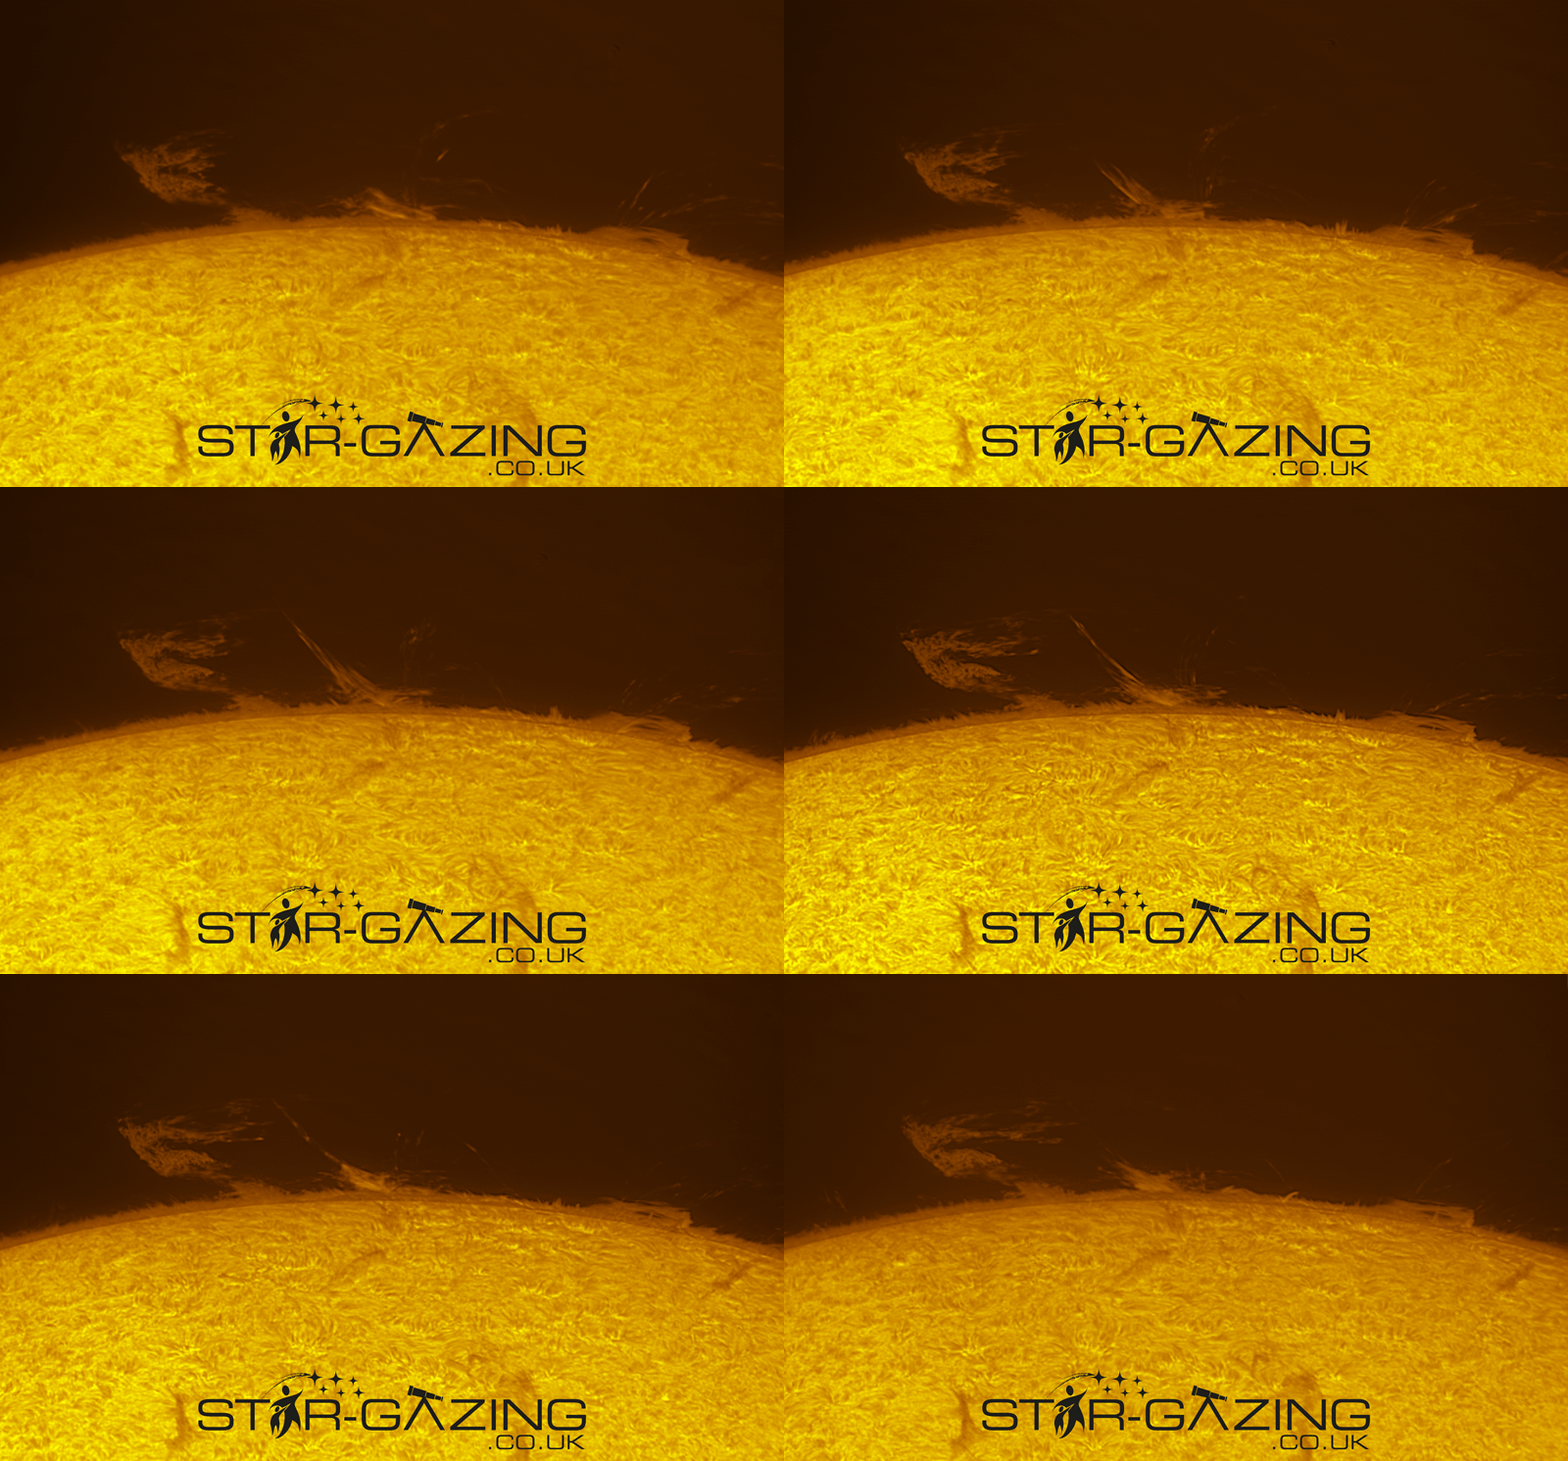
While taking a couple of different exposures to make a mosaic to get all the action in one image, I noticed a surge prom starting to develop.
Here is one of the images I took of it.

As things looked extremely active and moving fairly quickly, the impulse to capture an animation of all this going on was now far too strong.
I took loads of images 2 minutes apart, and managed to capture 30 minutes of action before the clouds to end my fun.
I then spent a good few hours processing each image and putting the animation together.
I have added this below.

Boy, there was so, so much going on here.

ASIAIR Pro Plus – First Impressions

A couple of weeks ago, I was lucky enough to be accepted as an ASIAIR Pro Plus Experience Officer.
What the heck does that mean?
Well, having used the ASIAIR Pro since last year, the manufacturers ZWO were looking for people who posted online content to receive one with a big discount and test out their new ASIAIR Pro Plus. So how could I refuse?

After it taking a bit of a tour round Asia and Europe, I eventually received mine and have now taken it out twice to see how it performs.

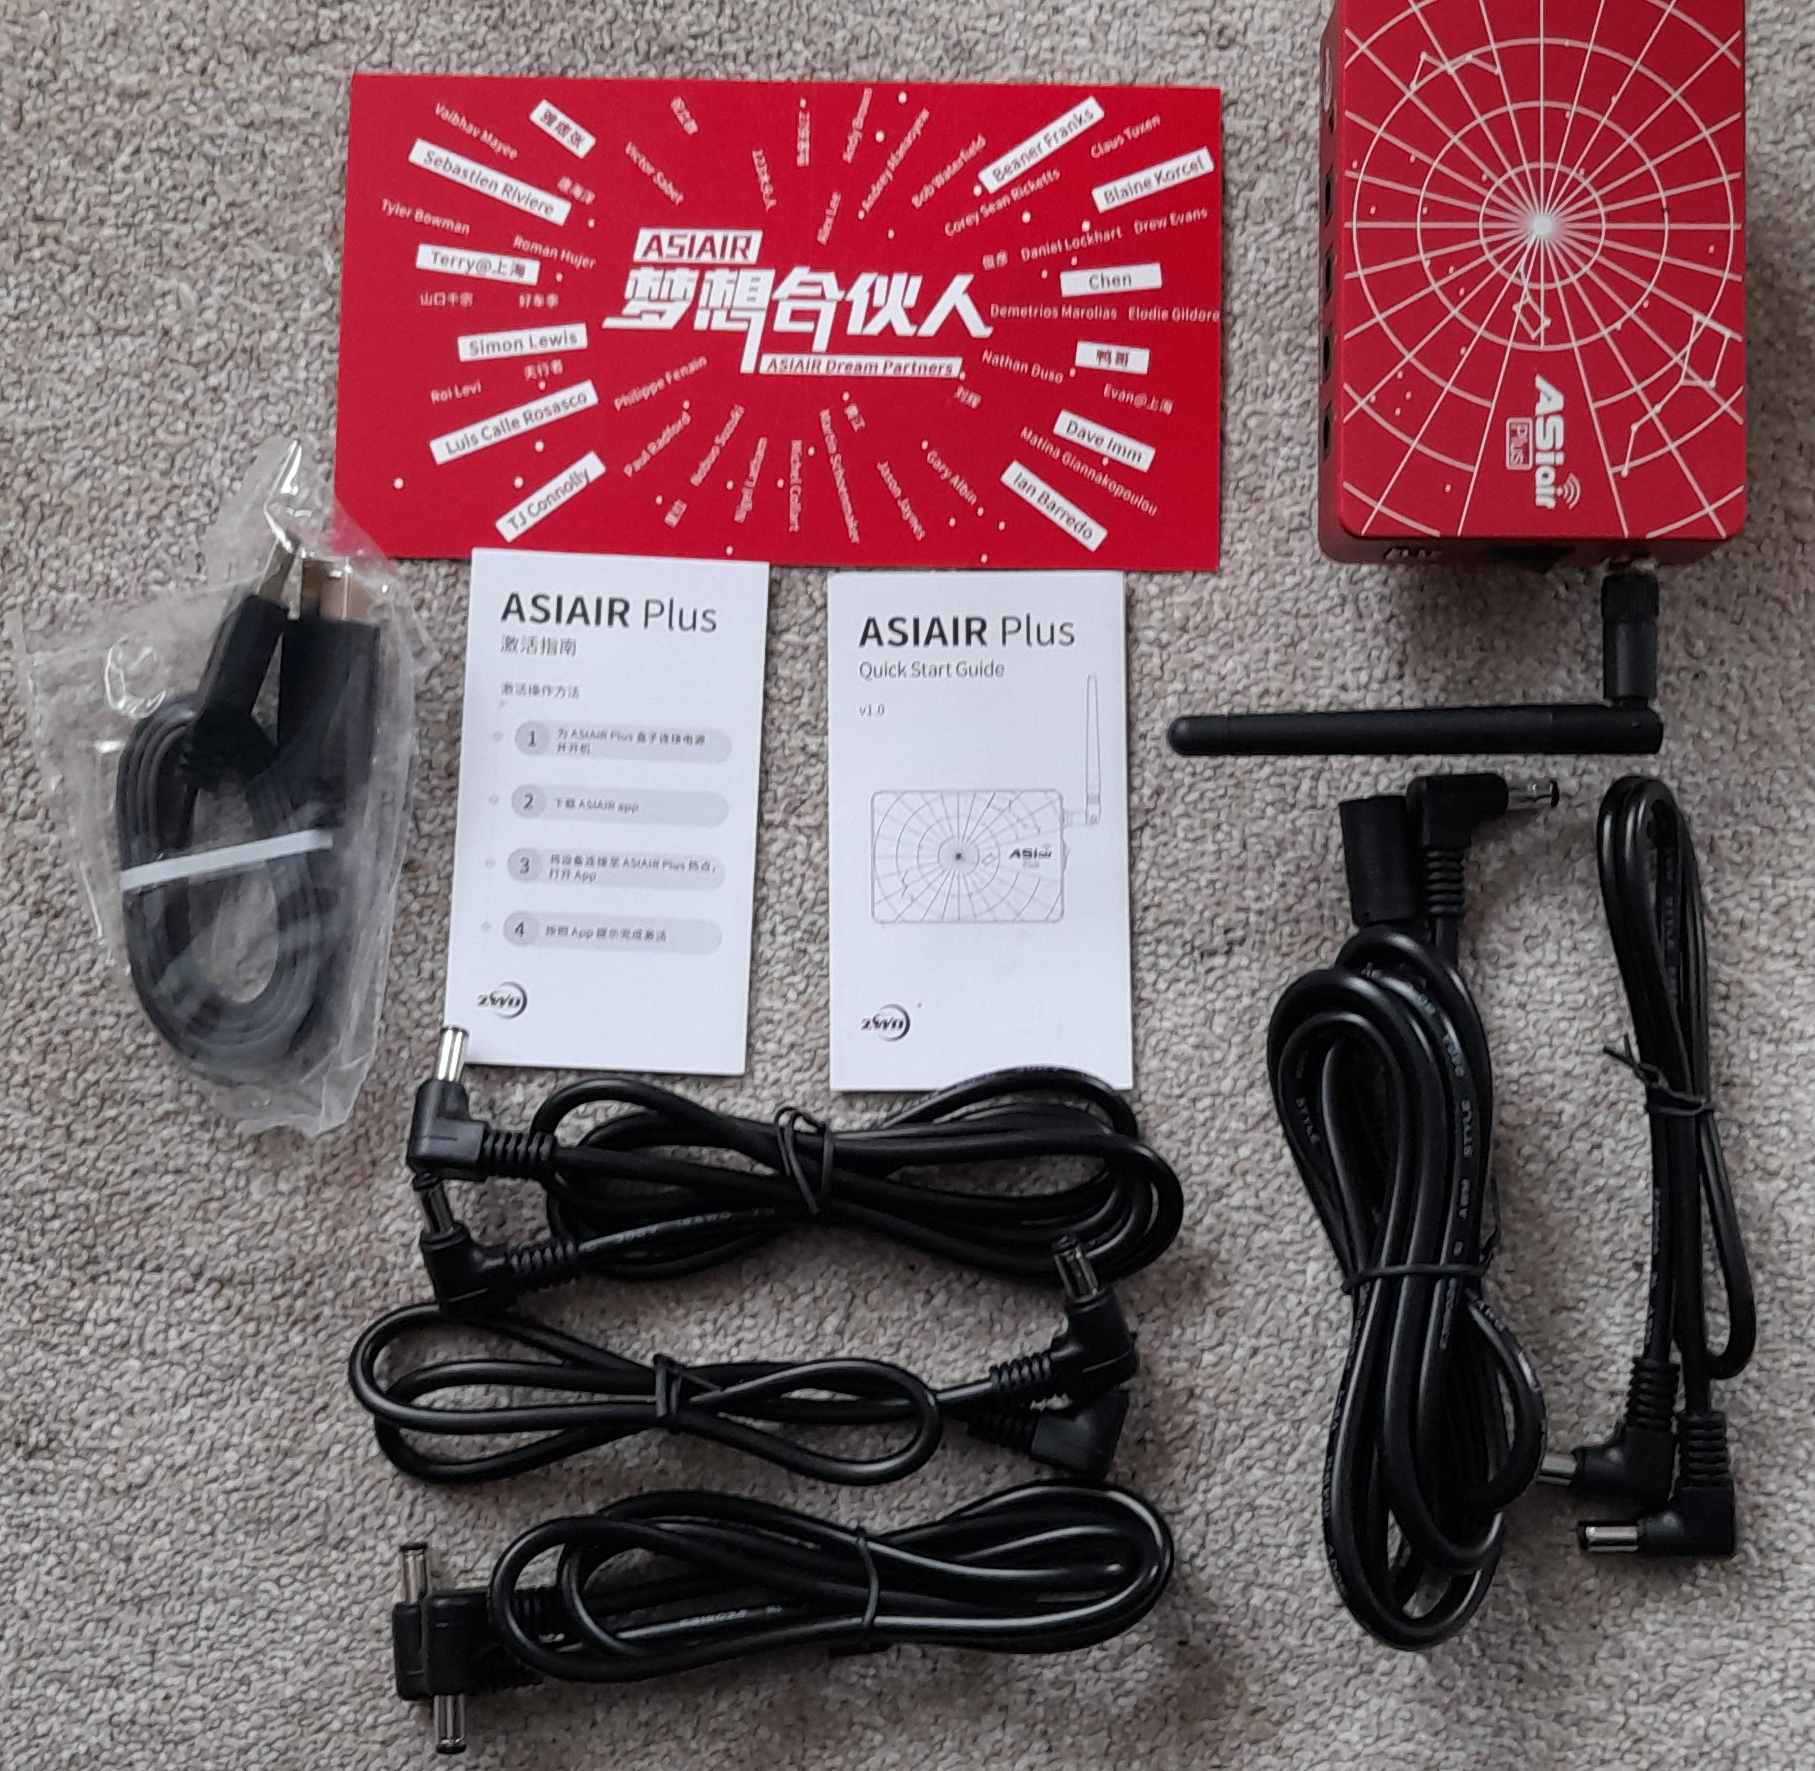
So here’s what you get in the box:

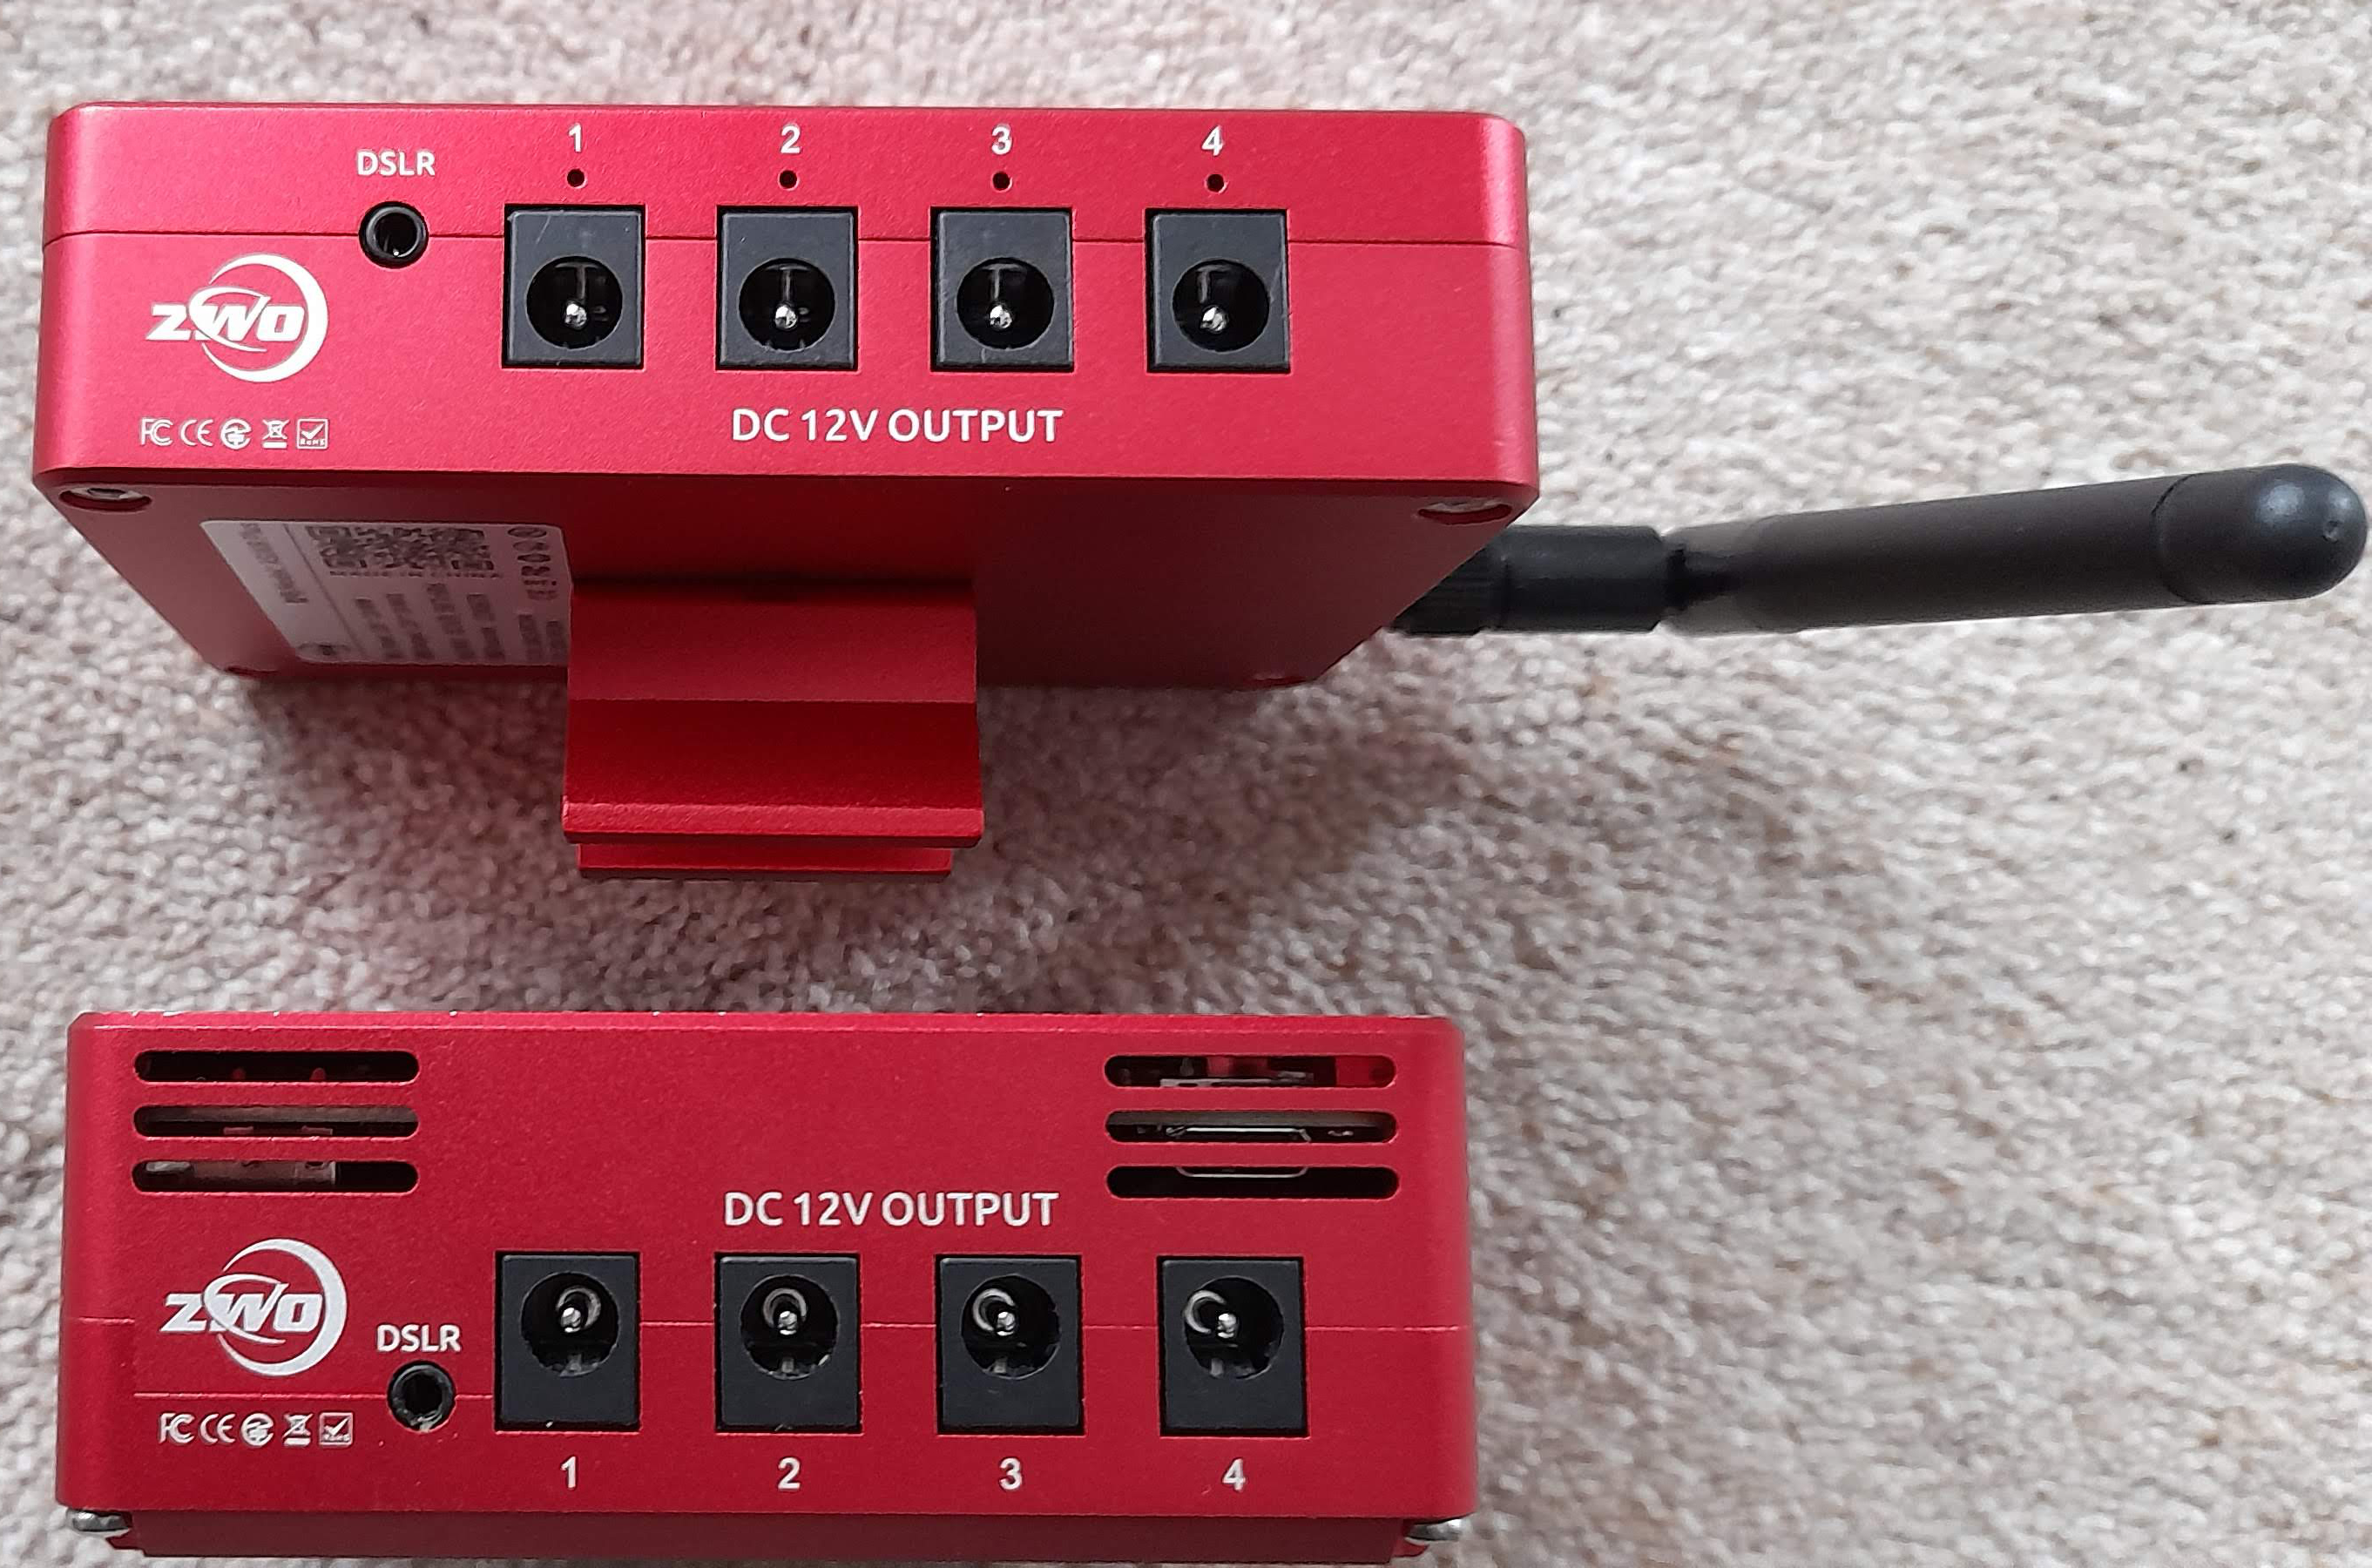
Of course the Plus has the external aerial, which everyone is hoping will solve the weak WiFi signal.

Included are a USB cable and a few power cables.

A USB stick was included with the previous version, but not with the Plus.
But you can still use a USB stick to transfer files from it.

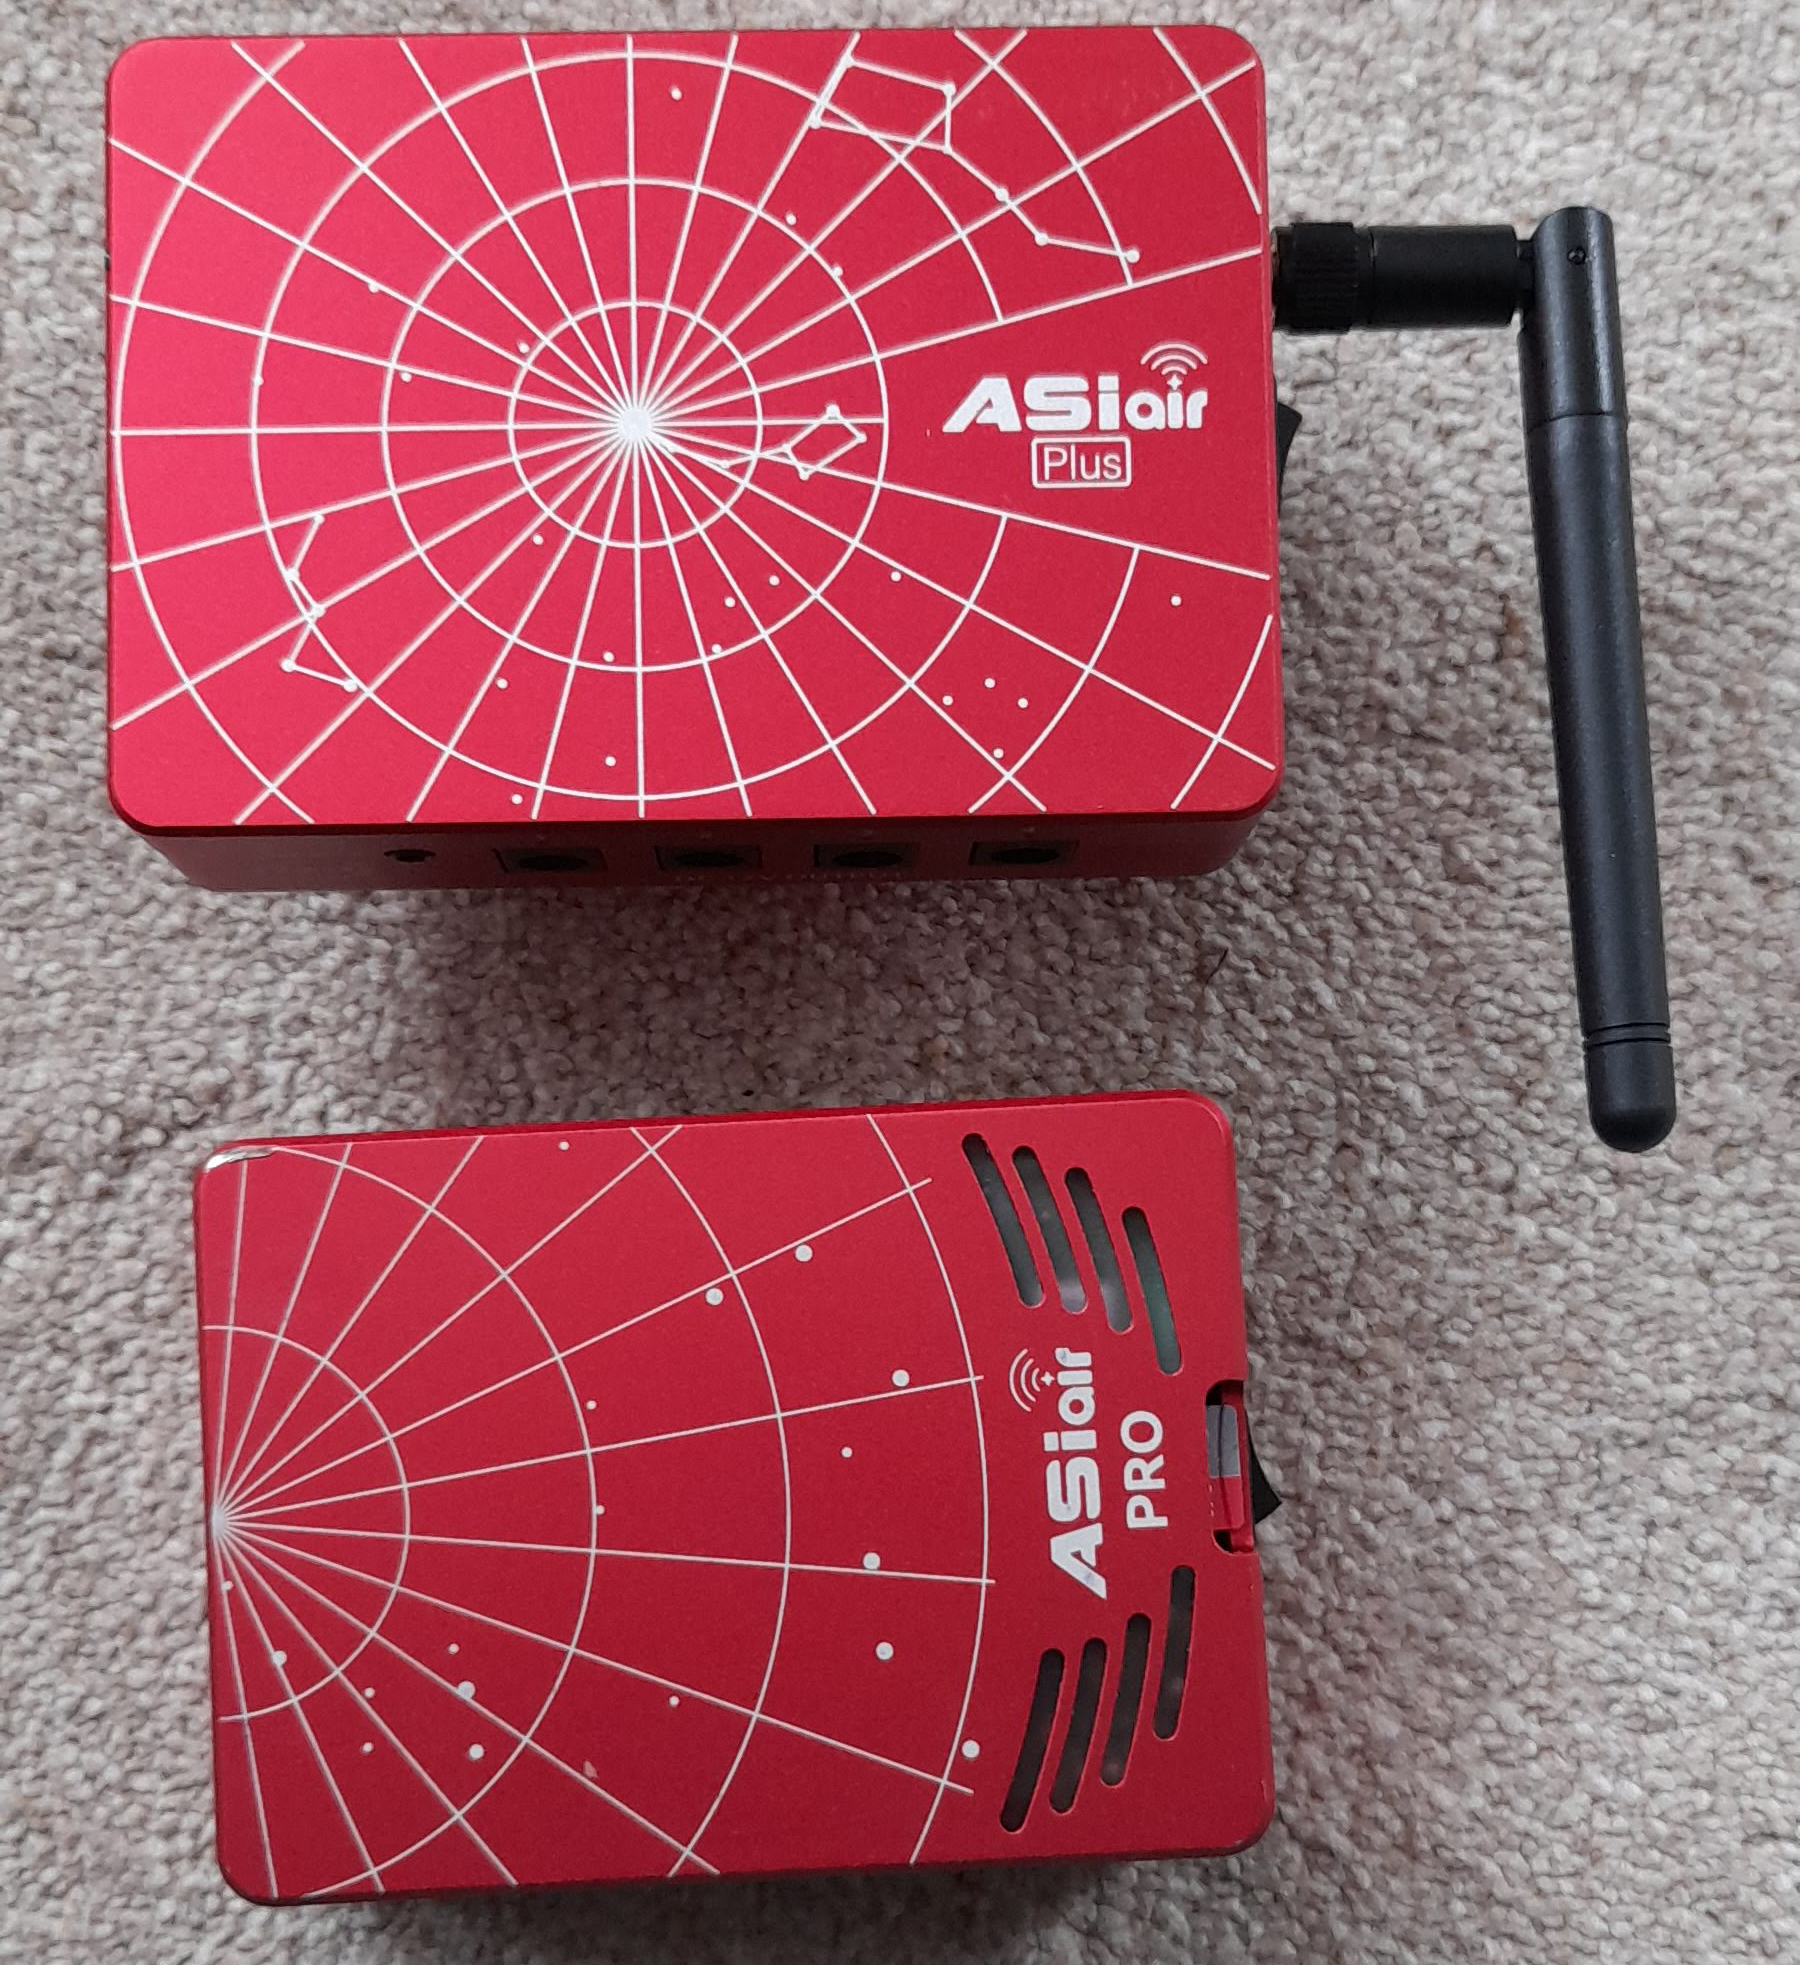
The Plus is slightly bigger that the Previous AAP Pro.
(Thanks Stu, now you mention it looks like Spiderman’s Router, I just can’t drop that impression from my mind).

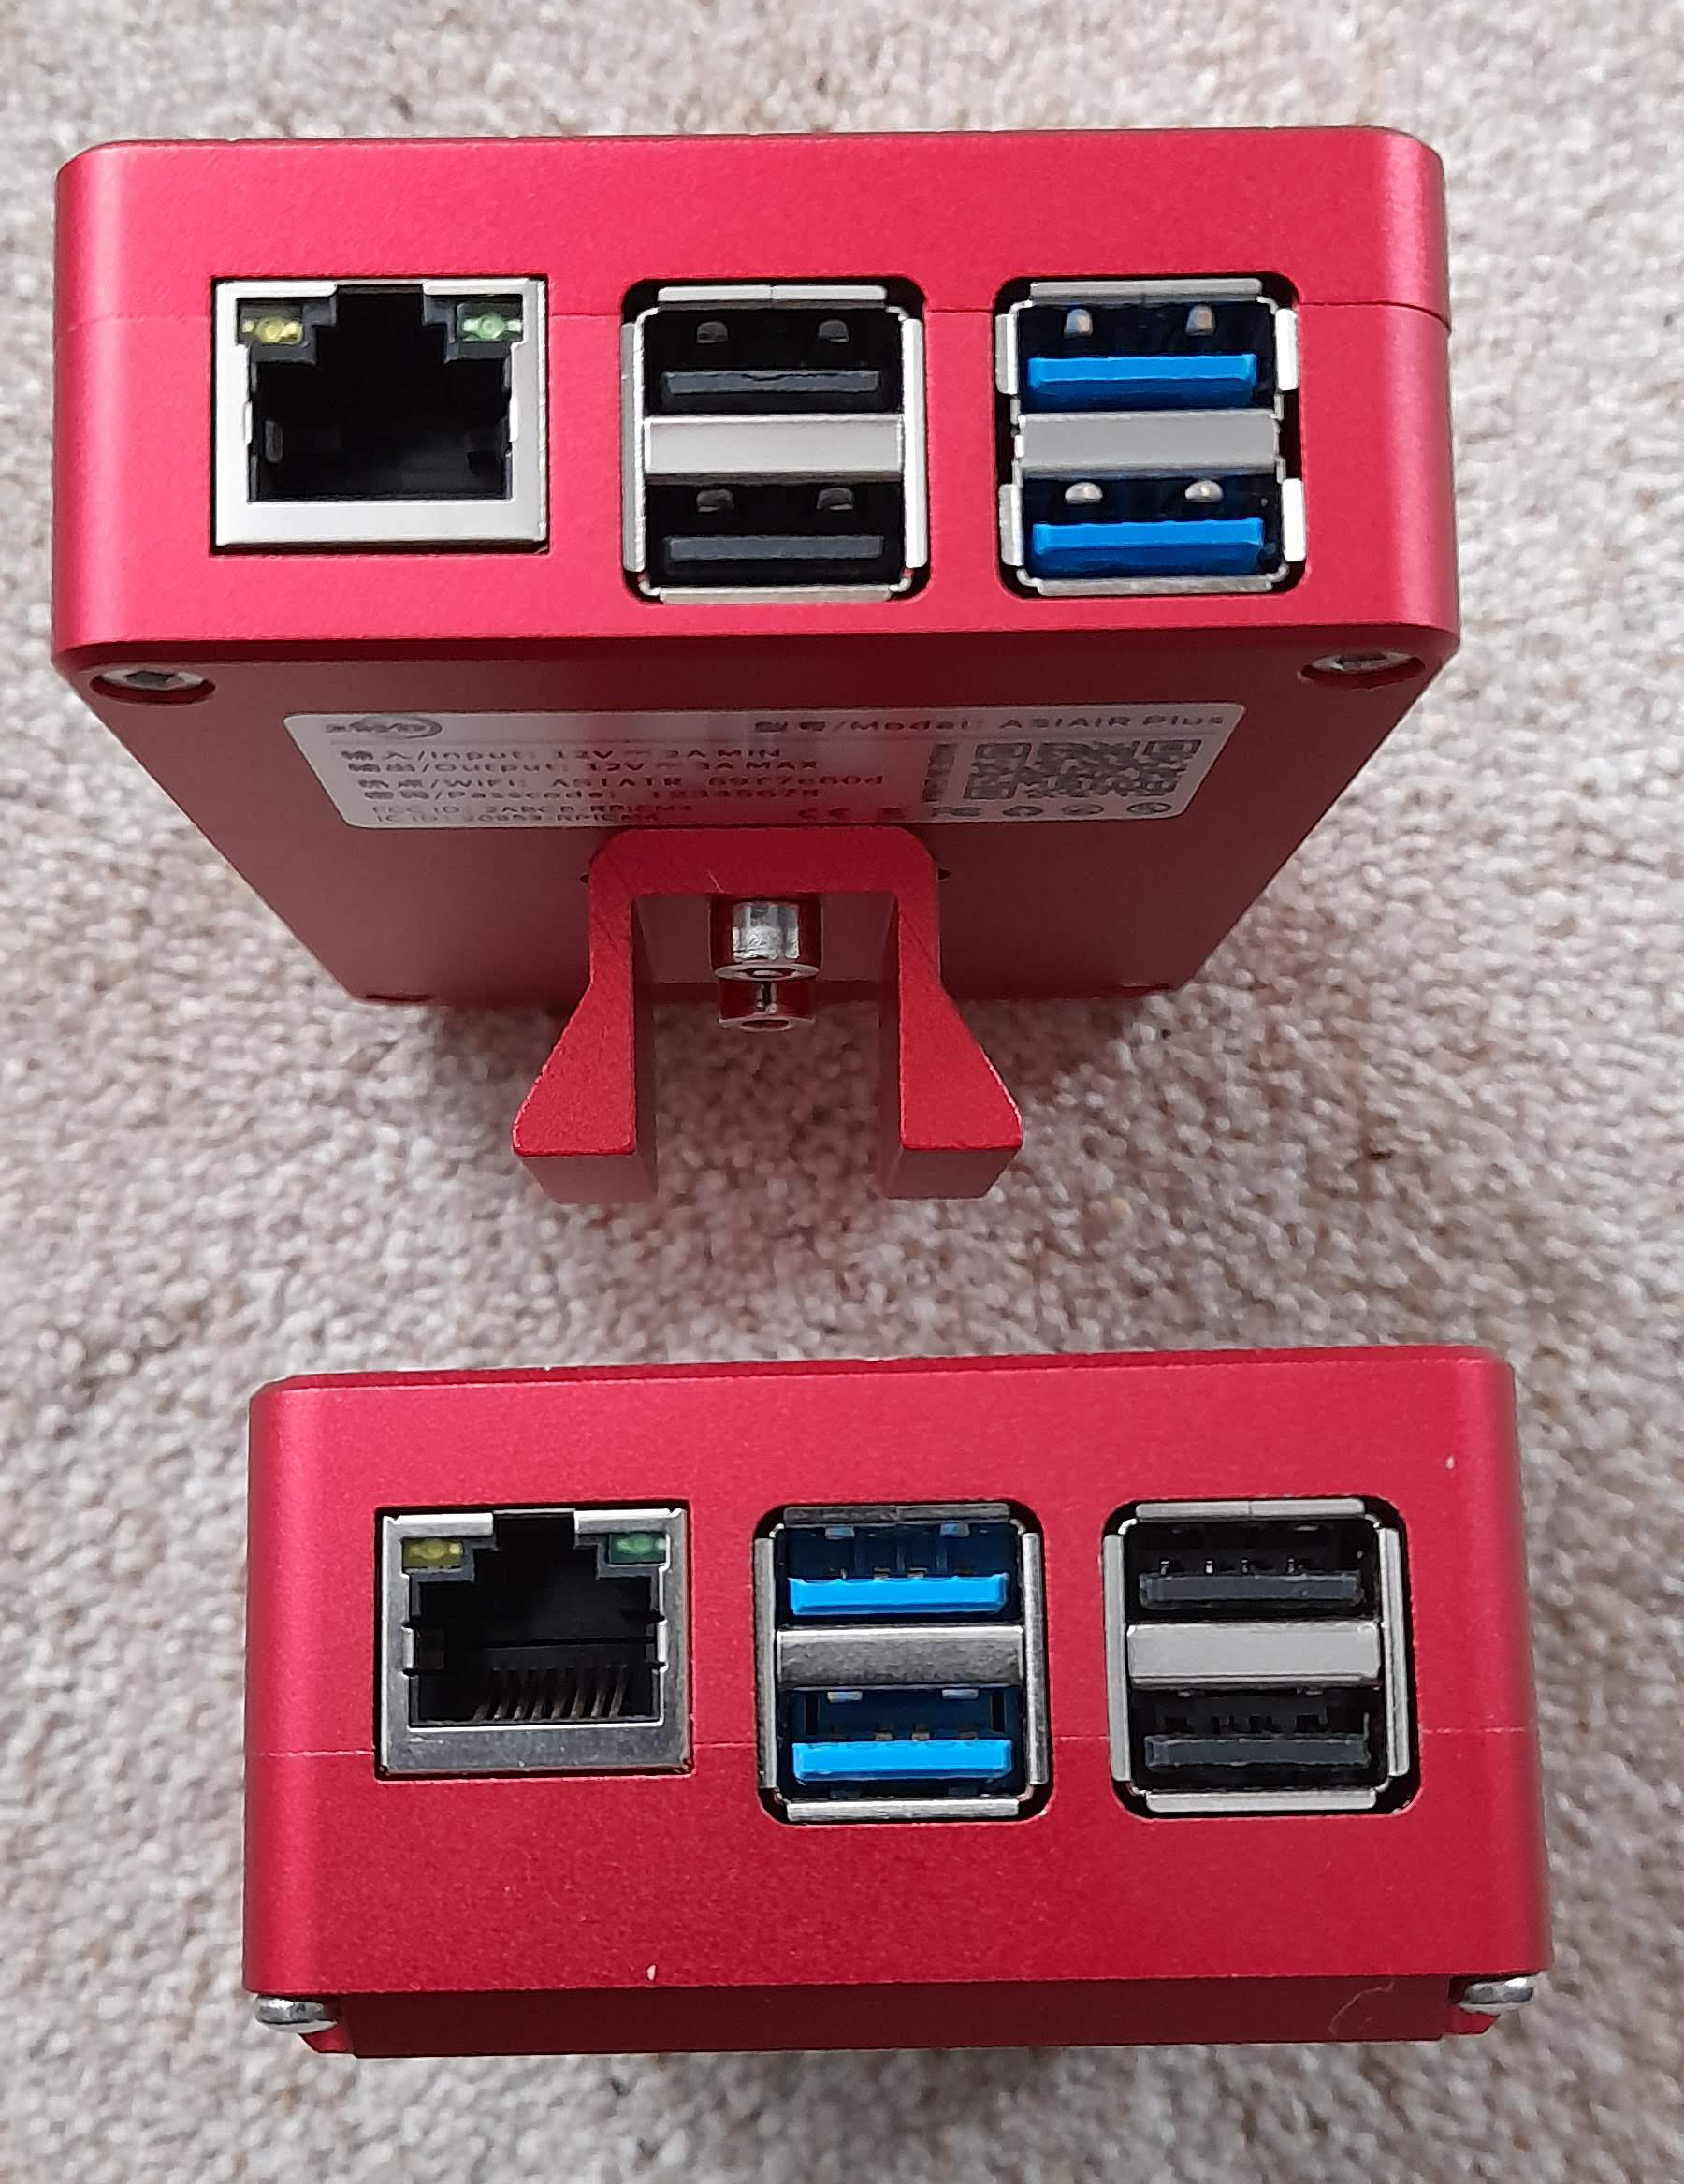
It has the same USB3 and USB2 ports and Ethernet ports.
In this view you can also see it is a bit thinner.
It is also a little it lighter:

The Power Ports have lights above them, so you can see when they are powered up:

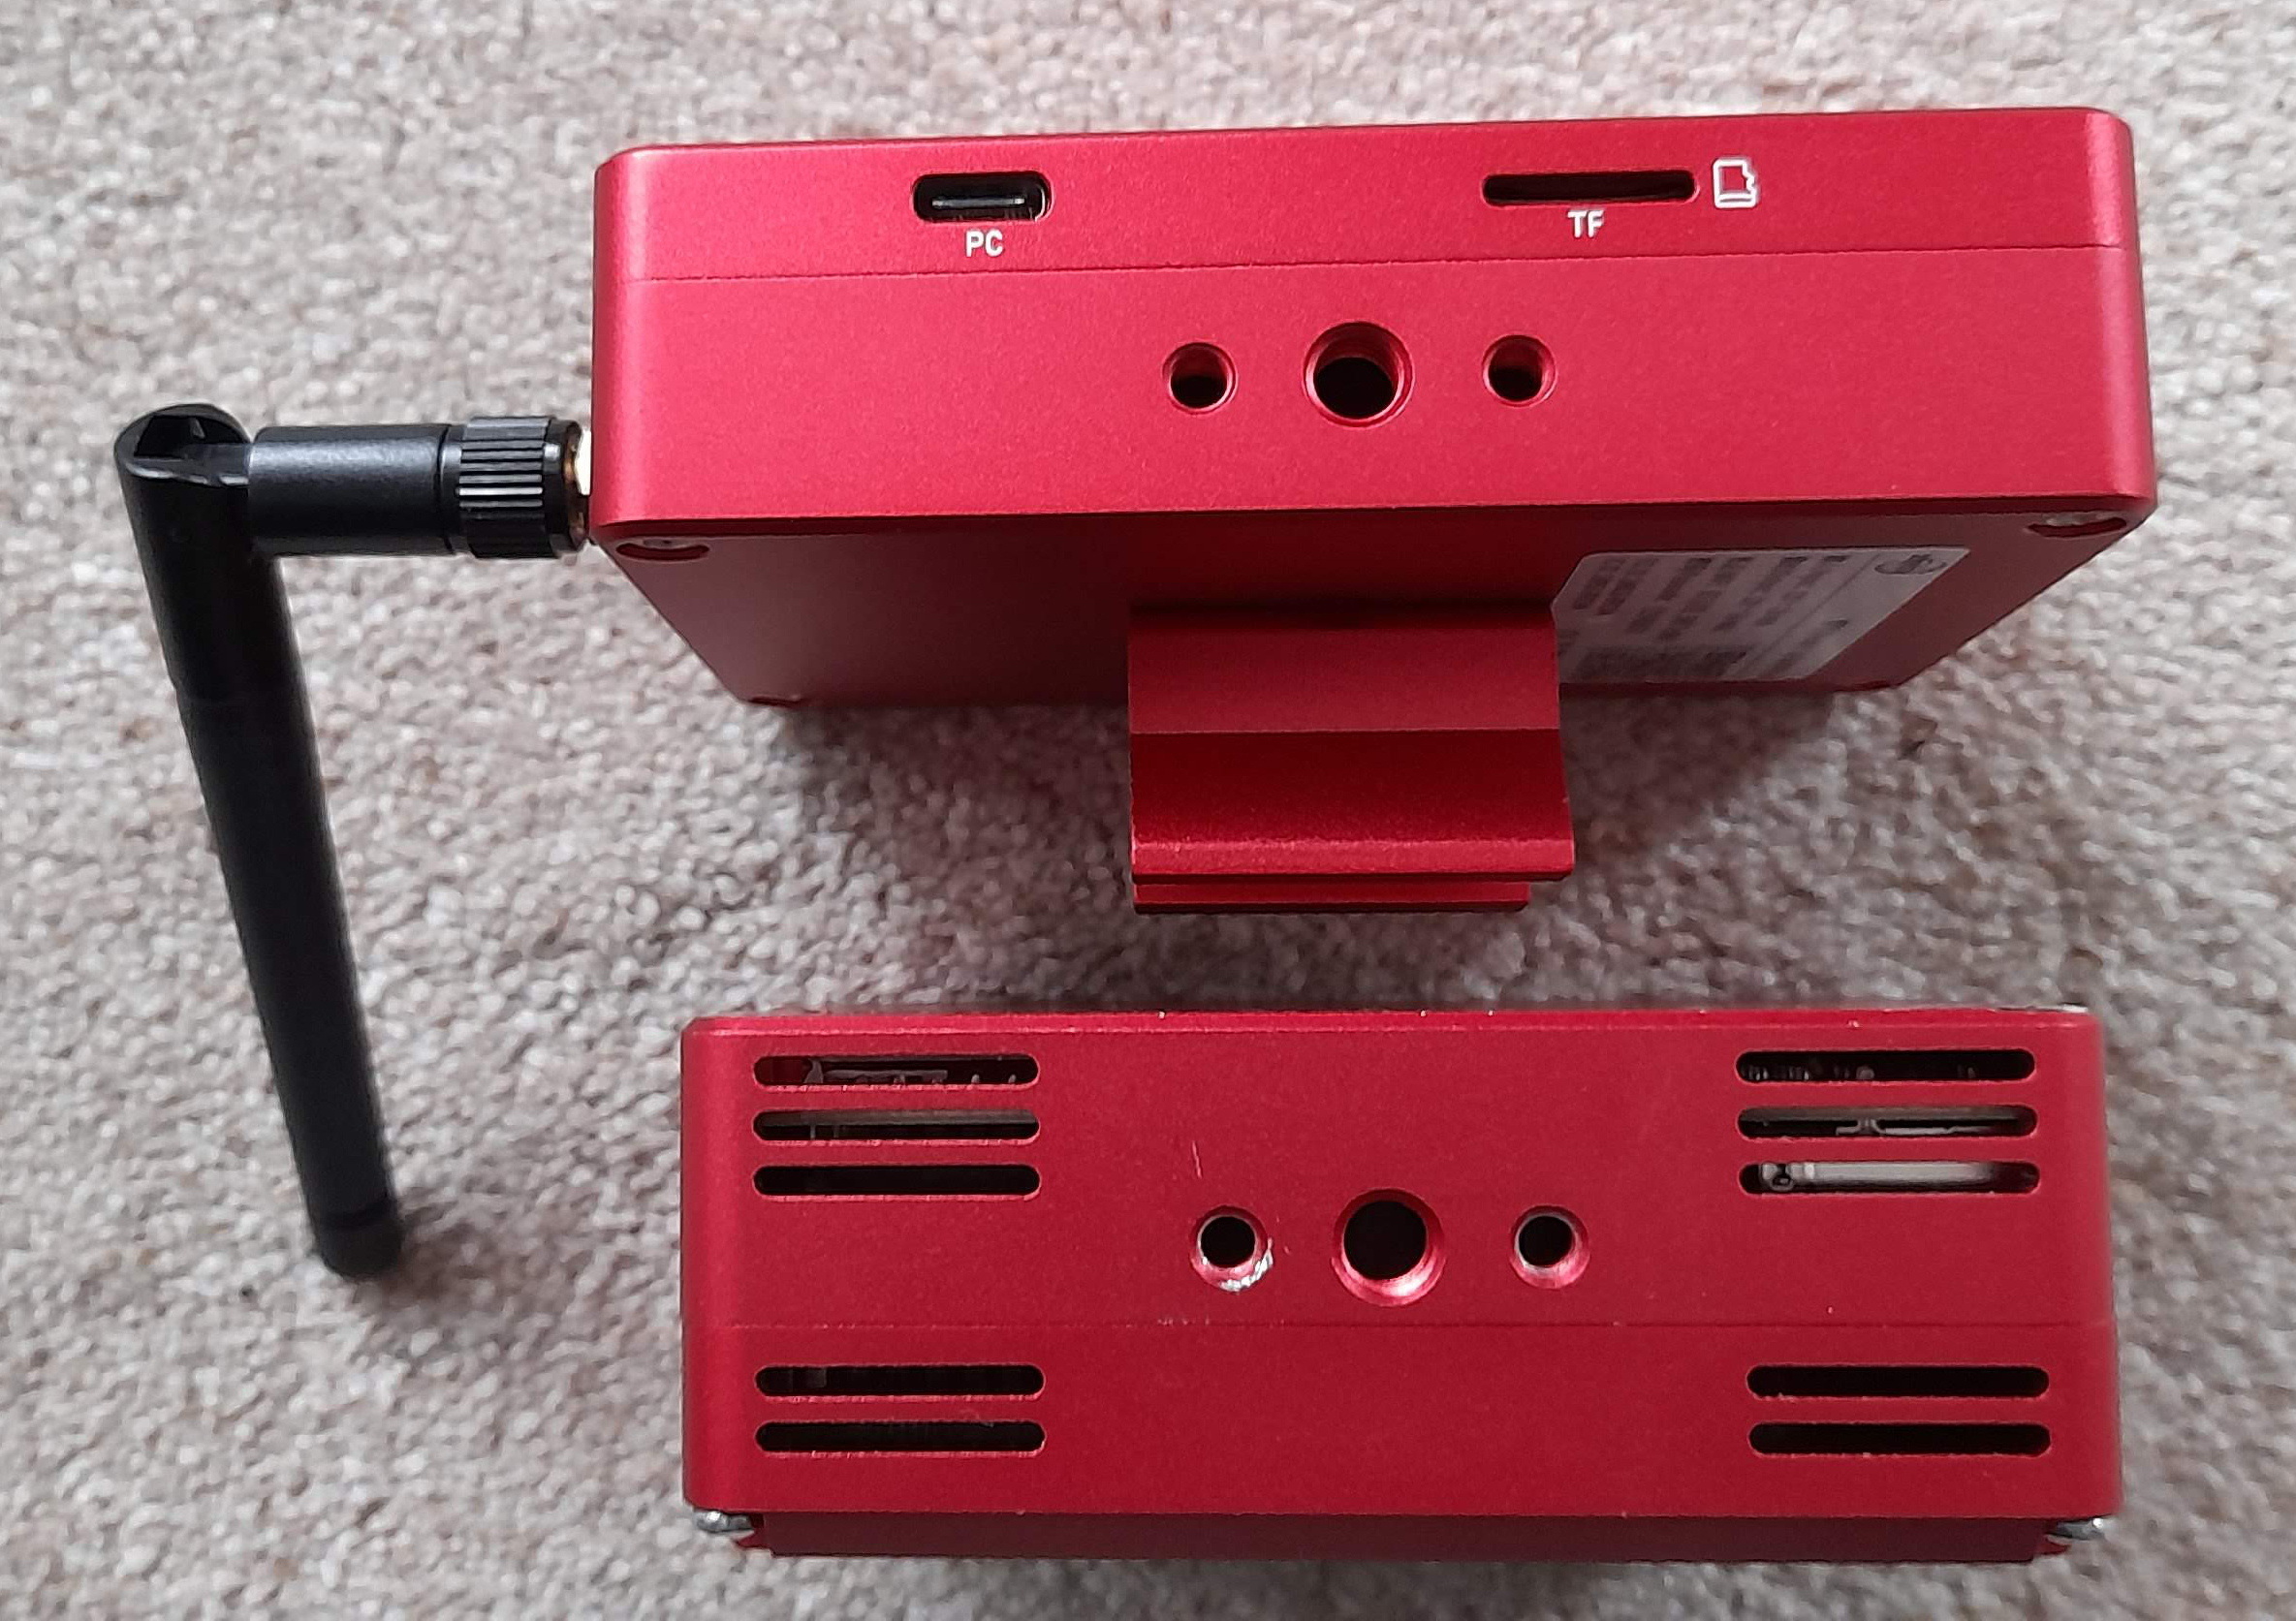
On the other side of the Plus there is now a USB-C and an DS Card slot, both used to transfer files:
Annoyingly, if you are using the securing holes to attach the dovetail foot or the clamp, it covers these up.
It would be really annoying to have to remove this each time to use them.

So that’s what it looks like, the next thing was to put it through its paces and see how I got on with it.
I managed to get two clear nights since it arrived.
I will post a following blog entry to let you know how I got on.

Dave


Perseid Meteor Fun

This is what I just love about this wonderful hobby. You never know where an image or social media post will take you.
I have found yet another rabbit warren into which I can lose myself.

Anyway, after a battle with my camera, I finally got my All-Sky Camera working properly in time to try and capture some meteors from this years Perseid Meteor Shower. The problem I had was that it produced a very grainy image, with lots of bright coloured speckles across it, from the camera I was using.
It was my old ZWO ASI120MC camera I used for imaging the planets.
Getting a good dark frame image to subtract has been a complete nightmare.

But I finally got it working and producing some reasonable images I could use.
So while we were away in The Elan Valley in Wales where I was hosting a Perseid event, the camera was faithfully capturing images for me, when it was clear here.

The camera caught a couple of meteors that week, which I posted on social media.

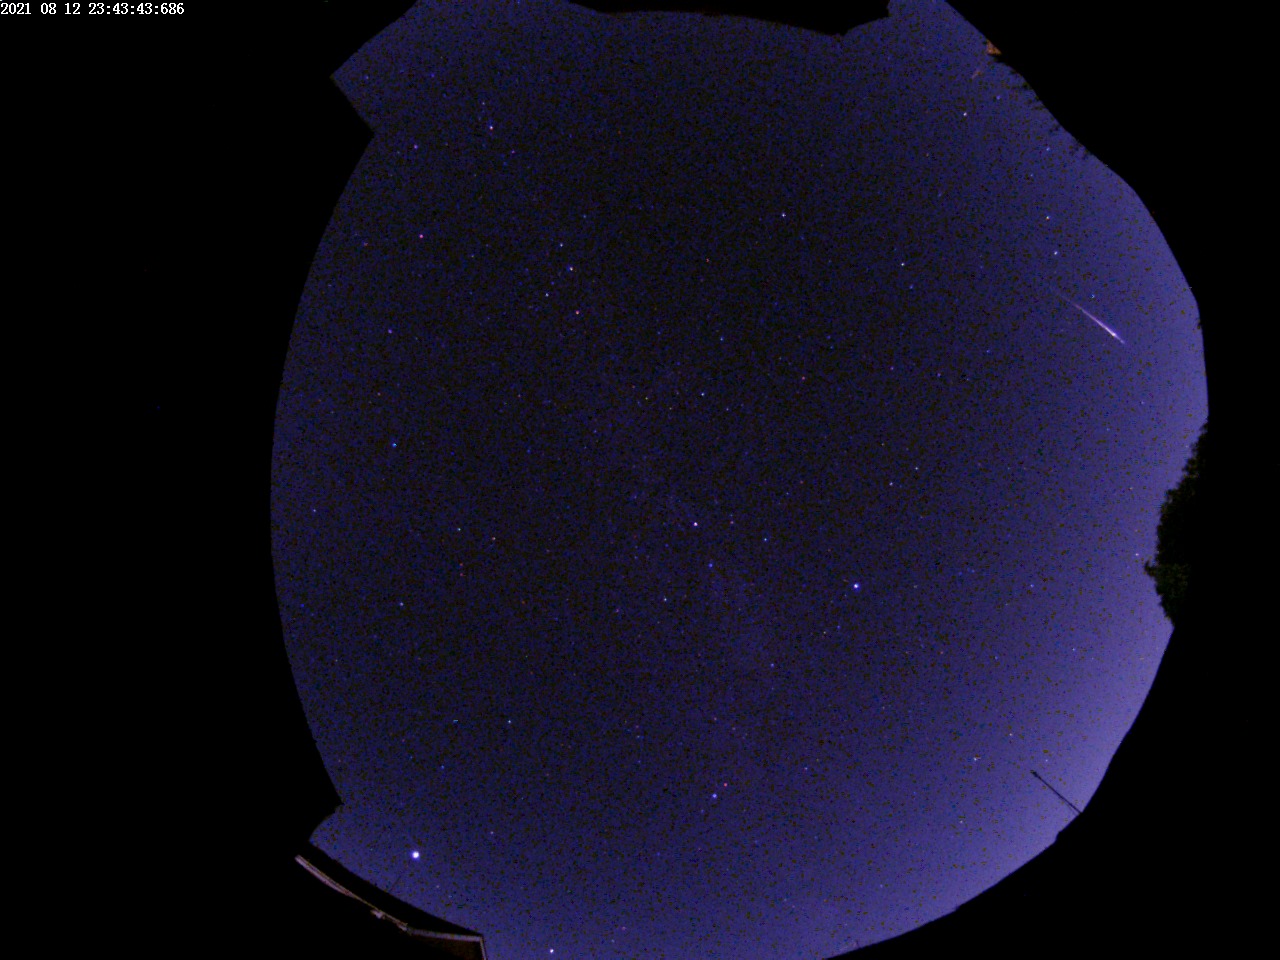
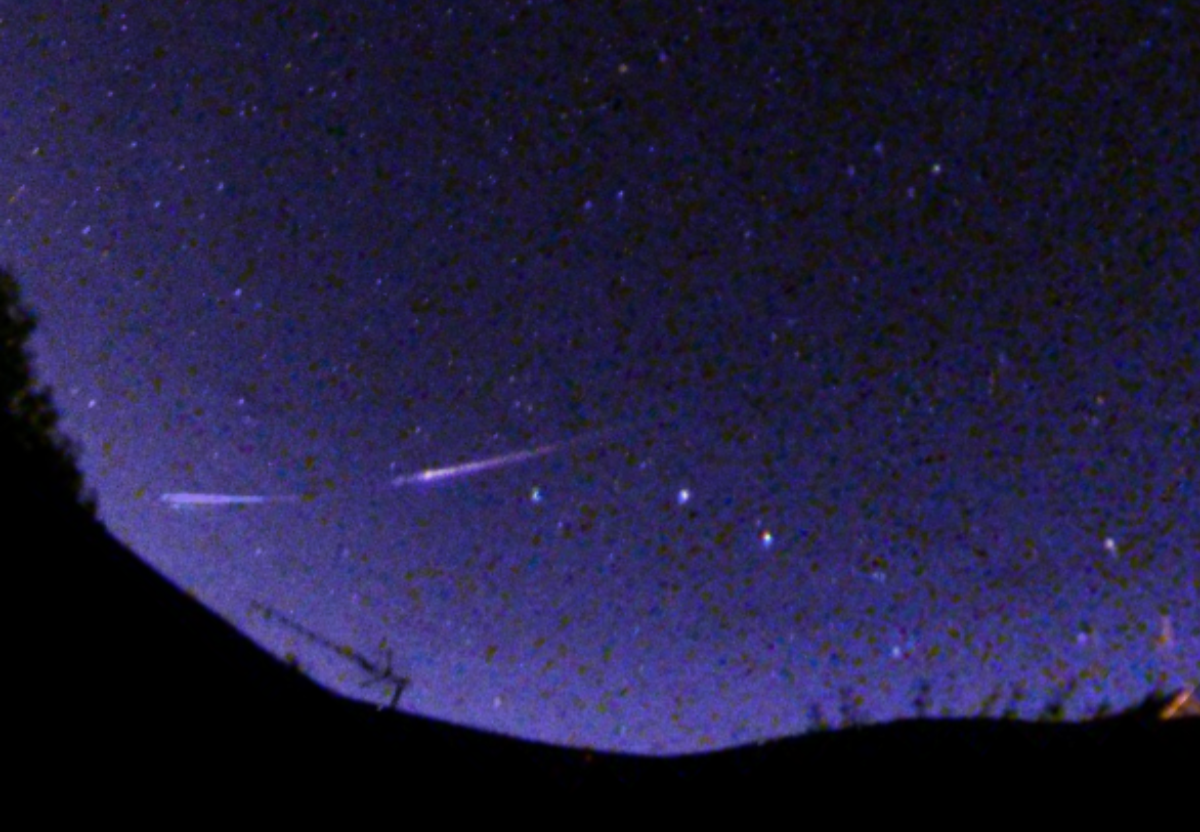
This image of a meteor captured at 23:43 UT on the evening of the maximum on the 12th of August showed a very bright Perseid at 23h 43m UT in the north western sky, passing close to the handle of The Plough.

This then started a chain of very interesting events.

After posting this image on Facebook, one of my friends from Breckland Astronomical Society, re-posted it on their Facebook page.

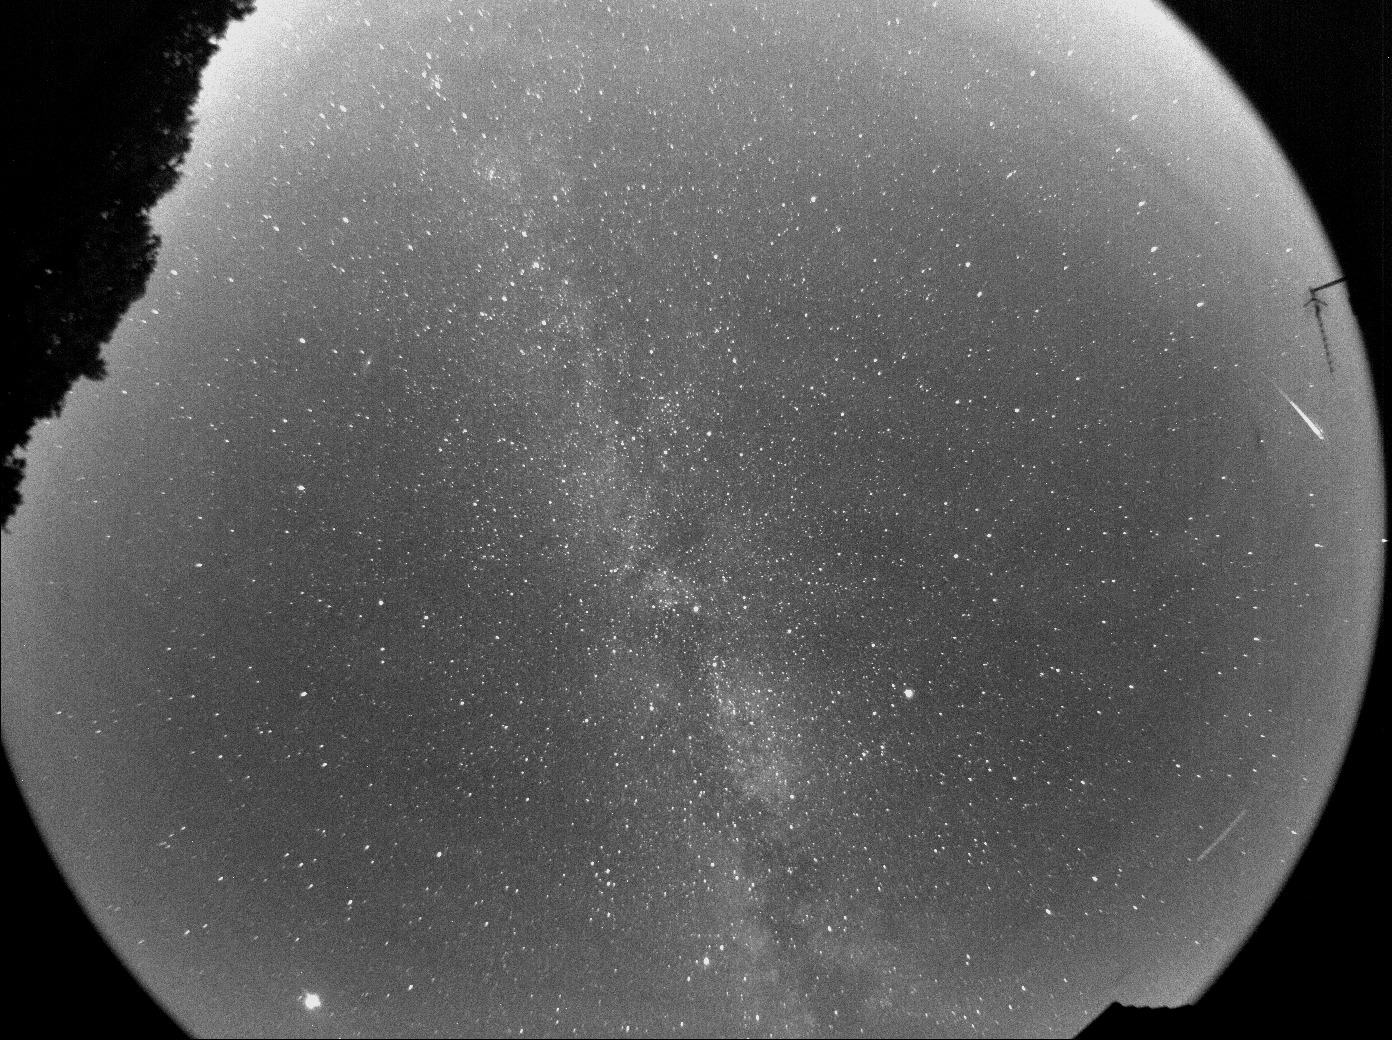
Chris Bailey, who has a monochrome All-Sky Camera, posted his image taken at the same time, which had clearly captured the same meteor.
Notice how the position of the meteor in the sky is different, due to the distance between our two observing sites.

I tried to superimpose the two images to show the shift on perspective below.
Chris’ meteor is closer to the horizon. Chris was located East of me in Suffolk, so must have been further away from the meteor.

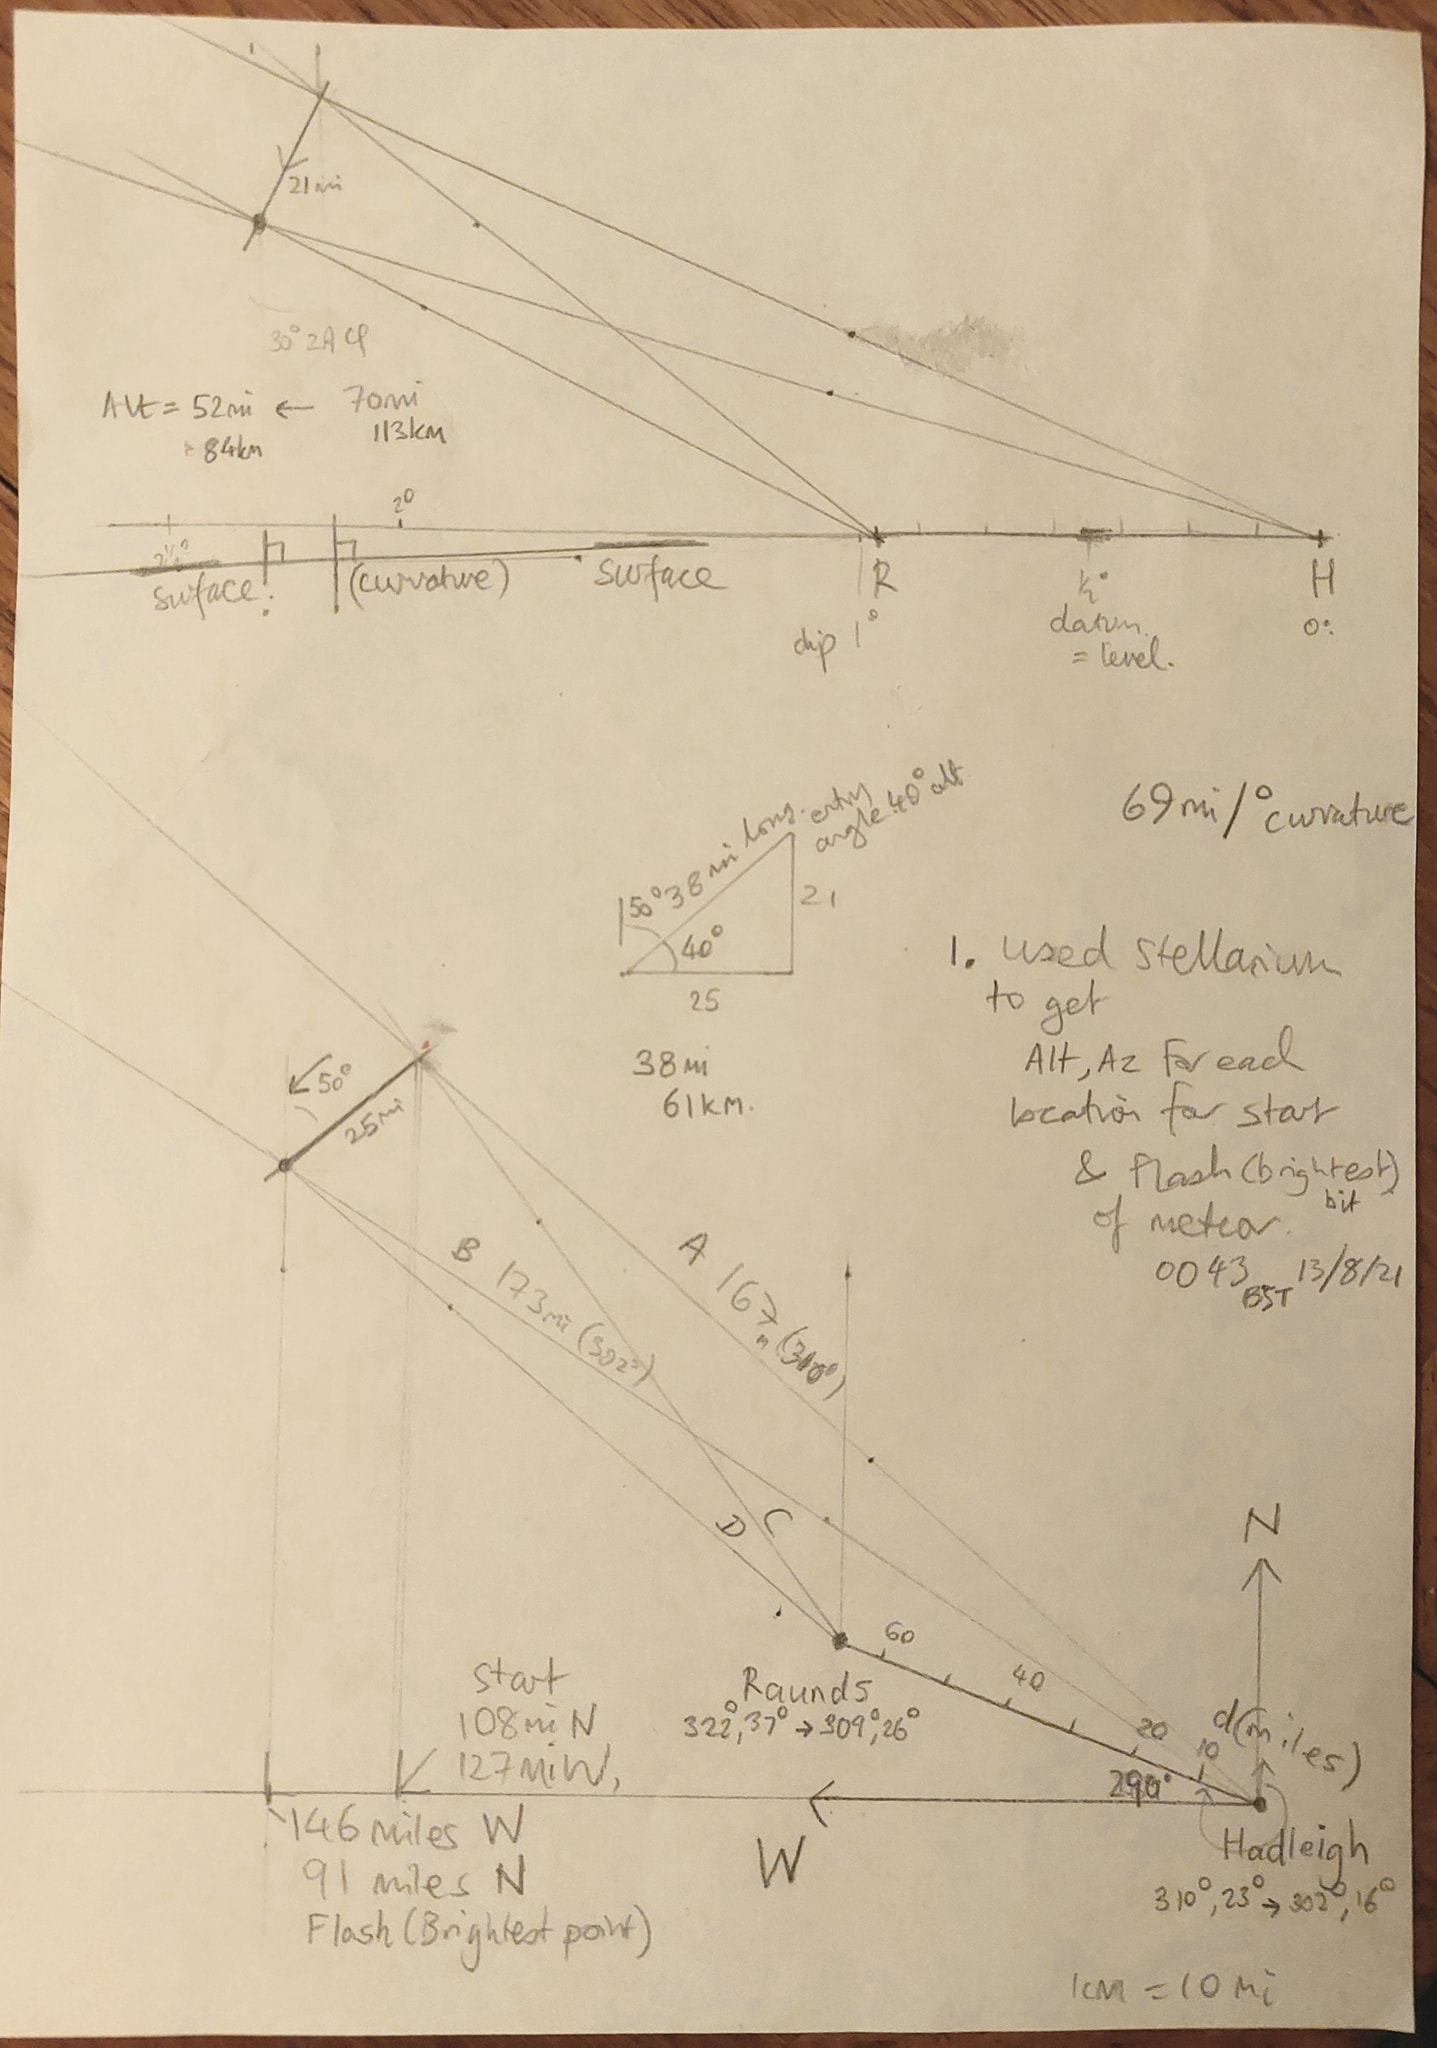
Another member of Breckland AS, Dan Self, using simple trigonometry (Simple that is, if you were taking it all in at school, unlike me!), and knowing our two locations, calculated the height, position and distance of the meteor from us both.

His calculations can be seen below.

These showed that the height of the meteor was between 70 miles and 52 miles high, top to bottom of the trail.
It was 167 – 163  miles away from Chris, depending on which part of the meteor trail you measured, which was 25 miles long.
And 107-108 miles from my location across the ground but as it was at that altitude, that came out as a distance from me of 128-120 miles.
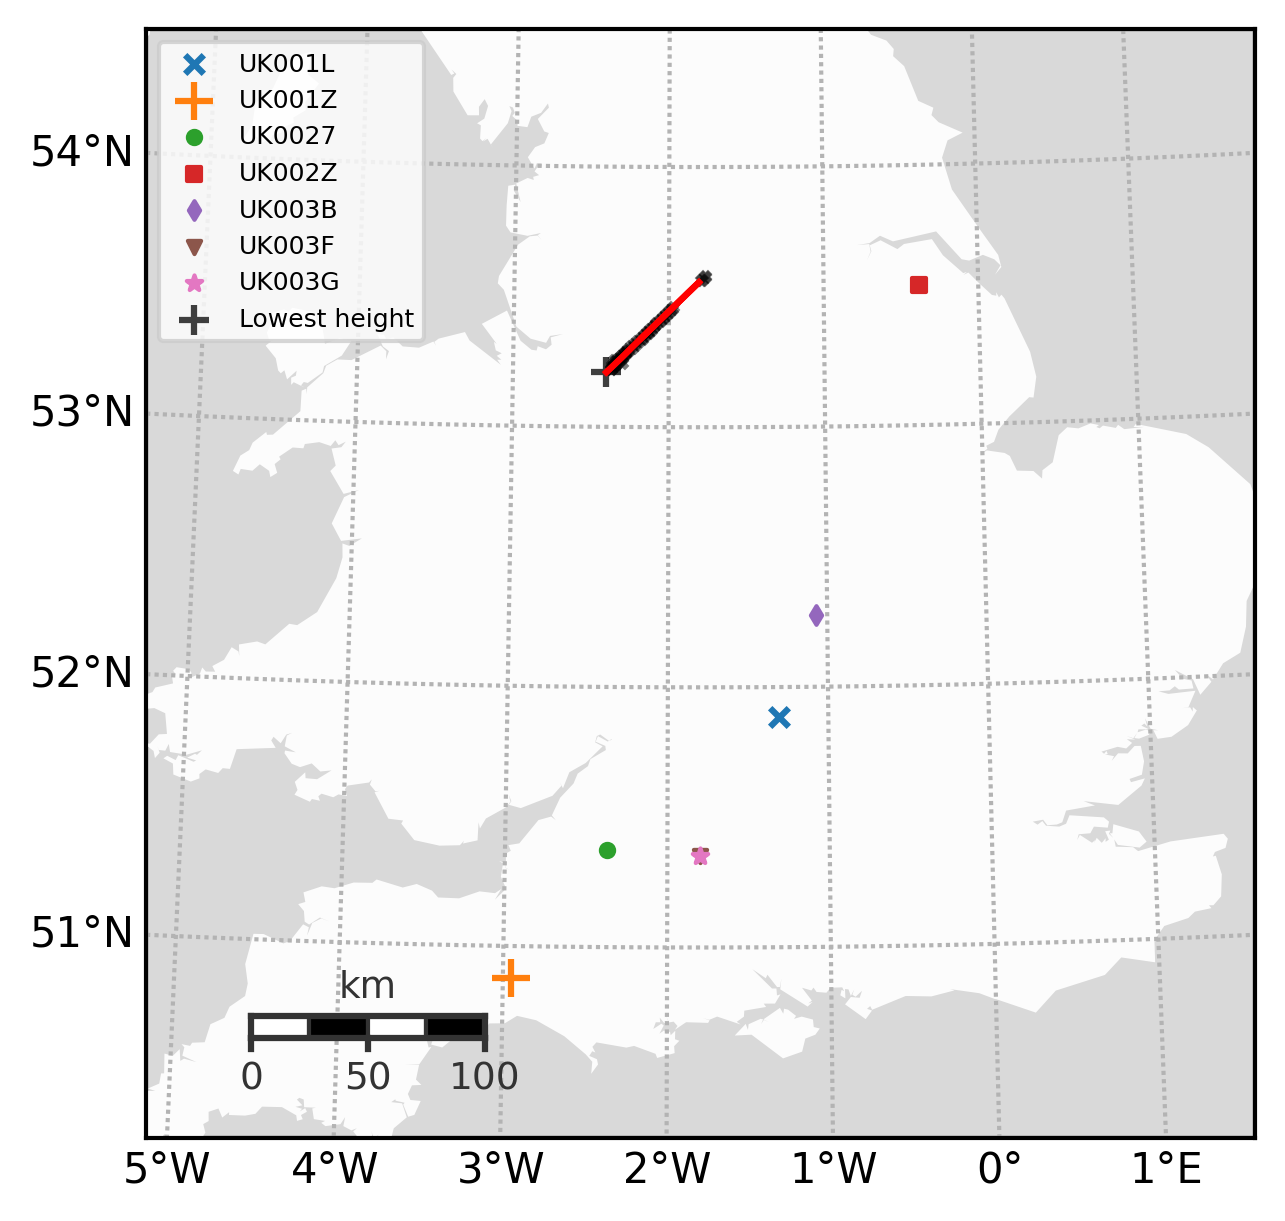
The meteor would have came across the sky almost directly above The Peak District.

Knowing this, I popped off a message to Patrick Poitevin, who has meteor detection cameras and lives in Tissington, right in The Peak District, to see if any of his cameras had captured it.

The meteor, being so high in altitude from Patrick’s location, was not picked up by any of his cameras.
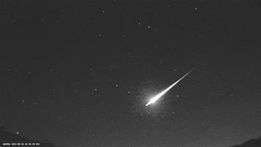
But it was captured by other cameras in the UK Meteor Network and logged, as can be seen in the image below, where it goes right through The Plough.

When they tracked the path of the meteor, it was slap bang right over The Peak District as shown in their image below.
Absolutely awesome work by Dan there.

Full details about that particular meteor from The UK Meteor Network Archive is shown here:
https://archive.ukmeteornetwork.co.uk/reports/2021/orbits/202108/20210812_234311.347_UK/index.html

Now, I might investigate to see how you get set up to join in with this meteor network.


A Monster Comet – 2014 UN271

There are many stories going around the internet about a “Monster” Comet which is making a beeline for our solar system.
Called 2014 UN271  (Bernardinelli-Bernstein), this comet is currently 20 Astronomical Units (20x the distance of Earth) from The Sun.
The comet is absolutely huge, possibly over 100km in diameter.

https://en.wikipedia.org/wiki/C/2014_UN271_(Bernardinelli-Bernstein)

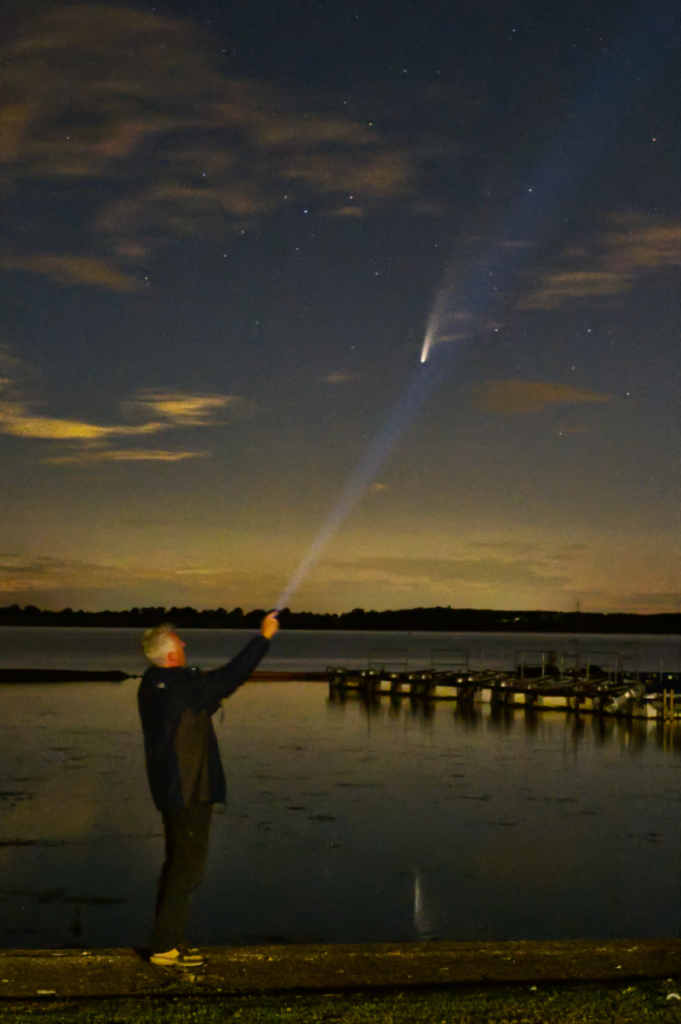
Selfie-C2020F3NEOWISE-20200712-Z75_5243-Web

Comets that big have the potential to make extremely bright apparitions, like Comet C/1995 O1 (Hale-Bopp), which put on a fantastic display in 1997, or Comet C/2020 F3 (NEOWISE), which gave a very fine display in 2020.

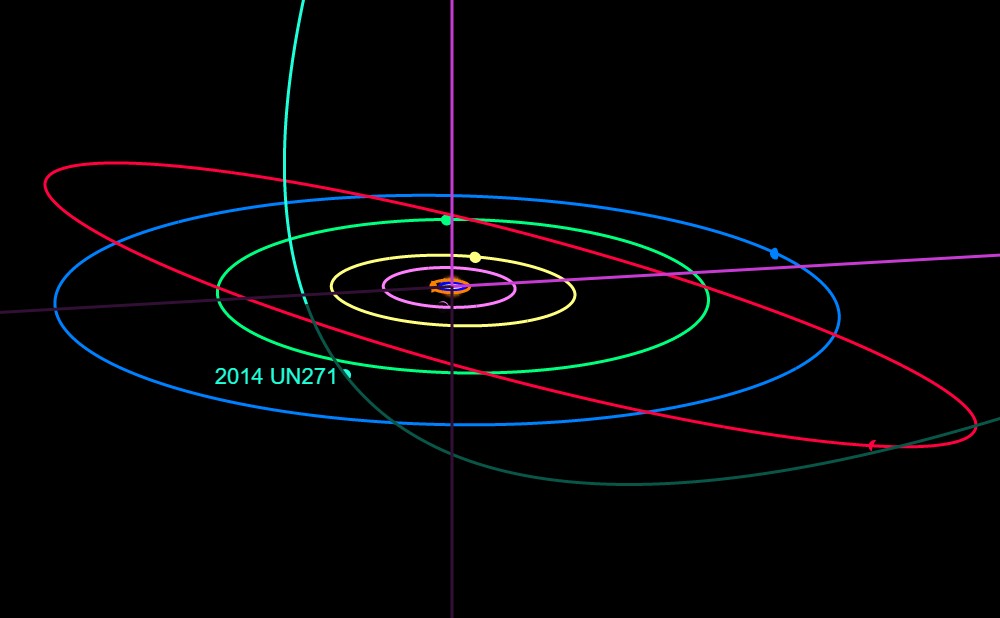
2014 UN271 is heading towards us, but will take quite a few years, reaching its closest to The Sun (Perihelion) in January 2031.
This has caused many stories to come out about us seeing a fantastic comet at that time.
Why there has been a sudden flood of interest, I do not know.
We have known about this object and its orbit since 2014.

Unfortunately, this is never going to give us a great show, as even at its closest, the comet is not going to get any nearer to The Sun than the planet Saturn.

As a result, it will not be close enough to The Sun to be heated properly to make it very active for it to produce a lot of gas and dust and a large coma.
Plus being such a long way from Earth, this will reduce its apparent brightness even further.

It will be extremely interesting to see how it behaves, being a brand new Oort Cloud comet, but you can ditch any idea of seeing a real spectacle.

From an amateurs point of view, it is only going to appear as a faint smudge of light at its very best. It will only be visible in large telescopes and revealed using deep long exposure photographs.

UPDATE 1st October 2021
Current thinking is that it won’t even get as bright as Pluto as seen from Earth, possibly around 17th magnitude.

UPDATE 7th July 2021
Some reports suggest that the comet may not be as big as first thought, as it may have a large coma already which is making it look bigger than the solid nucleus.
That’s what I love about comets, they always throw surprises.
So I will be following this story as it develops.

Perhaps they should send the proposed Comet Interceptor from ESA to get a better look at it?
This comet probe is due for launch a few years before in 2029.
https://www.esa.int/Science_Exploration/Space_Science/ESA_s_new_mission_to_intercept_a_comet

Unfortunately, even the Comet Interceptor will not be able to explore this celestial visitor for two reasons.
This cometary probe will be using solar panels to power it.
At the nearest distance of the comet, these panels will not supply enough power to keep it going as it will be too far from The Sun.

Plus it would take a number of years for a probe like this to match the comets motion in space, to keep up with it.
We saw this with the Rosetta comet probe a number of years ago, which took over a decade to reach Comet 67P.

https://www.esa.int/Science_Exploration/Space_Science/Rosetta/The_long_trek

Below – Path of 2014 UN271 through our solar system in 2031,


An Experiment in Processing

I am constantly looking at different methods of processing images to develop better workflows and improve my images.

This is so I can see what different things work, and continue discovering new ways of processing images to improve the images.
When do process my images, I always try as hard as I can to make them look as natural looking as possible.

I always instil in people who attend my astrophotography workshops NOT to over-process their images.

As you can imagine, being such a purist, it really drives me mad to see so many really over-processed images popping up online and on social media, with all sorts of processing artefacts visible. But I am starting to think that I might be missing a real trick here.

In the early hours of the 20th of April, I was coming to the end of a short imaging session to capture Comet Leonard and some mono images.

I was desperate to try and get some RGB data to attempt a colour image with the setup I am trying out, but was short of bright objects to try it on.
I could see that Hercules was fairly high by this time, so despite the gathering murk, I though that I’d grab a few shots of The fantastic globular cluster M13.

I quickly rattled off a few shots using the three different coloured filters with the ZWO ASI183MM mono camera.

Now onto the processing.
It was never going to be a show-stopping image under those grotty conditions, but at least I got some RGB data to play with.

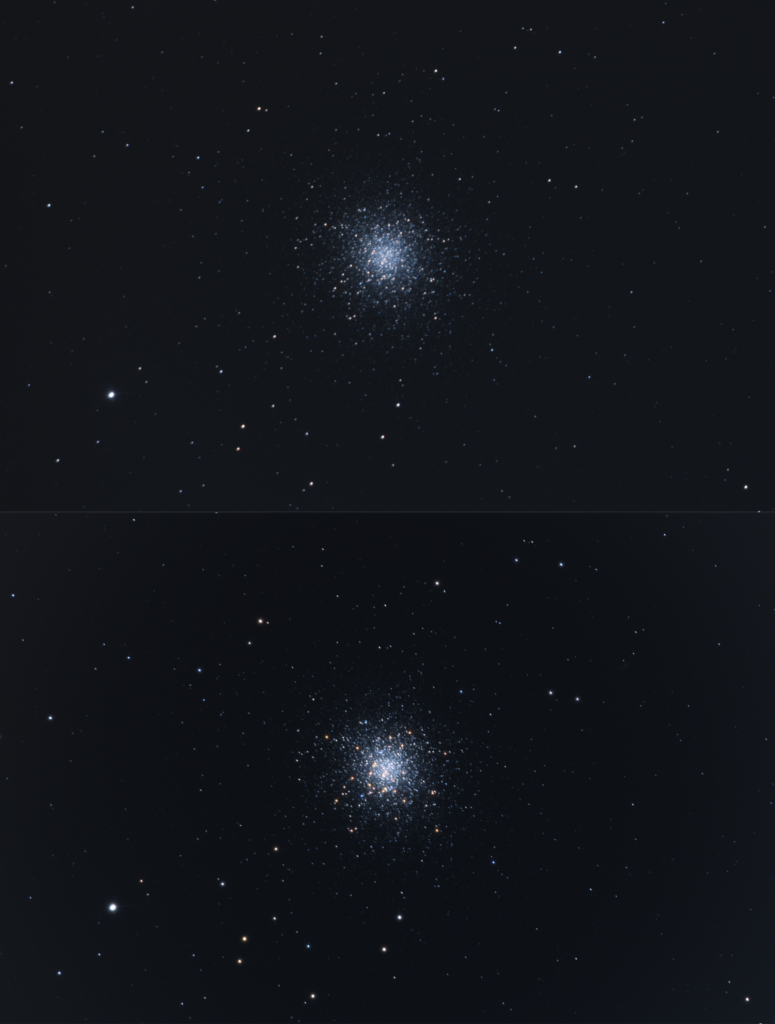
So, how did it turn out? The results are below.
The top image is a standard process using my tried and trusted technique.

The bottom image takes the processing a bit further, enhancing the brighter stars and their colours.

M13-20210419-Comparison-Process-Web

The bottom image, to my mind is well over-processed, but I felt that it does have something about it.

As an experiment, I thought I would put it to the test and posted them both on social media, asking which image folks preferred.

Apart from a few that liked the more natural looking top image, the vast majority of people who responded favoured the bottom image.

So this really was a eye-opener for me.
Does that mean I need to over-process my images to get more likes and shares, or should I stick to my principles?

What do you think folks?


International Sun-Day GoStargazing

I really enjoyed being a part of the Go Stargazing International Sun-Day yesterday.
https://gostargazing.co.uk

I was on standby to hopefully show some live images of The Sun, but clouds thought otherwise.

My talk on the Sun went down very well.

If you missed it, you can catch up with it below.

All the other talks are available on the Go Stargazing Facebook page.
https://www.facebook.com/gostargazinguk

Sky Diary for June 2021

My Sky Diary for June 2021 is now available to view on YouTube.

As well as the electronic version below, the Sky Diary is published electronically using a TeamUp calendar.
Thank you very much to Steve Tonkin from binocular Astronomy and Neill Sanders from Go StarGazing, who are helping me to keep this right up to date.

To set up the calendar up on your mobile device, so you can carry it around and keep up to date,
download the TeamUp App from their Web Site:
https://www.teamup.com

Once the app is installed, add my Star-Gazing Sky Diary calendar using the URL below.
https://teamup.com/ks5286ge5j8tq9jcn7

Please do let me know if I have missed anything out or have made a mistake.

My first image of Comet Leonard and Crescent Nebula

Being so busy lately,  I’ve somewhat neglected my blog for a while, so it’s time to take it up again.

On the evening of the 25th of May, we finally got prospects of a reasonably clear evening.
Despite the late time of the sky getting dark, and an almost full Moon, I decided to get the scope set up and see if I can capture an image of Comet C/2020 A2 (Leonard).

This comet could give us a great show later in the year. (Where have we heard that before?).
See my YouTube video below describing what we might expect from the comet.

I contacted my mate Kev, so he popped round to see the ASIAIR in action.

I had another problem with the Off Axis Guider, so ditched that for this session, guiding with a 50mm guide scope.

Got all set up before The Moon got too high and bright, then sent the scope towards Merak to calibrate the position.
I then used Sky Safari to GOTO the comet, which wasn’t located too far from that first magnitude star.
We quickly identified that we were looking at the correct star field so the comet should be right in the centre.

So I rattled off a number of short 30-second subs, not knowing how fast the comet was moving.
(I will do longer subs next time).

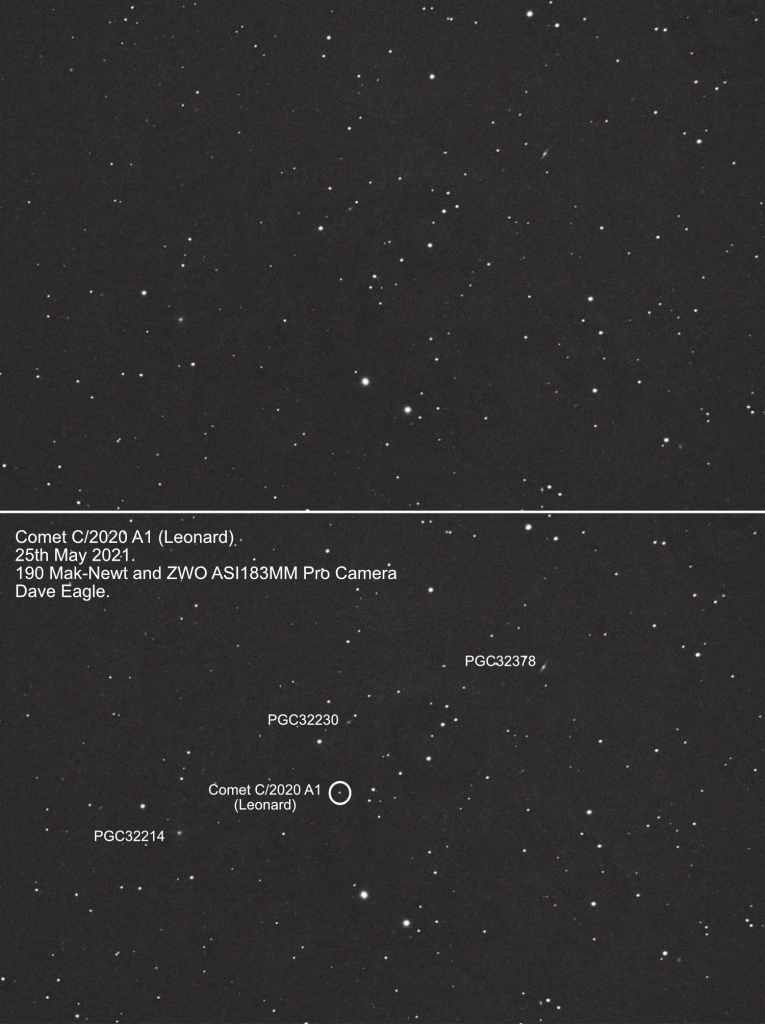
Once stacked, I got this very nice image below, showing the comet near some very faint galaxies.
The comet is about 16th or 17th magnitude, so has a long way to go before it gives us a good show.
But I was well pleased to capture the comet so early in the year.

Once I finished that, The Moon was getting extremely bright, so I switched to the Hydrogen Alpha filter and went to the location of NGC6888, The Crescent Nebula in Cygnus.
The resulting image is shown below.

All in all, it was a very enjoyable evening, and great fun to catch up with Kev again.

Comet-C2020A1-Leonard-20210525

Crescent-Nebula-20210525-Autosave001


Virtual Astronomy Club – Katrin’s Stamp Talk

Katrin Raynor-Evans’ talk “Exploring Astronomy and Space Through Philately” is now available to view on YouTube.

All of our past sessions that have been recorded are available for viewing on my YouTube Channel:
http://www.youtube.com/DaveEagle-Star-Gazing

They are also listed at the bottom of the Virtual Astronomy Club Web site:
www.virtual-astro-club.com

THE ASIAIR PRO – First Impressions

I have been fortunate in having an ASIAIR PRO very nicely sent out to me by First Light Optics.

It will give me a chance to have a play and review it for you.

First impressions are on the few clear nights I have had to test it out, is that it will be a game-changer in what I can offer, especially online educational streaming.

I have  uploaded my first impressions review on YouTube.

I’ll do a more more detailed review and run-through to follow, when we do get a clear night.

Comet C/2021 A1 (Leonard) could be good later this year.

Comet C/2021 A1 (Leonard) is causing some excitement as it HAS THE POTENTIAL be quite bright later this year.

What are we likely to see?

My YouTube video tells you all about what we currently know about Comet C/2021 A1 (Leonard).

Where it can be found throughout the year and what we likely to expect to see in November and December, when it COULD become bright enough to be a naked eye comet.

The full Sky Diary listing lots more sky events can be accessed from my Web site:
www.star-gazing.co.uk/Diary

Sky Diary for November 2020

My monthly look up at the night sky showing events for the month of November 2020.

Highlighting 5 outer planets visible the month, plus two potential comets (maybe!?) including C/2020 M3 (ATLAS), plus spotting the elusive lunar impact region of Mare Orientale at its best.

My electronic TeamUp calendar sky diary is available online at:
www.star-gazing.co.uk/Diary
Download the app and install the sky diary to take it around with you.

Join us at The Virtual Astronomy Club on the 1st and 3rd of the month at 7pm.
Details on how to join in the astronomy fun is on the VAC Web page:
www.virtual-astro-club.com

Keep Safe.
Keep Well
Keep Looking Up.

October’s Mars Opposition and Comet C/2020 P1.

Don’t forget, as well as this months Mars opposition, we also have Comet C/2020 P1 (NEOWISE) coming north.

It will be visible in the morning sky from mid-month until mid November.

If you like my videos, please like them and subscribe to my YouTube Channel
https://www.youtube.com/user/Eagleseye45/videos

Thank You.

View my YouTube Comet C/2020 P1 (NEOWISE) video here:

View my Sky Diary for October here:

The core of Comet NEOWISE

Although it is starting to fade now, Comet C/2020 F3 (NEOWISE) is continuing to give us a great display.

If you haven’t seen it yet, here’s my latest YouTube video on finding the comet:

So as long as you are looking in the right direction, you should not miss it.

Before it got properly dark last night, I stepped out into the garden and was amazed to see that the comet is now so far north, that it was visible from my usual viewing spot by my shed. So it was a mad scramble to get out the mount, quickly polar align and take a few DSLR images of the coma through the scopes. I tried the C11 and the Mak-Newt. The Mac-Newt gave better images, due to it’s wider field of view and brighter image.

By the time I finished that, the comet was just about to disappear behind the neighbours roof.

So it was time to dash out to my darker site to capture more details in the dust and ion tails.
This comet has been depriving me of sleep, conditions were fairly appalling, and the surrounding towns were throwing loads of light up into the sky.
So I only did a quick imaging run before finishing by 12:30am before returning home to try and catch up on some much needed sleep.

Both images taken using a Nikon D750 DSLR.
First image of the core taken through my 190 Mak-Newt. Second image using my 72mm refractor.