
A few months ago, I acquired a new camera, an Altair 183C Hypercam.
As the C would suggest, it is a one-shot colour camera.
Many years ago, I had experimented with a loaned one-shot colour camera, but technology then was much different to that on offer to us amateurs today. I found it very frustrating then, with a finicky way of processing the images. But surely technology has moved on? I thought I would have a relatively easy ride with this newer camera. I’ve already got a great image processing workflow, that really works, so of course I know what I’m doing, what could possibly go wrong?
Click here to read the blog describing my camera frustrations.
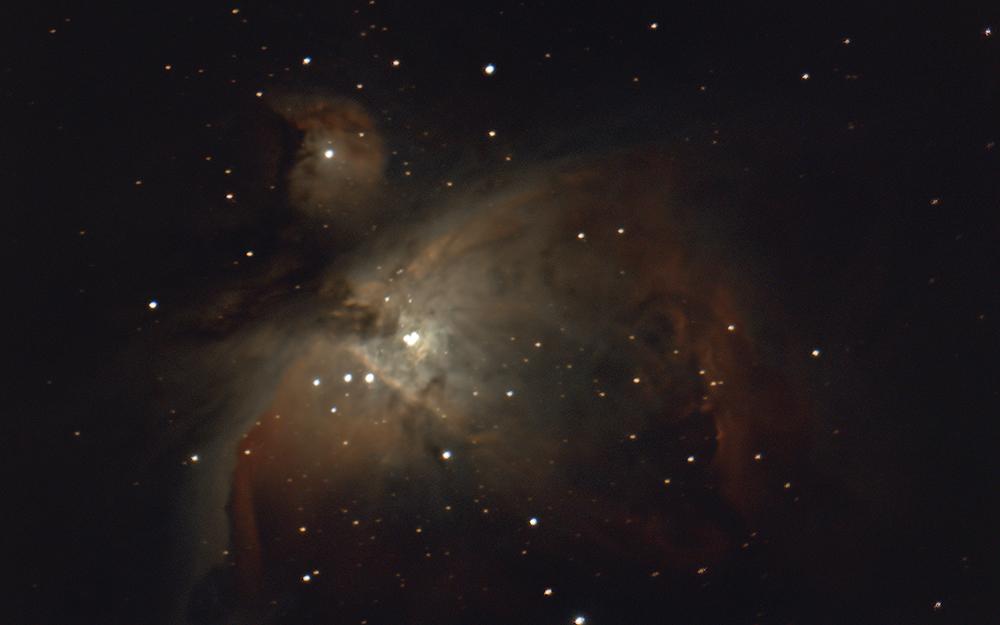
The camera was really sensitive, showing really faint stars. Planetary imaging was perfect, but whatever I did, despite seeing colour on the screen, once processed my deep sky and comet images frustratingly always turned out monochrome once stacked. Where had that lovely colour gone I could see on the screen?
A few nights of fiddling with capture and processing software, I finally started to get it to reveal some colour. This may not be the best way of doing things, but it’s certainly a way I have found of finally getting the camera tamed. My technique will obviously change as I develop and adapt the technique further.
So below is what I did to get my camera up and running to produce colour images.
Capturing the images.
I was using SharpCap to capture my images, but that only seemed to confuse things. I will probably re-visit and get this back up and running once I know I’ve cracked things properly.
I reverted back to using the Altair Capture software for the camera. As people who attend my astrophotography workshops will know I always advocate the KISS Method. (Keeping It Simple Stupid). The simpler the better, just like me! So start back from the basics, taking baby steps before trying to run full steam ahead.
Once Altair Capture is opened, I selected Format as RGB.
Make sure that the image file format the software saves it is set to FITS.
I use the software using Trigger Mode to capture several images, one after another.
These subs will now be saved by the system as FITS files.
These FITS files will be stacked in Deep Sky Stacker.
Stacking the FITS images in Deep Sky Stacker (DSS).
To stack the images correctly, a change needs to be made within DDS.
From the left-hand menu, under Options, Settings, I selected RAW/FITS DDP Settings.
In the Window that opened, I clicked the FITS Tab.
I then adjusted the contents of the FITS Settings in this Window to match the diagram below:
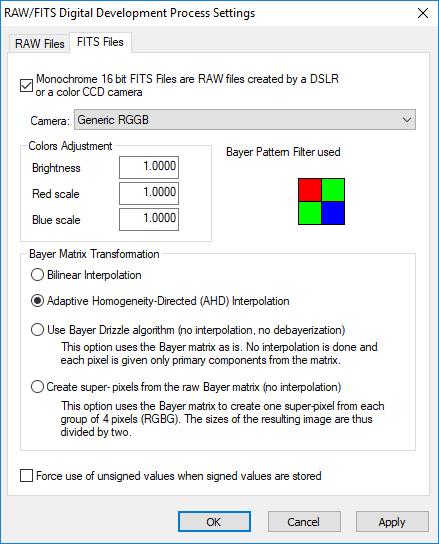
Most of us know about the Bayer Matrix. This is a filter placed over the imaging chip, which filters the individual pixels, so only light passing through a particular filter reaches each pixel. There a three different colour, Red, Green and Blue (RGB). As the human eye is more sensitive within the green part of the spectrum, Bayer Matrices are designed so ½ of the pixels are green filtered and ¼ each for Red and Blue. Without the Bayer Matrix in place above the imaging chip, a once-shot colour camera cannot produce colour images.
It may come as no surprise that there is not a consistent Bayer Matrix built into all cameras. They come in a variety of combinations. I have found that Generic RGGB is the one used by the Hypercam.
I made sure that Generic RGGB was selected from the drop-down menu.
I clicked Apply, then OK.
Deep Sky Stacker was now able to stack the FITS images and produce the correct colour balance.
Problems with registering Stars in DSS.
Just another matter I noticed that you may affect the stacking process, if taking quick images in less than ideal hazy or bright sky conditions.
I found that a number of images had difficulty stacking.
There appeared to be lots of stars registered, but when the final image was stacked the stars were not stacked at all.
The resulting image was a complete mess, as shown below:
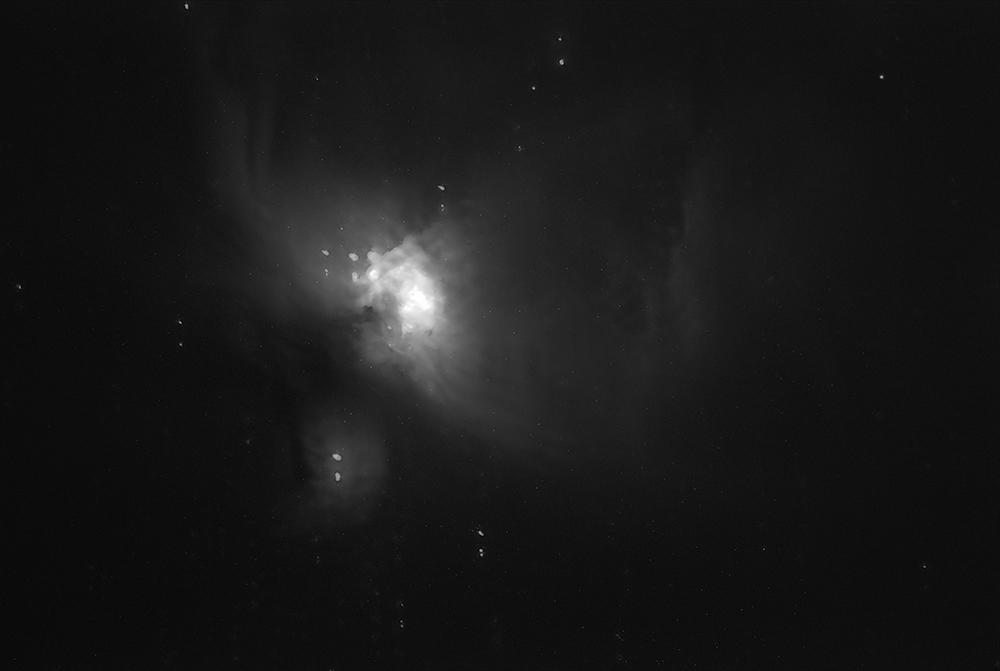
This gave me yet another round of head-scratching. DSS has ALWAYS been so reliable. When registering the images in DSS and using the Star Detection Threshold, I noticed that these images showed a ridiculously high number of stars when 2% threshold was used. Adjusting the threshold to a higher % setting had no effect on the number of stars, until it reached a very high percentage, when the star number suddenly dropped to nothing, over a single percent change.
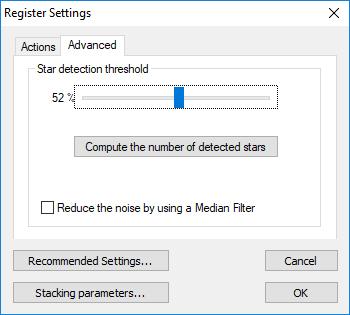
Clicking the comet button in DSS, I could see that lots of stars were shown where there were none. Due to the hazy, light polluted sky and the short exposures, resulting in low signal levels, DSS was adding stars where there were none, effectively a lot of the background noise was being marked as the position of a star. So Deep Sky Stacker was stacking on noise in each image, not the stars.
I managed to get these images stacked by using the comet stacking method. I marked a real star as a position of a comet in each image prior to stacking them. This ensured the stars themselves were registered correctly.
Now the dark nights are here, and I’ll have more time to get out there and try more imaging, hopefully it won’t be long before I finally round the top of this new steep learning curve. I’ll then, once again, be back onto more familiar territory and be sent merrily back on my way happily imaging in one-shot colour.
Once I’m happy with this setup, I’ll then go back to Sharpcap to make sure that I get the most from my Pro license.
Of course, I’m always happy to learn from other people’s experience, so if you have a great workflow for the Altair 183C Hypercam, and know a better way of doing all of this, please let me know.
Dave
Hi Dave ..
If you download RGB from Altair Capture, surely you dont need to Debayer them>> I always download RAW files and stack in APP. I would like to use DSS, so may well give it a try.
I do think that Altair should provide more online support in this regard…perhaps Mr Glover will oblidge!!